

Growing Carrots at Home might seem daunting, but trust me, it’s easier than you think! Imagine plucking vibrant, sweet carrots straight from your own backyard – the taste is simply unmatched. For centuries, carrots have been a staple in diets worldwide, with evidence suggesting their cultivation dates back to ancient Persia. These root vegetables weren’t always the bright orange we know and love; originally, they came in shades of purple, white, and yellow!
But why should you bother with the effort of growing your own carrots? Well, store-bought carrots often lack the freshness and flavor of homegrown ones. Plus, you have complete control over what goes into your garden, ensuring your carrots are free from harmful pesticides and chemicals. In this article, I’m going to share some simple, yet effective, DIY tricks and hacks that will transform your garden into a carrot-growing haven. Whether you’re a seasoned gardener or just starting out, these tips will help you achieve a bountiful harvest. So, let’s dive in and discover the secrets to successfully growing carrots at home!
Growing Carrots at Home: A Beginner’s Guide to Crunchy Success
Okay, so you want to grow carrots at home? Awesome! Carrots are surprisingly easy to grow, and there’s nothing quite like pulling a vibrant, homegrown carrot straight from the earth. Trust me, the taste difference is incredible. I’m going to walk you through everything you need to know, from choosing the right variety to harvesting your delicious bounty. Let’s get started!
Choosing the Right Carrot Variety
First things first, you need to pick the right carrot variety for your garden. Not all carrots are created equal, and some are better suited for certain climates and soil types than others. Here’s a quick rundown of some popular choices:
- Nantes: These are classic, cylindrical carrots with a sweet flavor. They’re relatively short and blunt-ended, making them a good choice for heavier soils.
- Danvers: These are longer, tapered carrots that are also quite sweet. They’re a bit more tolerant of poor soil conditions than Nantes varieties.
- Chantenay: These are short, stout carrots with broad shoulders. They’re very adaptable and do well in a variety of soil types. They are also great for canning and freezing.
- Baby Carrots: If you’re short on space or just want a quick harvest, consider growing baby carrot varieties like ‘Thumbelina’ or ‘Parisian’.
- Heirloom Varieties: For something a little different, try growing heirloom varieties like ‘Purple Haze’ (purple on the outside, orange inside) or ‘Yellowstone’ (bright yellow).
Consider your soil type and growing season when making your choice. If you have heavy clay soil, shorter, rounder varieties like Chantenay or baby carrots will be your best bet. If you have loose, sandy soil, you can grow longer varieties like Danvers.
Preparing Your Carrot Bed: The Key to Success
Carrots need loose, well-drained soil to thrive. Rocky or compacted soil will result in stunted, misshapen carrots. This is probably the most important step, so don’t skip it!
- Choose a Sunny Location: Carrots need at least 6 hours of sunlight per day.
- Clear the Area: Remove any rocks, weeds, or debris from the planting area.
- Loosen the Soil: This is crucial! Use a garden fork or tiller to loosen the soil to a depth of at least 12 inches. The deeper, the better. I usually go for 18 inches if I can.
- Amend the Soil: Carrots prefer slightly acidic soil with a pH between 6.0 and 6.8. Amend the soil with compost or well-rotted manure to improve drainage and fertility. Avoid using fresh manure, as it can cause forking.
- Create Raised Beds (Optional): If your soil is particularly heavy or poorly drained, consider creating raised beds. This will improve drainage and allow the soil to warm up faster in the spring.
- Rake the Soil Smooth: Once you’ve loosened and amended the soil, rake it smooth to create a level planting surface.
Planting Your Carrot Seeds: Patience is a Virtue
Carrot seeds are tiny, so planting them can be a bit tricky. But don’t worry, I’ll show you how to do it right.
- Check the Last Frost Date: Carrots are a cool-season crop, so you can plant them in early spring or late summer. Check your local last frost date to determine the best time to plant. You can usually plant 2-3 weeks before the last expected frost.
- Create Shallow Furrows: Use a hoe or your finger to create shallow furrows in the soil, about 1/4 to 1/2 inch deep. Space the furrows about 2-3 inches apart.
- Sow the Seeds Sparsely: This is the trickiest part. Carrot seeds are tiny, so it’s easy to sow them too thickly. Try to space the seeds about 1/2 inch apart. You can use a seed dispenser or simply pinch the seeds between your fingers and sprinkle them along the furrow. Don’t worry if you sow them a little too thickly; you can always thin them later.
- Cover the Seeds Lightly: Gently cover the seeds with a thin layer of soil.
- Water Gently: Water the soil gently with a watering can or hose with a gentle spray nozzle. Be careful not to wash away the seeds.
- Keep the Soil Moist: Carrot seeds need consistent moisture to germinate. Keep the soil moist but not soggy until the seedlings emerge, which can take 1-3 weeks. I usually water them lightly every day or two, depending on the weather.
Thinning Your Carrot Seedlings: Giving Them Room to Grow
Once your carrot seedlings emerge, you’ll need to thin them to give them enough room to grow. This is a crucial step, as overcrowding will result in small, stunted carrots.
- Wait Until Seedlings Are 1-2 Inches Tall: Wait until the seedlings are about 1-2 inches tall before thinning them.
- Thin to 1-2 Inches Apart: Carefully thin the seedlings to about 1-2 inches apart. You can use small scissors to snip off the unwanted seedlings at the soil line, or gently pull them out. Be careful not to disturb the roots of the remaining seedlings.
- Thin Again Later (Optional): As the carrots grow, you may need to thin them again to give them even more space. Thin them to about 3-4 inches apart when they are about 4-6 inches tall.
Caring for Your Carrots: Water, Weeding, and Pest Control
Once your carrots are thinned, it’s time to focus on ongoing care.
- Watering: Carrots need consistent moisture, especially during hot, dry weather. Water deeply once or twice a week, or more often if the soil dries out quickly. Avoid overhead watering, as this can promote fungal diseases. Soaker hoses or drip irrigation are ideal.
- Weeding: Keep the carrot bed free of weeds, as weeds can compete with the carrots for nutrients and water. Hand-pull weeds carefully to avoid disturbing the carrot roots. Mulching around the carrots can help suppress weeds and retain moisture.
- Fertilizing: Carrots don’t need a lot of fertilizer, but a light feeding of a balanced fertilizer can help them grow. Apply fertilizer according to the package directions. Avoid using fertilizers that are high in nitrogen, as this can promote leafy growth at the expense of root development.
- Pest Control: Carrots are relatively pest-resistant, but they can be susceptible to certain pests, such as carrot rust flies and nematodes. If you notice signs of pest damage, such as yellowing leaves or stunted growth, take action to control the pests. You can use organic pest control methods, such as insecticidal soap or neem oil. Crop rotation can also help prevent pest problems.
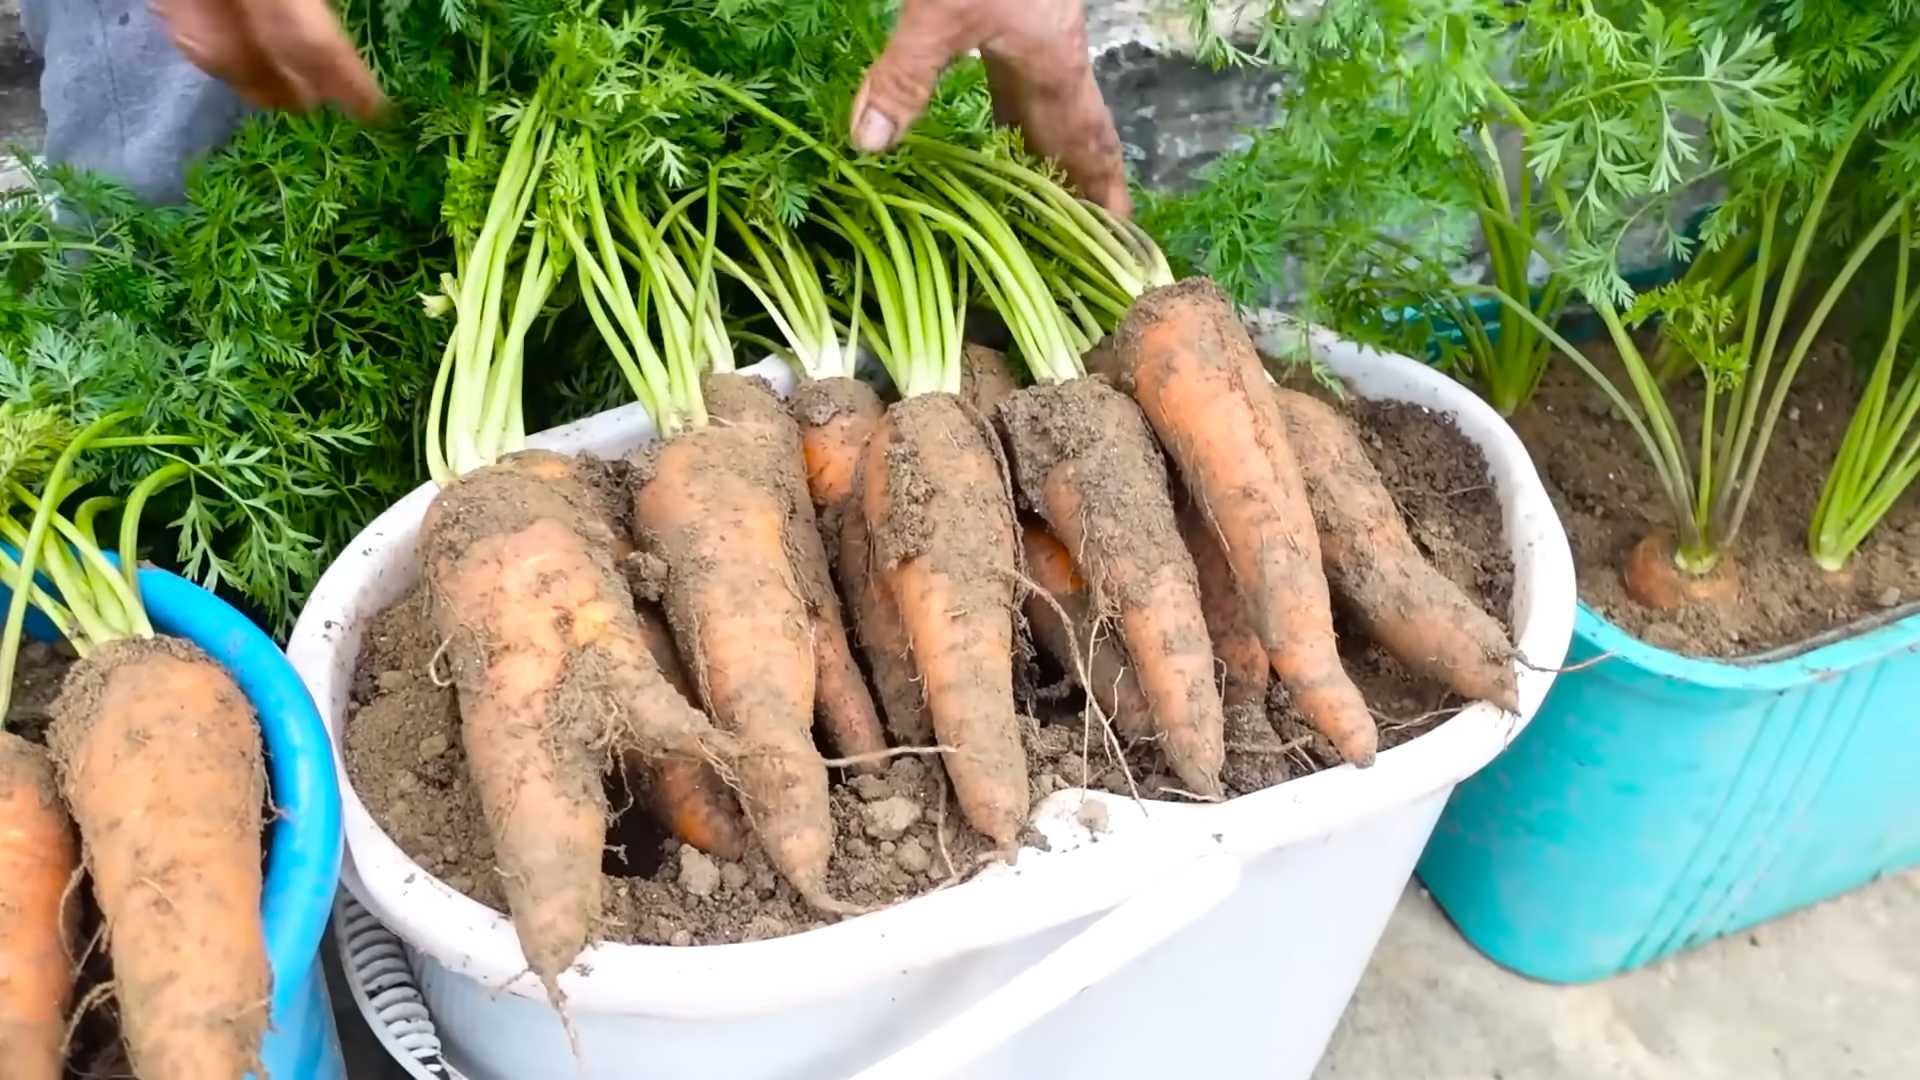
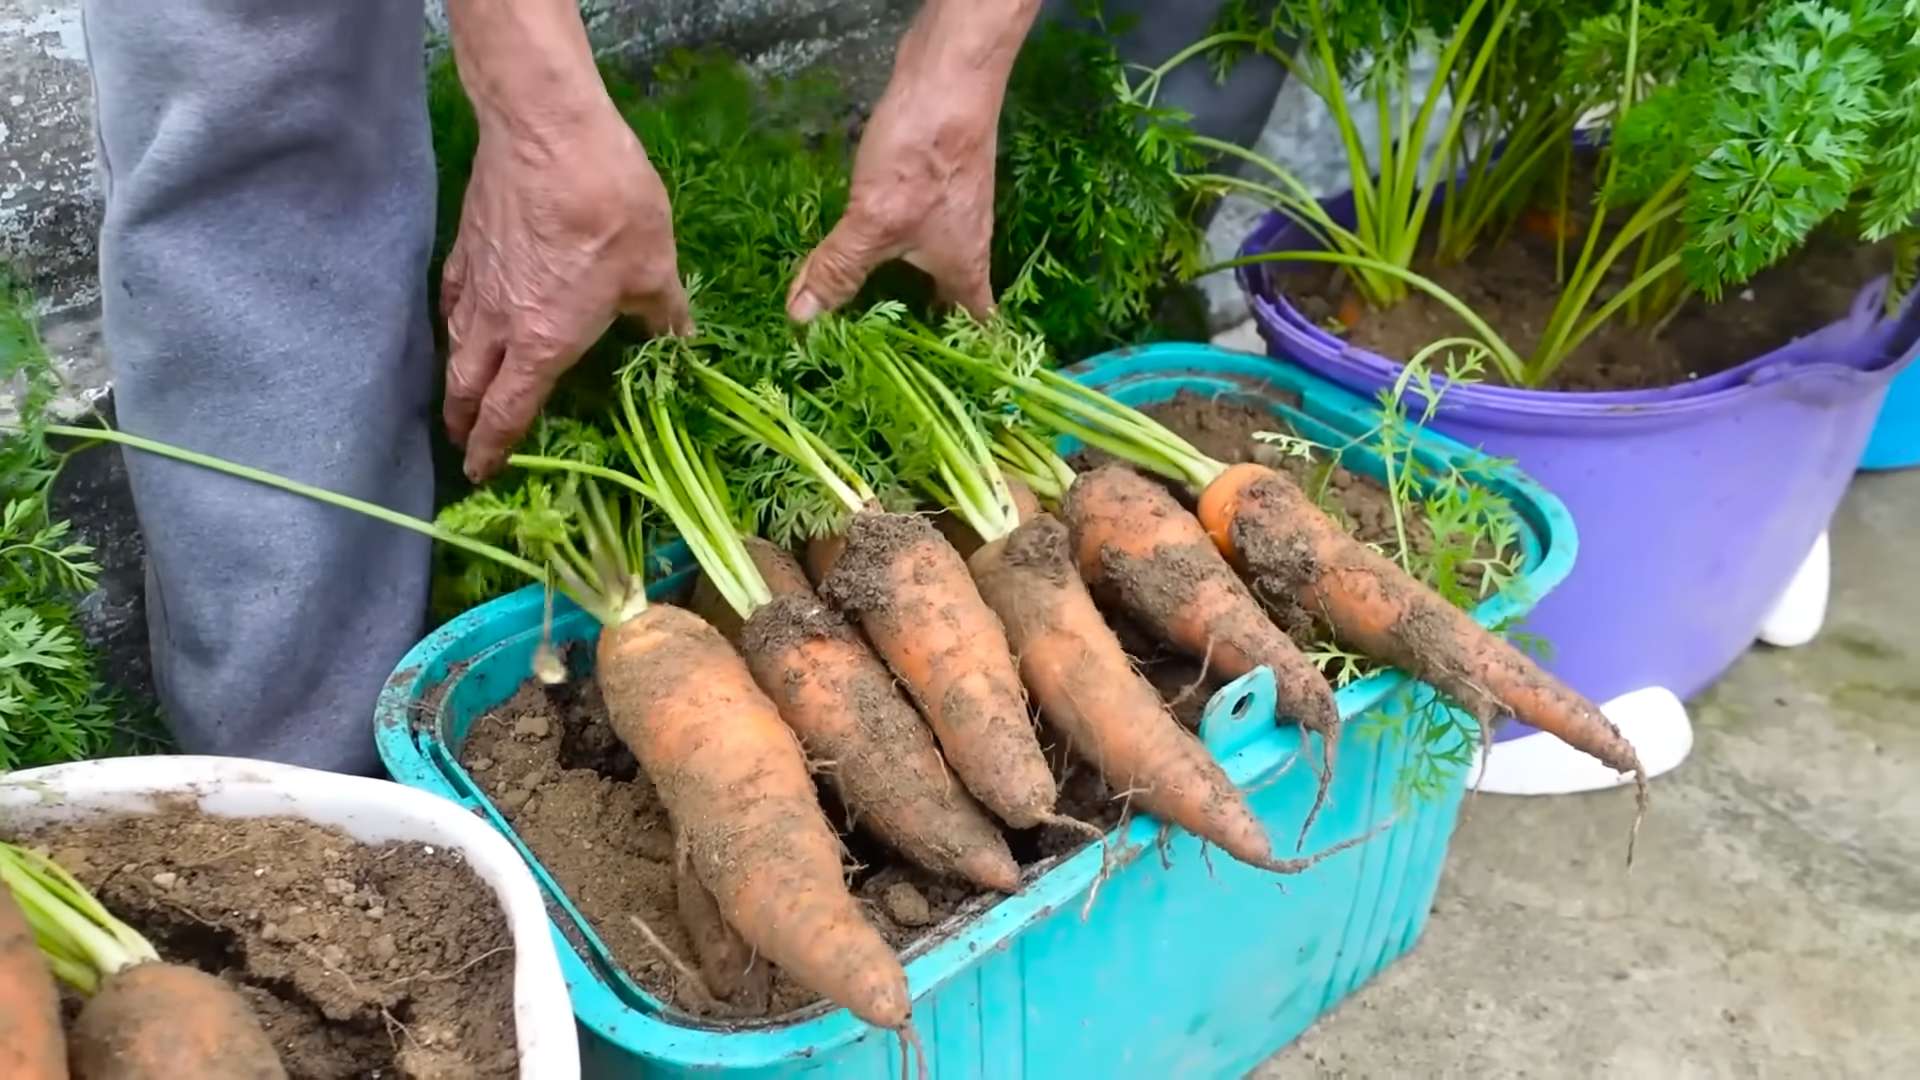
Harvesting Your Carrots: The Sweet Reward
The moment you’ve been waiting for! Harvesting your carrots is the most rewarding part of the process.
- Check the Maturity Date: Check the seed packet for the maturity date of your carrot variety. This will give you an idea of when your carrots will be ready to harvest.
- Look for Size and Color: Carrots are typically ready to harvest when they are about 1/2 to 1 inch in diameter at the top. They should also be a vibrant color.
- Loosen the Soil: Before pulling the carrots, loosen the soil around them with a garden fork. This will make it easier to pull them out without breaking them.
- Pull the Carrots: Grasp the carrot tops firmly and gently pull the carrots out of the ground. If the carrots are difficult to pull, use the garden fork to loosen the soil further.
- Wash and Store: Wash the carrots thoroughly to remove any dirt. Store them in the refrigerator in a plastic bag or container. They should keep for several weeks.
Troubleshooting: Common Carrot Growing Problems
Even with the best care, you may encounter some problems when growing carrots. Here are a few common issues and how to address them:
- Forking: Forking occurs when the carrot roots split into multiple branches. This is often caused by rocky or compacted soil. To prevent forking, make sure to prepare the soil thoroughly before planting.
- Stunted Growth: Stunted growth can be caused by a variety of factors, including poor soil, lack of water, or pest damage. Make sure to provide your carrots with adequate water and nutrients, and control any pests that may be present.
- Green Shoulders: Green shoulders occur when the
Conclusion
So, there you have it! Growing carrots at home, while it might seem daunting at first, is a surprisingly rewarding experience. It’s a chance to connect with nature, enjoy the freshest possible produce, and, let’s be honest, brag a little to your friends about your green thumb. But beyond the bragging rights, the real magic lies in the taste. Homegrown carrots possess a sweetness and vibrancy that you simply can’t find in store-bought varieties. They’re crisp, juicy, and bursting with flavor, making them the perfect addition to salads, soups, snacks, or simply enjoyed raw, straight from the garden.
This DIY approach to **growing carrots at home** isn’t just about saving money (though that’s certainly a perk!). It’s about taking control of your food source, knowing exactly what goes into your produce, and minimizing your environmental impact. You’re avoiding the pesticides and herbicides often used in commercial farming, and you’re reducing the carbon footprint associated with transportation.
But the best part? You can customize the experience to suit your preferences and space. Experiment with different carrot varieties! Nantes are known for their sweetness and cylindrical shape, making them ideal for slicing. Danvers are classic, all-purpose carrots that are easy to grow. And Chantenay carrots are shorter and stouter, perfect for heavier soils.
Consider companion planting to further enhance your carrot-growing success. Plant onions or garlic nearby to deter carrot root flies, or interplant with lettuce or radishes to maximize space utilization. You can even grow carrots in containers if you’re short on garden space. Just be sure to choose a deep container to accommodate their root growth.
Don’t be afraid to get your hands dirty and embrace the learning process. There will be challenges along the way, but the satisfaction of harvesting your own delicious, homegrown carrots is well worth the effort.
We’ve provided you with a solid foundation for success, but remember that gardening is a dynamic and ever-evolving art. Observe your plants, adapt your techniques, and most importantly, have fun!
So, what are you waiting for? Grab your seeds, prepare your soil, and embark on your carrot-growing adventure today! We’re confident that you’ll be amazed by the results. And when you do, we’d love to hear about your experience. Share your photos, tips, and triumphs in the comments below. Let’s build a community of home gardeners and inspire others to discover the joy of growing their own food. Happy gardening!
Frequently Asked Questions (FAQ)
Q: What is the best time of year to plant carrots?
A: Carrots are a cool-season crop, so the best time to plant them is in early spring or late summer/early fall. For a spring crop, sow seeds 2-3 weeks before the last expected frost. For a fall crop, sow seeds 10-12 weeks before the first expected frost. This allows them enough time to mature before the ground freezes. In warmer climates, you can often grow carrots throughout the winter.
Q: What kind of soil is best for growing carrots?
A: Carrots thrive in loose, well-drained soil that is free of rocks and clumps. Rocky soil can cause the roots to fork or become stunted. Amend heavy clay soil with compost or other organic matter to improve drainage and aeration. A slightly acidic soil pH of 6.0 to 6.8 is ideal. Before planting, till the soil to a depth of at least 12 inches to allow for proper root development.
Q: How often should I water my carrots?
A: Carrots need consistent moisture to grow properly. Water deeply and regularly, especially during dry periods. Aim for about 1 inch of water per week. Avoid overwatering, which can lead to root rot. A good rule of thumb is to water when the top inch of soil feels dry to the touch. Mulching around the plants can help retain moisture and suppress weeds.
Q: How far apart should I plant carrot seeds?
A: Carrot seeds are tiny, so it can be challenging to sow them evenly. Sow seeds about 1/4 inch deep and 1/2 inch apart in rows that are 12-18 inches apart. Once the seedlings emerge, thin them to 2-3 inches apart to allow for proper root development. Thinning is crucial to prevent overcrowding and ensure that the carrots have enough space to grow to their full size.
Q: What are some common pests and diseases that affect carrots?
A: Carrot root flies are a common pest that can damage carrot roots. Cover your plants with row covers to prevent the flies from laying their eggs. Other pests include aphids, nematodes, and wireworms. Diseases that can affect carrots include leaf blight, powdery mildew, and root rot. Practice good garden hygiene, such as removing diseased plants and avoiding overwatering, to prevent these problems.
Q: How do I know when my carrots are ready to harvest?
A: Carrots are typically ready to harvest 60-80 days after planting, depending on the variety. Check the seed packet for specific maturity dates. You can harvest carrots when they reach the desired size, which is usually about 1-2 inches in diameter at the top. Gently loosen the soil around the carrot and pull it straight up. If the soil is dry, water it beforehand to make harvesting easier.
Q: Can I grow carrots in containers?
A: Yes, you can grow carrots in containers, but you’ll need to choose a deep container (at least 12 inches deep) to accommodate their root growth. Use a well-draining potting mix and provide consistent moisture. Choose shorter, rounder carrot varieties like ‘Thumbelina’ or ‘Paris Market’ for container growing.
Q: What are some good companion plants for carrots?
A: Carrots benefit from companion planting with onions, garlic, rosemary, sage, and marigolds. Onions and garlic deter carrot root flies, while rosemary and sage repel other pests. Marigolds attract beneficial insects that prey on carrot pests. Avoid planting carrots near fennel or dill, as they can inhibit carrot growth.
Q: How do I store harvested carrots?
A: To store harvested carrots, remove the green tops and gently brush off any excess soil. Do not wash them until you are ready to use them. Store the carrots in a cool, dark, and humid place, such as the refrigerator crisper drawer or a root cellar. You can also store them in a container filled with moist sand or sawdust. Properly stored carrots can last for several months.
Q: My carrots are forking or splitting. What could be the cause?
A: Forking or splitting carrots is often caused by rocky or compacted soil. The roots encounter resistance and split or fork to find a path through the soil. Amend your soil with compost or other organic matter to improve drainage and aeration. Remove any rocks or debris before planting. Inconsistent watering can also contribute to forking, so ensure that your carrots receive consistent moisture.
Leave a Comment