

Growing Kohlrabi in Containers might sound like a challenge, but trust me, it’s totally doable and incredibly rewarding! Have you ever dreamt of harvesting fresh, crisp kohlrabi right from your balcony or patio? Imagine the satisfaction of snipping off a bulb you nurtured from a tiny seed, knowing exactly where it came from and what went into it. This isn’t just about gardening; it’s about connecting with nature, even in the smallest of spaces.
Kohlrabi, sometimes called a German turnip, has a fascinating history, dating back to ancient Rome. While it might not be as widely known as its cabbage cousins, it’s a nutritional powerhouse packed with vitamins and fiber. For centuries, it’s been a staple in European and Asian cuisines, prized for its unique flavor and versatility.
But why should you bother growing kohlrabi in containers? Well, for starters, it’s perfect for urban dwellers or anyone with limited garden space. Plus, container gardening gives you more control over the soil, watering, and sunlight, leading to healthier, more productive plants. In this DIY guide, I’ll share my tried-and-true tricks and hacks for successfully cultivating this unusual vegetable in pots, from choosing the right container and soil to preventing common pests and diseases. Get ready to unlock the secrets to a bountiful kohlrabi harvest, no matter where you live!
Growing Kohlrabi in Containers: A Beginner’s Guide
Hey there, fellow gardening enthusiasts! Ever thought about growing kohlrabi but felt limited by space? Well, I’m here to tell you that you absolutely can cultivate this quirky and delicious vegetable right in containers! It’s easier than you might think, and I’m going to walk you through every step of the process. Get ready to enjoy fresh, homegrown kohlrabi, even if you only have a balcony or patio.
Choosing the Right Container and Soil
First things first, let’s talk about the essentials: the container and the soil. These are crucial for a happy and productive kohlrabi plant.
* Container Size: Kohlrabi needs room to grow, especially its bulbous stem. I recommend a container that’s at least 12 inches in diameter and 12 inches deep. This gives the roots plenty of space to spread out. A 5-gallon bucket or a large planter pot works perfectly.
* Drainage: Excellent drainage is non-negotiable. Kohlrabi hates sitting in soggy soil, which can lead to root rot. Make sure your container has drainage holes at the bottom. If not, you can drill some yourself.
* Soil Mix: Forget using garden soil straight from the ground. It’s often too heavy and doesn’t drain well. Instead, opt for a high-quality potting mix. I like to use a mix that’s specifically formulated for vegetables. You can also create your own by combining equal parts of:
* Compost: This provides essential nutrients and improves drainage.
* Peat moss or coconut coir: These help retain moisture.
* Perlite or vermiculite: These improve aeration and drainage.
Planting Kohlrabi Seeds or Seedlings
Now that we’ve got the container and soil sorted, it’s time to get planting! You have two options here: starting from seeds or buying seedlings. I’ve done both, and both work well, but starting from seeds gives you more control over the entire process.
* Starting from Seeds:
* Timing: Kohlrabi is a cool-season crop, so the best time to plant is in early spring or late summer/early fall. Check your local frost dates to determine the ideal planting time. I usually start my seeds indoors about 4-6 weeks before the last expected frost.
* Sowing Seeds: Fill your container with the potting mix, leaving about an inch of space at the top. Moisten the soil thoroughly. Sow the kohlrabi seeds about ½ inch deep and 1 inch apart. Gently cover them with soil and water again.
* Germination: Keep the soil consistently moist but not waterlogged. The seeds should germinate in about 5-10 days.
* Thinning: Once the seedlings have a few true leaves, thin them out, so they are about 4-6 inches apart. This gives each plant enough room to grow.
* Using Seedlings:
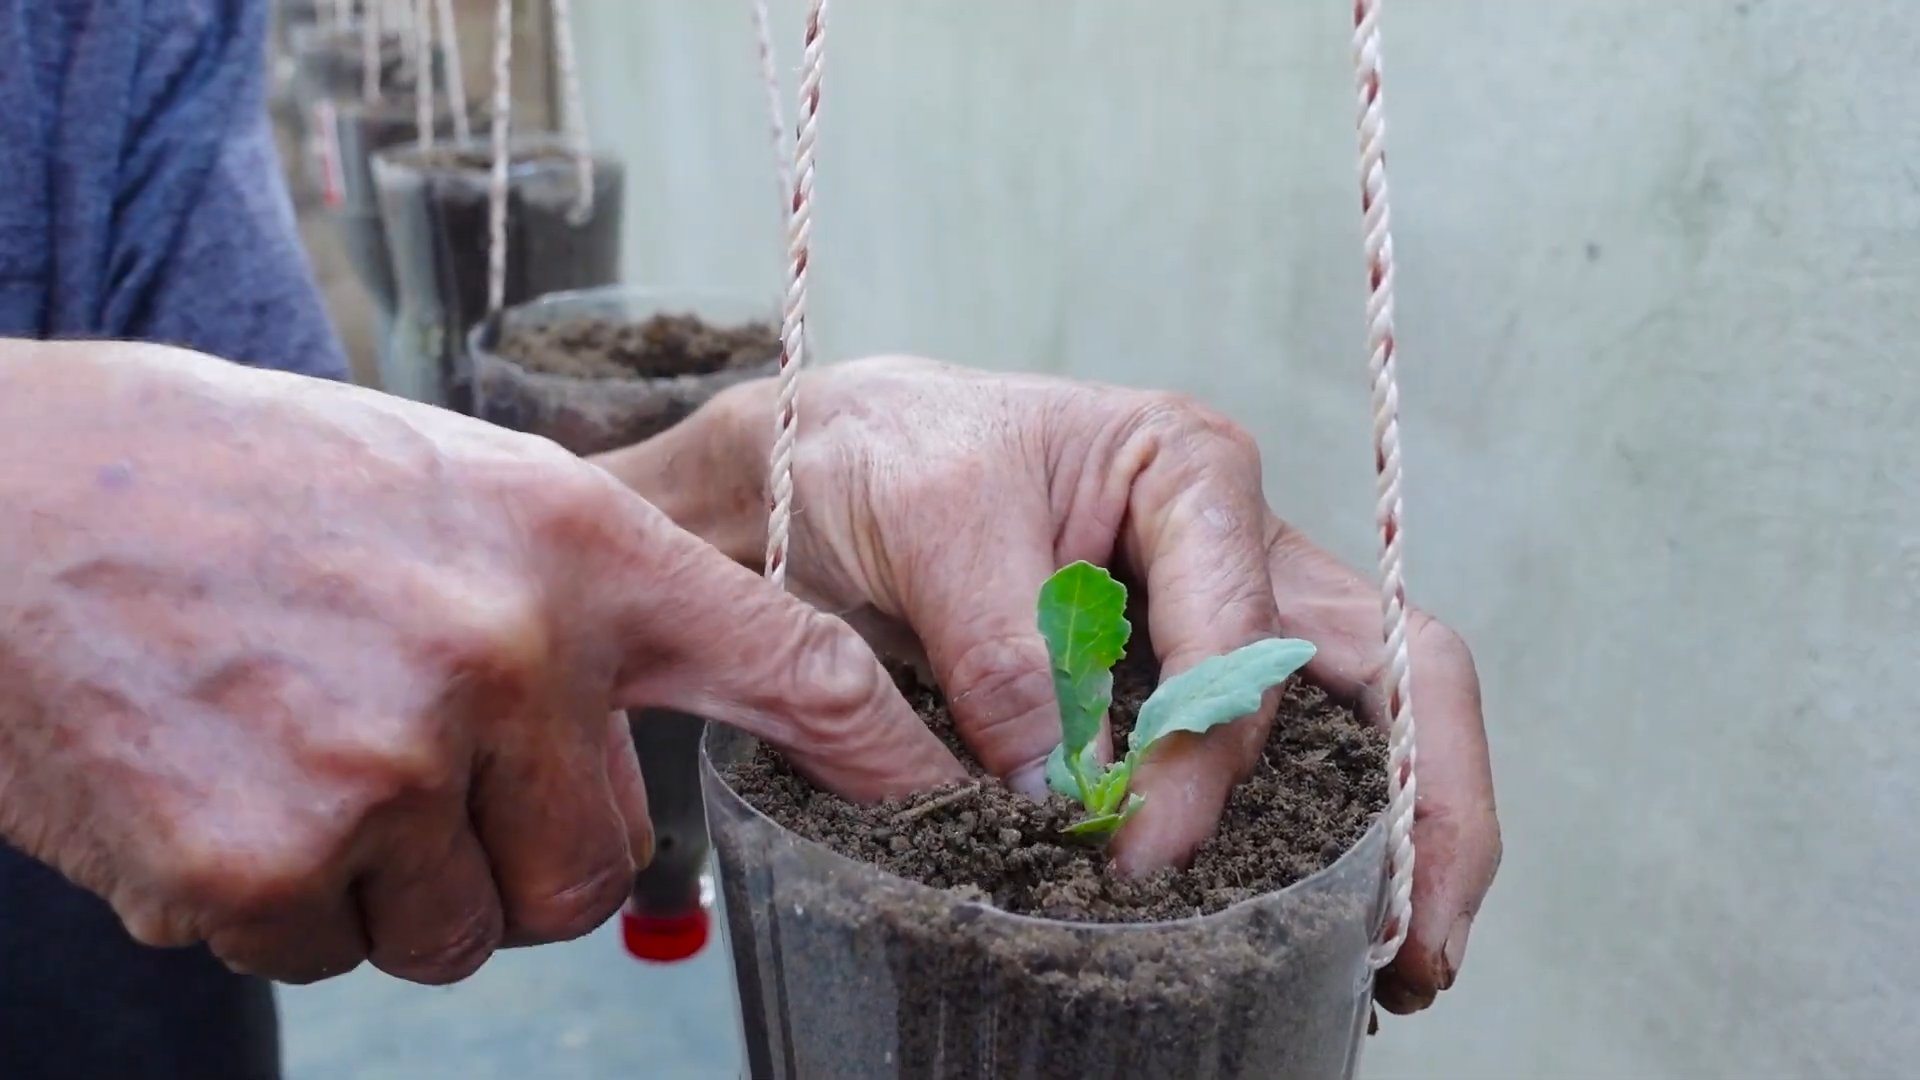
* Choosing Seedlings: Select healthy-looking seedlings with sturdy stems and vibrant green leaves. Avoid plants that are leggy or have yellowing leaves.
* Transplanting: Gently remove the seedlings from their containers. Loosen the roots slightly. Dig a hole in the potting mix that’s large enough to accommodate the root ball. Place the seedling in the hole and backfill with soil. Water thoroughly. Space the seedlings about 4-6 inches apart.
Caring for Your Kohlrabi Plants
Once your kohlrabi plants are established, it’s important to provide them with the right care to ensure a bountiful harvest.
* Watering: Kohlrabi needs consistent moisture, especially during hot weather. Water deeply whenever the top inch of soil feels dry to the touch. Avoid overwatering, as this can lead to root rot. I usually water every other day, but it depends on the weather.
* Fertilizing: Kohlrabi is a heavy feeder, so it needs regular fertilization. I like to use a balanced liquid fertilizer, such as a 10-10-10, every 2-3 weeks. You can also amend the soil with compost or aged manure before planting.
* Sunlight: Kohlrabi needs at least 6 hours of sunlight per day. Place your container in a sunny location. If you live in a hot climate, provide some afternoon shade to prevent the plants from overheating.
* Weeding: Keep the container free of weeds, as they can compete with the kohlrabi plants for nutrients and water. Hand-pull any weeds that appear.
* Pest Control: Kohlrabi can be susceptible to pests such as aphids, cabbage worms, and flea beetles. Inspect your plants regularly for signs of infestation. If you find pests, you can try spraying them with insecticidal soap or neem oil. You can also cover the plants with row covers to prevent pests from reaching them.
Harvesting Your Kohlrabi
The moment you’ve been waiting for! Harvesting your homegrown kohlrabi.
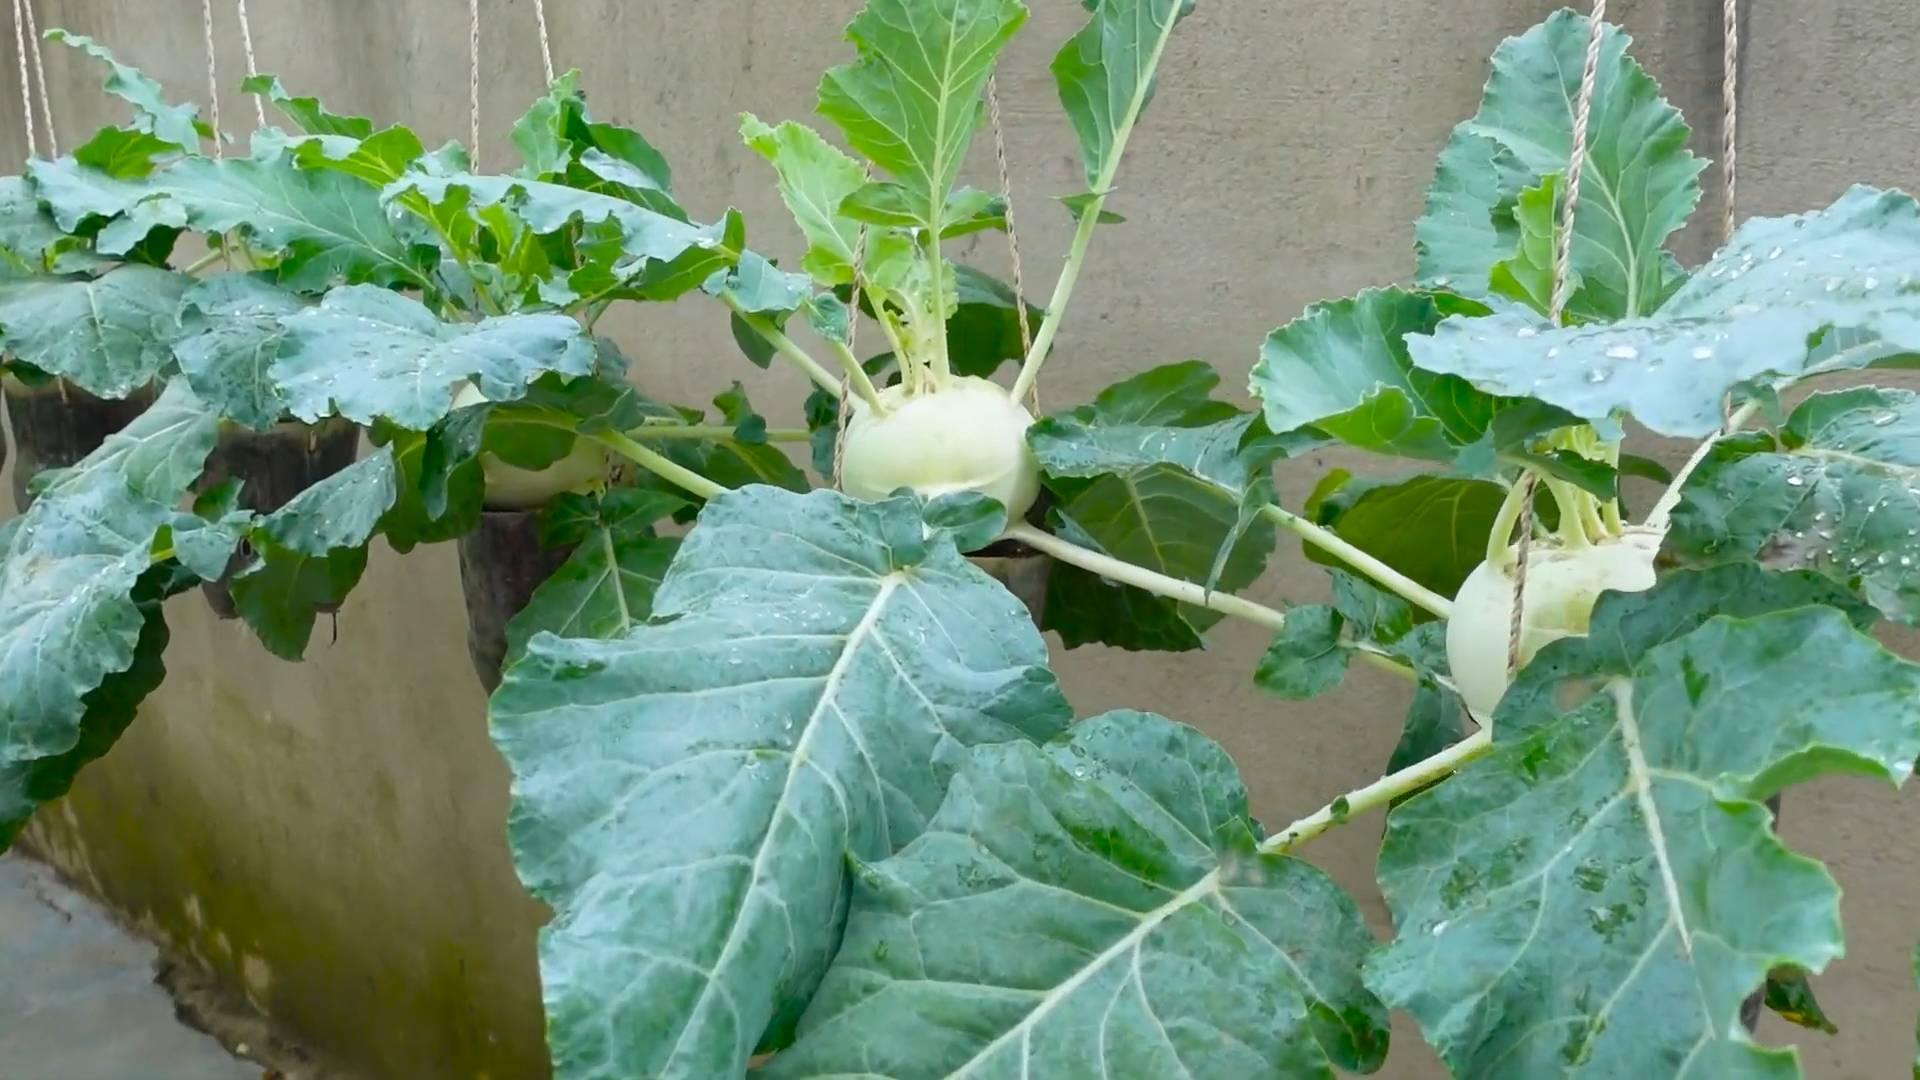
* Timing: Kohlrabi is typically ready to harvest about 50-60 days after planting. The bulb should be about 2-3 inches in diameter. Don’t let it get too large, as it can become tough and woody.
* Harvesting Method: To harvest, simply cut the kohlrabi bulb from the stem with a sharp knife. Leave about an inch of stem attached.
* Leaf Usage: Don’t throw away the leaves! Kohlrabi leaves are edible and can be used in salads, stir-fries, or soups. They taste similar to collard greens.
Troubleshooting Common Problems
Even with the best care, you might encounter some problems while growing kohlrabi. Here are a few common issues and how to address them:
* Bolting: Bolting occurs when the plant prematurely flowers and goes to seed. This can happen if the weather gets too hot or if the plant is stressed. To prevent bolting, plant kohlrabi in early spring or late summer/early fall. Provide shade during hot weather.
* Root Rot: Root rot is caused by overwatering or poor drainage. To prevent root rot, make sure your container has drainage holes and avoid overwatering.
* Pest Infestations: As mentioned earlier, kohlrabi can be susceptible to pests. Inspect your plants regularly and take action if you find any pests.
* Cracking Bulbs: Irregular watering can cause the bulbs to crack. Ensure consistent watering, especially during dry spells.
Choosing the Right Kohlrabi Variety
There are several kohlrabi varieties to choose from, each with its own unique characteristics. Here are a few popular options:
* Early White Vienna: This is a classic variety that produces pale green bulbs. It’s known for its mild flavor and early maturity.
* Early Purple Vienna: Similar to Early White Vienna, but with purple bulbs. It has a slightly sweeter flavor.
* Grand Duke: This variety is known for its large size and excellent flavor. It’s a good choice for those who want to grow large kohlrabi bulbs.
* Kossak: This is a giant variety that can produce bulbs weighing up to 10 pounds! It’s a good choice for those who want to grow show-stopping kohlrabi.
Tips for Success
Here are a few extra tips to help you succeed in growing kohlrabi in containers:
* Rotate Crops: Avoid planting kohlrabi in the same container year after year. Rotate crops to prevent soilborne diseases.
* Companion Planting: Plant kohlrabi with companion plants such as dill, chamomile, and mint. These plants can help deter pests and attract beneficial insects.
* Succession Planting: Plant kohlrabi seeds every few weeks to ensure a continuous harvest throughout the growing season.
* Mulching: Apply a layer of mulch around the kohlrabi plants to help retain moisture and suppress weeds. I like to use straw or shredded leaves.
* Observe Your Plants: Pay attention to your kohlrabi plants and learn to recognize the signs of stress or disease. The sooner you identify a problem, the easier it will be to fix it.
Enjoying Your Harvest
Now that you’ve successfully grown kohlrabi in containers, it’s time to enjoy the fruits (or rather, vegetables) of your labor! Kohlrabi can be eaten raw or cooked. It has a mild, slightly sweet flavor that’s similar to broccoli stems or turnips.
* Raw: Peel the kohlrabi bulb and slice it into thin strips. Add it to salads, slaws, or crudités platters.
* Cooked: Kohlrabi can be steamed, boiled, roasted, or stir-fried. It’s a great addition to soups, stews, and casseroles.
* Leaves: As I
Conclusion
So, there you have it! Growing kohlrabi in containers is not only achievable, but it’s also a remarkably rewarding experience. We’ve walked through the essential steps, from selecting the right container and soil to nurturing your kohlrabi plants and harvesting their delicious, bulbous stems. But why should you bother with this DIY project when you could simply buy kohlrabi at the grocery store? The answer lies in the unparalleled freshness, the satisfaction of growing your own food, and the ability to control every aspect of the growing process, ensuring a truly organic and healthy harvest.
Imagine biting into a crisp, juicy kohlrabi bulb that you nurtured from a tiny seed. The flavor is noticeably sweeter and more vibrant than anything you’ll find pre-packaged. Plus, you’ll have the added benefit of knowing exactly what went into growing your kohlrabi, free from harmful pesticides and chemicals. This is especially important for those who prioritize organic gardening and healthy eating.
Beyond the superior flavor and health benefits, growing kohlrabi in containers offers incredible flexibility. Whether you have a sprawling backyard or a small balcony, container gardening allows you to cultivate this unique vegetable virtually anywhere. It’s also a fantastic way to extend your growing season, as you can easily move your containers indoors during colder months or protect them from harsh weather conditions.
Don’t be afraid to experiment with different varieties of kohlrabi. While the standard green and purple varieties are readily available, you might also consider trying ‘Superschmelz’ for its exceptionally large bulbs or ‘White Vienna’ for its mild flavor. You can also adjust the planting density based on your container size and desired bulb size. For smaller, more tender bulbs, plant your kohlrabi closer together. For larger bulbs, give them more space to grow.
Consider companion planting to further enhance your kohlrabi growing experience. Marigolds can help deter pests, while herbs like dill and chamomile can attract beneficial insects. These companion plants not only protect your kohlrabi but also add beauty and fragrance to your container garden.
Growing kohlrabi in containers is a must-try for any gardener, regardless of experience level. It’s a simple, rewarding, and delicious way to enjoy fresh, homegrown produce.
We encourage you to embark on this exciting gardening adventure. Start small, experiment with different techniques, and most importantly, have fun! Once you’ve harvested your first crop of homegrown kohlrabi, we’d love to hear about your experience. Share your tips, tricks, and photos in the comments below. Let’s build a community of kohlrabi enthusiasts and inspire others to discover the joys of container gardening!
Frequently Asked Questions (FAQ)
What is the best container size for growing kohlrabi?
A container that is at least 12 inches in diameter and 12 inches deep is generally recommended for growing kohlrabi. This size provides enough space for the roots to develop properly and allows the bulb to reach a decent size. If you plan on growing multiple kohlrabi plants in the same container, opt for a larger container, such as a half-barrel or a large planter box. Ensure the container has adequate drainage holes to prevent waterlogging, which can lead to root rot. Remember, the larger the container, the more room the kohlrabi has to grow, potentially resulting in larger bulbs.
What type of soil is best for growing kohlrabi in containers?
Kohlrabi thrives in well-draining, fertile soil that is rich in organic matter. A good potting mix specifically formulated for vegetables is an excellent choice. You can also create your own soil mix by combining equal parts of compost, peat moss (or coconut coir), and perlite or vermiculite. The compost provides essential nutrients, the peat moss or coconut coir helps retain moisture, and the perlite or vermiculite improves drainage. Avoid using garden soil in containers, as it can become compacted and hinder root growth. The ideal soil pH for kohlrabi is between 6.0 and 7.5.
How often should I water my kohlrabi plants in containers?
Kohlrabi requires consistent moisture to thrive, especially when grown in containers. Water your plants deeply whenever the top inch of soil feels dry to the touch. During hot and dry weather, you may need to water them daily. Avoid overwatering, as this can lead to root rot. Ensure that the container has adequate drainage to prevent water from pooling at the bottom. A good rule of thumb is to water until you see water draining from the drainage holes. Mulching around the base of the plants can help retain moisture and regulate soil temperature.
How much sunlight does kohlrabi need?
Kohlrabi needs at least 6 hours of direct sunlight per day to grow properly. Choose a location for your containers that receives plenty of sunlight throughout the day. If you live in a particularly hot climate, providing some afternoon shade can help prevent the plants from overheating. If you don’t have access to enough natural sunlight, you can supplement with grow lights. Position the grow lights a few inches above the plants and provide them with 12-14 hours of light per day.
When should I harvest my kohlrabi?
Kohlrabi is typically ready to harvest about 55-60 days after planting. The ideal time to harvest is when the bulbs are about 2-3 inches in diameter. Harvesting at this size ensures that the bulbs are tender and flavorful. If you wait too long, the bulbs can become tough and woody. To harvest, simply cut the stem just above the soil line. You can also harvest the leaves, which are edible and can be used in salads or cooked like spinach.
What are some common pests and diseases that affect kohlrabi?
Kohlrabi can be susceptible to several pests and diseases, including aphids, cabbage worms, flea beetles, and clubroot. Aphids can be controlled with insecticidal soap or by introducing beneficial insects like ladybugs. Cabbage worms can be handpicked or treated with Bacillus thuringiensis (Bt). Flea beetles can be deterred with row covers or by using diatomaceous earth. Clubroot is a soilborne disease that can be prevented by practicing crop rotation and ensuring good soil drainage. Regularly inspect your plants for signs of pests or diseases and take action promptly to prevent them from spreading.
Can I grow kohlrabi indoors during the winter?
Yes, you can grow kohlrabi indoors during the winter, provided you have adequate lighting and temperature control. Place your containers in a sunny window or under grow lights. Maintain a consistent temperature between 60-70°F (15-21°C). Water regularly and fertilize as needed. Keep an eye out for pests and diseases, which can be more prevalent indoors. Growing kohlrabi indoors can be a great way to enjoy fresh produce year-round.
What are some creative ways to use kohlrabi in cooking?
Kohlrabi is a versatile vegetable that can be used in a variety of dishes. It can be eaten raw, sliced thinly and added to salads or slaws. It can also be cooked, steamed, roasted, or stir-fried. Kohlrabi can be used in soups, stews, and gratins. The leaves are also edible and can be used in salads or cooked like spinach. Try grating kohlrabi and adding it to fritters or pancakes. The possibilities are endless!
How can I prevent my kohlrabi bulbs from cracking?
Cracking in kohlrabi bulbs is often caused by inconsistent watering. To prevent cracking, ensure that your plants receive consistent moisture throughout the growing season. Avoid letting the soil dry out completely and then overwatering. Mulching around the base of the plants can help retain moisture and regulate soil temperature. Also, avoid over-fertilizing, as this can also contribute to cracking.
Is kohlrabi a good source of nutrients?
Yes, kohlrabi is a nutritious vegetable that is a good source of vitamin C, potassium, and fiber. It is also low in calories and fat. Vitamin C is an antioxidant that helps protect the body against damage from free radicals. Potassium is an essential mineral that helps regulate blood pressure. Fiber promotes digestive health and can help lower cholesterol levels. Including kohlrabi in your diet can contribute to overall health and well-being.

Leave a Comment