

Growing Long Beans can seem daunting, but trust me, with a few simple tricks and a little DIY magic, you’ll be harvesting armfuls of these delicious, slender veggies in no time! Forget those pricey grocery store beans – imagine stepping into your own backyard and picking fresh, crisp long beans for your stir-fries, salads, or even just a simple, satisfying snack.
Long beans, also known as yardlong beans or asparagus beans, have a rich history, particularly in Asian cuisine. They’ve been cultivated for centuries, bringing a unique texture and flavor to dishes across various cultures. Think of the vibrant stir-fries in Southeast Asia or the flavorful curries in India – long beans are a staple!
But why should *you* bother with growing them yourself? Well, beyond the sheer satisfaction of nurturing something from seed to table, growing long beans at home allows you to control exactly what goes into your food. No more worrying about pesticides or questionable farming practices. Plus, let’s be honest, there’s something incredibly rewarding about showing off your homegrown bounty to friends and family. I’m going to share some easy DIY tricks and hacks that will transform your garden into a long bean paradise, even if you’re a complete beginner. Get ready to unleash your inner gardener!
DIY: From Seed to Supper – Growing Your Own Bountiful Long Beans!
Hey there, fellow garden enthusiasts! I’m so excited to share my tried-and-true method for growing long beans – those incredibly prolific and delicious veggies that can climb and sprawl their way into your heart (and onto your dinner plate!). Long beans, also known as yardlong beans, asparagus beans, or Chinese long beans, are surprisingly easy to grow, even if you’re a beginner gardener. Get ready to impress your friends and family with your homegrown harvest!
What You’ll Need: The Essential Supplies
Before we dive into the nitty-gritty, let’s gather our supplies. Having everything ready beforehand will make the whole process smoother and more enjoyable.
* Long Bean Seeds: Choose a variety that suits your climate. I personally love the ‘Red Noodle’ variety for its vibrant color and excellent flavor, but ‘Chinese Red Noodle’ and ‘Orient Wonder’ are also fantastic choices.
* Seed Starting Trays or Small Pots (Optional): If you want a head start, you can start your seeds indoors.
* Potting Mix (If Starting Indoors): Use a well-draining mix specifically formulated for seedlings.
* Garden Soil: Amend your garden soil with compost or well-rotted manure for optimal growth.
* Compost or Well-Rotted Manure: This will enrich the soil and provide essential nutrients.
* Trellis or Support Structure: Long beans are climbers, so they need something to grow on. A trellis, fence, bamboo stakes, or even a sturdy tomato cage will work.
* Gardening Gloves: To protect your hands.
* Watering Can or Hose: For regular watering.
* Fertilizer (Optional): A balanced fertilizer can boost growth, but it’s not always necessary if your soil is healthy. I prefer using organic options like fish emulsion or seaweed extract.
* Mulch (Optional): Mulch helps retain moisture, suppress weeds, and regulate soil temperature. Straw, wood chips, or shredded leaves are all good choices.
Step-by-Step Guide: From Seed to Harvest
Here’s the breakdown of how I grow my long beans, from planting the seeds to harvesting the delicious pods.
Phase 1: Starting Your Seeds (Optional but Recommended)
Starting seeds indoors gives you a head start, especially if you live in a region with a shorter growing season.
1. Sow the Seeds: Fill your seed starting trays or small pots with potting mix. Make a small indentation (about 1 inch deep) in the soil and place one or two long bean seeds in each indentation. Cover the seeds with soil and gently water.
2. Provide Warmth and Light: Long beans need warmth to germinate. Place the trays or pots in a warm location, such as a sunny windowsill or under grow lights. The ideal temperature is between 70-80°F (21-27°C).
3. Keep the Soil Moist: Water regularly to keep the soil consistently moist, but not waterlogged.
4. Transplant Seedlings: Once the seedlings have developed a few sets of true leaves (usually after 2-3 weeks) and the weather outside has warmed up, they’re ready to be transplanted into the garden.
Phase 2: Preparing Your Garden Bed
Proper soil preparation is crucial for healthy long bean growth.
1. Choose a Sunny Location: Long beans need at least 6-8 hours of sunlight per day.
2. Prepare the Soil: Loosen the soil to a depth of at least 12 inches. Remove any rocks, weeds, or debris.
3. Amend the Soil: Incorporate plenty of compost or well-rotted manure into the soil. This will improve drainage, fertility, and overall soil health. Long beans prefer well-drained soil that is rich in organic matter.
4. Install Your Trellis or Support Structure: Before planting, set up your trellis or support structure. This will give the long beans something to climb on as they grow. Make sure the structure is sturdy enough to support the weight of the mature plants.
Phase 3: Planting Your Long Beans
Now for the fun part – getting those beans in the ground!
1. Direct Sowing (If Not Starting Indoors): If you’re not starting seeds indoors, you can direct sow them into the garden once the soil has warmed up and the danger of frost has passed. Plant the seeds about 1 inch deep and 4-6 inches apart.
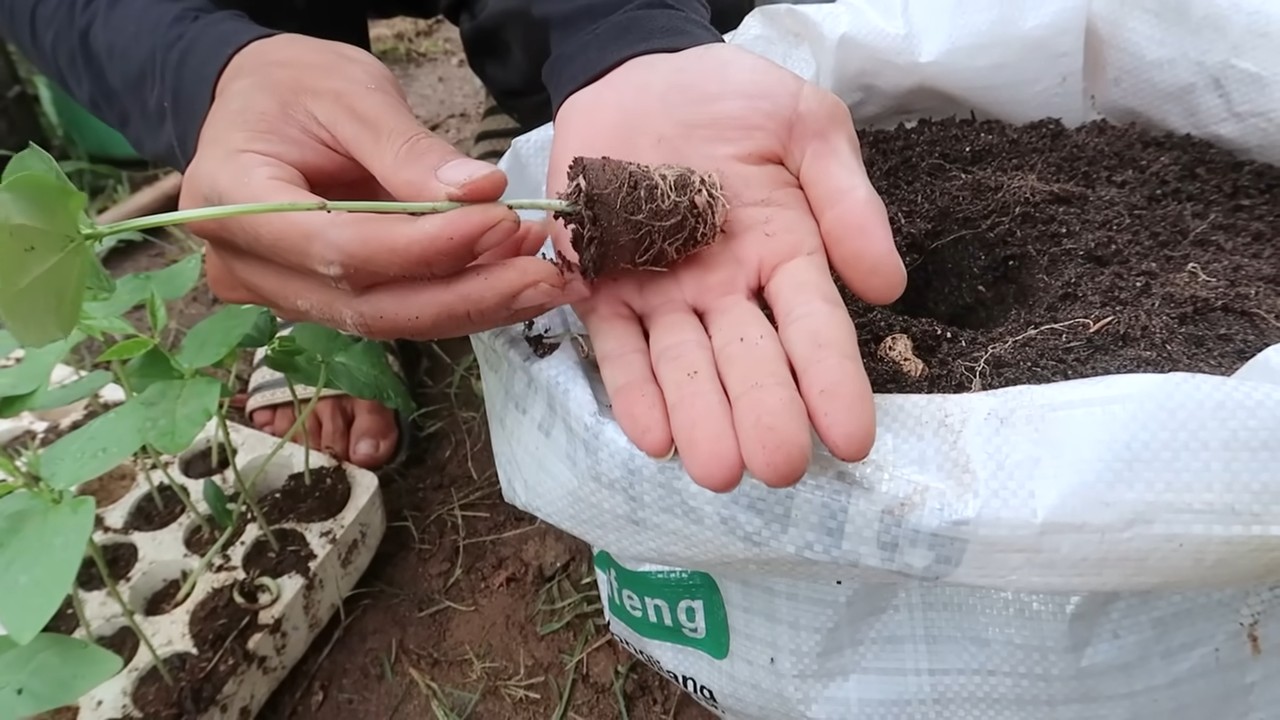
2. Transplanting Seedlings (If Starting Indoors): Gently remove the seedlings from their trays or pots. Dig a hole in the prepared garden bed that is large enough to accommodate the root ball. Place the seedling in the hole and backfill with soil. Water thoroughly. Space the seedlings about 4-6 inches apart.
3. Water Thoroughly: After planting, water the long beans thoroughly to help them establish their roots.
Phase 4: Caring for Your Long Beans
Consistent care is key to a bountiful harvest.
1. Water Regularly: Long beans need consistent moisture, especially during hot, dry weather. Water deeply and regularly, aiming for about 1 inch of water per week. Avoid overhead watering, as this can lead to fungal diseases.
2. Fertilize (Optional): If your soil is lacking in nutrients, you can fertilize your long beans every few weeks with a balanced fertilizer or an organic option like fish emulsion or seaweed extract. Follow the instructions on the fertilizer package.
3. Mulch (Optional): Apply a layer of mulch around the base of the plants to help retain moisture, suppress weeds, and regulate soil temperature.
4. Train the Vines: As the long bean vines grow, gently train them to climb up the trellis or support structure. You may need to tie them to the structure with twine or plant clips.
5. Weed Regularly: Keep the garden bed free of weeds, as they can compete with the long beans for nutrients and water.
6. Pest and Disease Control: Keep an eye out for pests and diseases. Common pests include aphids, bean beetles, and spider mites. Common diseases include powdery mildew and bean rust. Treat any problems promptly with appropriate organic or chemical controls. I usually start with insecticidal soap for aphids and neem oil for other pests. For fungal diseases, ensure good air circulation and consider using a copper fungicide if necessary.
Phase 5: Harvesting Your Long Beans
The moment you’ve been waiting for – harvesting your delicious long beans!
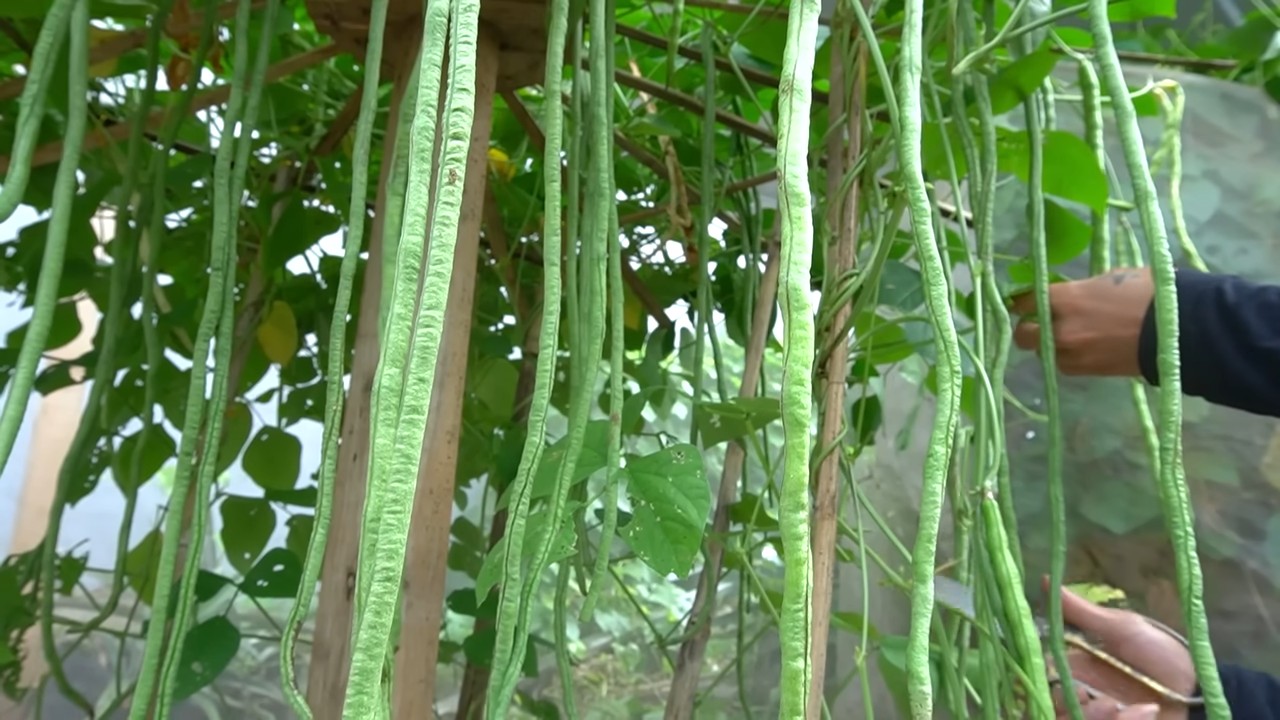
1. Harvest Regularly: Long beans are ready to harvest when they are about 12-18 inches long and still tender. Harvest them regularly to encourage continued production. The more you pick, the more they’ll produce!
2. Use Scissors or Pruners: Use scissors or pruners to cut the beans from the vine. Be careful not to damage the plant.
3. Harvest in the Morning: Harvest long beans in the morning, when they are at their freshest.
4. Store Properly: Store harvested long beans in the refrigerator for up to a week.
Troubleshooting: Common Problems and Solutions
Even with the best care, you might encounter a few challenges along the way. Here are some common problems and how to address them:
* Poor Germination: If your seeds aren’t germinating, make sure the soil is warm enough and consistently moist. You can also try soaking the seeds in water for 24 hours before planting to improve germination rates.
* Yellowing Leaves: Yellowing leaves can indicate a nutrient deficiency. Try fertilizing with a balanced fertilizer or an organic option like fish emulsion.
* Pest Infestations: As mentioned earlier, keep an eye out for pests and treat them promptly with appropriate controls.
* Disease Problems: Ensure good air circulation and avoid overhead watering to prevent fungal diseases. If necessary, use a copper fungicide.
* Lack of Pod Production: If your long beans aren’t producing pods, it could be due to a lack of pollination. Long beans are self-pollinating, but sometimes they need a little help. You can try hand-pollinating the flowers by gently transferring pollen from one flower to another with a small brush. Also, ensure the plants are getting enough sunlight and water.
Tips and Tricks for a Bumper Crop
Here are a few extra tips and tricks I’ve learned over the years to maximize my long bean harvest:
* Succession Planting: Plant long beans every few weeks to extend your harvest season.
* Companion Planting: Plant long beans with beneficial companion plants like basil, marigolds, and rosemary. These plants can help deter pests and attract pollinators.
* Water Deeply: When watering, water deeply and less frequently, rather than shallowly and more often. This encourages the roots to grow deeper, making the plants more drought-tolerant.
* Use a Soaker Hose: A soaker hose is a great
Conclusion
So, there you have it! Growing long beans doesn’t have to be a daunting task reserved for seasoned gardeners. With this simple DIY trick, you can transform your backyard, balcony, or even a sunny windowsill into a thriving long bean haven. This method, focusing on creating the optimal support structure and nurturing environment, drastically increases your chances of a bountiful harvest.
Why is this DIY approach a must-try? Because it’s efficient, cost-effective, and incredibly rewarding. Forget expensive store-bought trellises or complicated gardening systems. This method utilizes readily available materials and leverages the natural climbing tendencies of long beans, maximizing space and sunlight exposure. The result? Healthier plants, increased yields, and the unparalleled satisfaction of harvesting your own homegrown long beans.
But the beauty of this DIY trick lies in its adaptability. Feel free to experiment with variations to suit your specific needs and preferences. For instance, if you live in a particularly windy area, consider reinforcing your support structure with sturdier poles or anchoring it more securely to the ground. You can also explore different types of climbing supports, such as netting or even repurposed branches, to create a more natural and aesthetically pleasing look.
Another exciting variation is to companion plant your long beans with other beneficial vegetables and herbs. Marigolds, for example, can help deter pests, while basil can improve the flavor of your long beans. Experiment with different combinations to discover what works best in your garden.
Remember, the key to success with this DIY trick is observation and adaptation. Pay close attention to your long beans, monitor their growth, and adjust your approach as needed. Don’t be afraid to experiment and learn from your mistakes. Gardening is a journey, and every challenge is an opportunity to grow, both literally and figuratively.
We are confident that this DIY trick will revolutionize your long bean growing experience. It’s a game-changer for both novice and experienced gardeners alike. So, grab your tools, gather your materials, and get ready to embark on a rewarding gardening adventure.
We wholeheartedly encourage you to try this DIY trick for growing long beans. We’re eager to hear about your experiences, successes, and any variations you discover along the way. Share your photos, tips, and stories in the comments below. Let’s create a community of long bean enthusiasts and inspire each other to grow the most delicious and abundant harvests possible! Happy gardening!
Frequently Asked Questions (FAQ)
What kind of support structure is best for long beans?
The best support structure for long beans is one that is tall, sturdy, and provides ample surface area for the vines to climb. A trellis made of bamboo poles, wooden stakes, or metal fencing works well. You can also use netting or even repurposed branches to create a more natural look. The height of the support should be at least 6-8 feet to accommodate the vigorous growth of long beans. Ensure the structure is firmly anchored to the ground to withstand wind and the weight of the growing vines. Consider the available space in your garden when choosing the size and shape of the support.
How often should I water my long beans?
Long beans need consistent moisture, especially during hot and dry weather. Water deeply and regularly, aiming to keep the soil consistently moist but not waterlogged. The frequency of watering will depend on factors such as the weather, soil type, and drainage. As a general rule, water every 2-3 days, or more often during periods of intense heat. Check the soil moisture by inserting your finger a few inches into the soil. If it feels dry, it’s time to water. Avoid overhead watering, as this can promote fungal diseases. Instead, water at the base of the plants to keep the foliage dry.
What kind of soil is best for growing long beans?
Long beans thrive in well-drained, fertile soil that is rich in organic matter. The ideal soil pH is between 6.0 and 7.0. Before planting, amend the soil with compost, aged manure, or other organic materials to improve drainage, fertility, and water retention. Avoid heavy clay soils, as they can become waterlogged and inhibit root growth. If you have clay soil, consider adding sand or perlite to improve drainage. A soil test can help you determine the nutrient levels in your soil and identify any deficiencies that need to be addressed.
How do I fertilize my long beans?
Long beans benefit from regular fertilization to support their vigorous growth and abundant yields. Use a balanced fertilizer with equal amounts of nitrogen, phosphorus, and potassium (e.g., 10-10-10) or a fertilizer specifically formulated for beans and legumes. Apply fertilizer according to the package instructions, typically every 2-3 weeks during the growing season. Avoid over-fertilizing, as this can lead to excessive foliage growth and reduced bean production. You can also supplement with organic fertilizers such as compost tea or fish emulsion.
What are some common pests and diseases that affect long beans?
Long beans can be susceptible to various pests and diseases, including aphids, bean beetles, spider mites, powdery mildew, and bean rust. Regularly inspect your plants for signs of pests or diseases. Control aphids and spider mites with insecticidal soap or neem oil. Handpick bean beetles or use row covers to protect your plants. Prevent powdery mildew and bean rust by ensuring good air circulation, avoiding overhead watering, and applying fungicides if necessary. Choose disease-resistant varieties of long beans to minimize the risk of infection.
When is the best time to harvest long beans?
Long beans are typically ready to harvest about 60-70 days after planting. Harvest the beans when they are young, tender, and about 12-18 inches long. The pods should be firm and snap easily when bent. Avoid letting the beans become too mature, as they will become tough and stringy. Harvest regularly to encourage continued production. Use scissors or pruning shears to cut the beans from the vine, being careful not to damage the plant.
Can I grow long beans in containers?
Yes, long beans can be successfully grown in containers, provided you choose a large enough container and provide adequate support. Select a container that is at least 12 inches deep and 12 inches wide. Fill the container with a well-draining potting mix that is rich in organic matter. Provide a sturdy trellis or other support structure for the vines to climb. Water regularly and fertilize every 2-3 weeks. Place the container in a sunny location that receives at least 6-8 hours of sunlight per day.
How do I save seeds from my long beans?
To save seeds from your long beans, allow a few pods to mature completely on the vine. The pods will turn brown and dry out. Once the pods are completely dry, harvest them and remove the seeds. Spread the seeds out on a tray to dry completely for several days. Store the dried seeds in an airtight container in a cool, dry place. Label the container with the variety and date of harvest. Seeds saved from hybrid varieties may not produce true-to-type plants.


Leave a Comment