

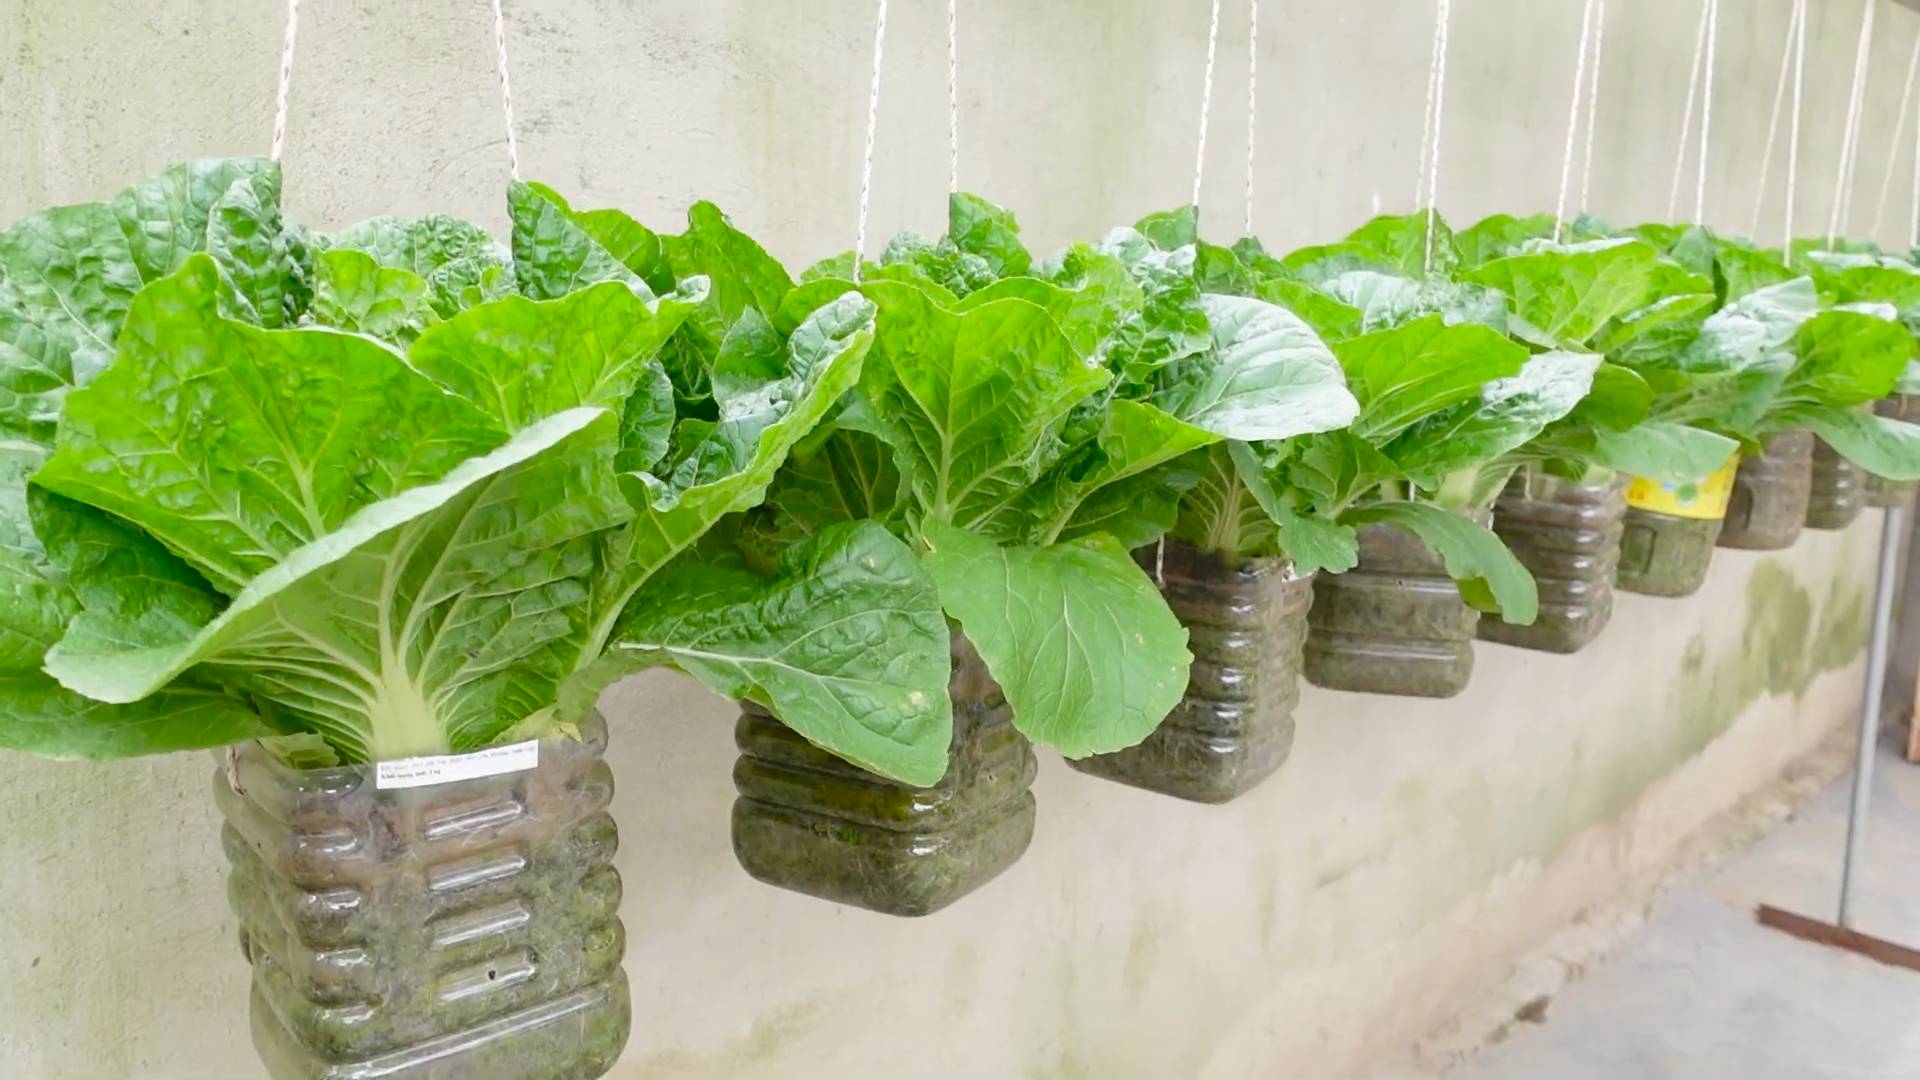
Growing Napa Cabbage No Garden? Absolutely! I know what you’re thinking: “Cabbage? In my tiny apartment?” But trust me, you don’t need acres of farmland to enjoy the crisp, slightly sweet flavor of homegrown Napa cabbage. This DIY guide is your ticket to fresh, delicious Napa cabbage, even if your “garden” is currently limited to a sunny windowsill.
Napa cabbage, also known as Chinese cabbage, has a rich history rooted in East Asian cuisine. For centuries, it’s been a staple ingredient in kimchi, stir-fries, and countless other dishes. Its versatility and nutritional value have made it a beloved vegetable worldwide. But what if you don’t have the space for a traditional garden? That’s where this DIY trick comes in!
Let’s face it, fresh produce from the grocery store can be expensive and sometimes lacks that vibrant flavor you crave. Plus, there’s something incredibly satisfying about nurturing your own food from seed to table. This guide will show you how to successfully growing Napa Cabbage No Garden, saving you money, reducing your carbon footprint, and adding a touch of green to your living space. We’ll cover everything from choosing the right container to providing the perfect growing conditions, ensuring you’ll be harvesting your own delicious Napa cabbage in no time. So, grab your gardening gloves (or just your enthusiasm!), and let’s get started!
Growing Napa Cabbage Without a Garden: A DIY Container Gardening Guide
Hey there, fellow gardening enthusiasts! So, you’re craving some delicious Napa cabbage but don’t have a traditional garden? No problem! I’m here to show you how to successfully grow this versatile veggie right in containers. It’s easier than you think, and the reward of fresh, homegrown Napa cabbage is totally worth it. Let’s get started!
Choosing the Right Container and Soil
First things first, we need to set the stage for our Napa cabbage to thrive. This means picking the perfect container and filling it with the right soil.
* Container Size: Napa cabbage needs room to grow. I recommend a container that’s at least 12 inches in diameter and 12 inches deep. A 5-gallon bucket or a large planter pot works perfectly. Remember, bigger is generally better, as it gives the roots more space to spread out.
* Drainage: This is crucial! Make sure your container has drainage holes at the bottom. Napa cabbage doesn’t like sitting in soggy soil, which can lead to root rot. If your container doesn’t have drainage holes, you’ll need to drill some.
* Soil Mix: Forget using garden soil straight from the ground. It’s often too heavy and doesn’t drain well in containers. Instead, opt for a high-quality potting mix. I like to use a mix that’s specifically formulated for vegetables. You can also make your own by combining equal parts of:
* Peat moss or coconut coir (for moisture retention)
* Perlite or vermiculite (for drainage and aeration)
* Compost (for nutrients)
Starting from Seeds or Seedlings
You have two options here: starting from seeds or buying seedlings from a nursery. Both work well, but starting from seeds gives you more control over the entire process.
* Starting from Seeds:
* Timing: Napa cabbage is a cool-season crop, so you’ll want to start your seeds indoors about 4-6 weeks before the last expected frost in spring, or 6-8 weeks before the first expected frost in fall.
* Sowing: Fill small seed-starting trays or pots with seed-starting mix. Sow the seeds about ¼ inch deep and gently water them.
* Germination: Keep the soil consistently moist but not soggy. Place the trays in a warm location (around 70-75°F). The seeds should germinate in about 5-10 days.
* Thinning: Once the seedlings have a few true leaves, thin them out, leaving only the strongest seedling in each pot.
* Buying Seedlings:
* Selection: Choose healthy-looking seedlings with vibrant green leaves and a sturdy stem. Avoid seedlings that are leggy, yellowed, or have signs of pests or diseases.
* Hardening Off: Before transplanting your seedlings outdoors, you’ll need to “harden them off.” This means gradually exposing them to outdoor conditions over a period of about a week. Start by placing them in a sheltered spot for a few hours each day, gradually increasing the amount of time they spend outdoors.
Transplanting and Planting
Now comes the exciting part – getting your Napa cabbage into its new home!
1. Prepare the Container: Fill your chosen container with the potting mix, leaving about an inch or two of space at the top.
2. Transplant Seedlings (if applicable): Gently remove the seedlings from their trays or pots. If the roots are tightly bound, gently loosen them with your fingers.
3. Planting: Dig a hole in the potting mix that’s large enough to accommodate the root ball of the seedling. Place the seedling in the hole and gently backfill with potting mix. Make sure the top of the root ball is level with the surface of the soil.
4. Spacing: If you’re planting multiple Napa cabbage plants in the same container, space them at least 12 inches apart.
5. Watering: Water the newly planted seedlings thoroughly.
Caring for Your Napa Cabbage
Once your Napa cabbage is planted, it’s time to provide it with the care it needs to thrive.
* Sunlight: Napa cabbage needs at least 6 hours of sunlight per day. Place your container in a sunny location. If you don’t have a spot that gets enough sunlight, you can supplement with grow lights.
* Watering: Keep the soil consistently moist, but not soggy. Water deeply whenever the top inch of soil feels dry to the touch. Avoid overhead watering, as this can lead to fungal diseases.
* Fertilizing: Napa cabbage is a heavy feeder, so you’ll need to fertilize it regularly. Use a balanced fertilizer (e.g., 10-10-10) every 2-3 weeks. You can also use organic fertilizers like compost tea or fish emulsion.
* Pest Control: Keep an eye out for common cabbage pests like cabbage worms, aphids, and flea beetles. You can control these pests with organic methods like handpicking, insecticidal soap, or neem oil. I’ve found that covering my plants with row covers early in the season helps prevent many pest problems.
* Weed Control: Keep the container free of weeds. Weeds compete with your Napa cabbage for nutrients and water. Hand-pull any weeds that appear.
* Mulching: Add a layer of mulch around the base of the plants to help retain moisture, suppress weeds, and regulate soil temperature. Straw, shredded leaves, or wood chips work well.
Harvesting Your Napa Cabbage
The moment you’ve been waiting for! Harvesting your homegrown Napa cabbage is incredibly satisfying.
* Timing: Napa cabbage is typically ready to harvest in about 70-80 days from planting.
* Signs of Maturity: The head should be firm and compact. The leaves should be tightly packed together.
* Harvesting Method: Use a sharp knife to cut the head of cabbage from the base of the plant. Leave a few outer leaves intact to protect the head.
Troubleshooting
Even with the best care, you might encounter some challenges along the way. Here are a few common problems and how to address them:
* Bolting (Premature Flowering): This can happen if the weather gets too hot. To prevent bolting, try to plant your Napa cabbage early in the spring or late in the summer. You can also provide shade during the hottest part of the day.
* Root Rot: This is caused by overwatering or poor drainage. Make sure your container has drainage holes and avoid overwatering.
* Pest Infestations: As mentioned earlier, keep an eye out for common cabbage pests. Use organic methods to control them.
* Nutrient Deficiencies: If your Napa cabbage leaves are yellowing or stunted, it may be a sign of nutrient deficiency. Fertilize regularly with a balanced fertilizer.
Enjoying Your Harvest
Now that you’ve harvested your Napa cabbage, it’s time to enjoy the fruits (or rather, vegetables) of your labor! Napa cabbage is incredibly versatile and can be used in a variety of dishes.
* Salads: Napa cabbage is a great addition to salads. Its mild flavor and crisp texture make it a perfect complement to other vegetables and dressings.
* Slaws: Napa cabbage is a key ingredient in many slaws. Try it in a classic coleslaw or a more Asian-inspired slaw with sesame oil and soy sauce.
* Stir-fries: Napa cabbage is a delicious addition to stir-fries. It cooks quickly and adds a nice crunch.
* Soups and Stews: Napa cabbage can be added to soups and stews for extra flavor and nutrients.
* Kimchi: Napa cabbage is the main ingredient in kimchi, a traditional Korean fermented dish.
Extra Tips for Success
Here are a few extra tips to help you grow the best Napa cabbage possible:
* Choose the Right Variety: There are many different varieties of Napa cabbage available. Some varieties are more heat-tolerant than others. Choose a variety that’s well-suited to your climate.
* Rotate Your Crops: Avoid planting Napa cabbage in the same container year after year. Crop rotation helps prevent soilborne diseases and pest problems.
* Companion Planting: Plant Napa cabbage with companion plants like dill, chamomile, and rosemary. These plants can help deter pests and attract beneficial insects.
* Observe Your Plants Regularly: Take the time to observe your plants regularly. This will help you identify any problems early on and take corrective action.
Growing Napa cabbage in containers is a rewarding experience. With a little bit of planning and care, you can enjoy fresh, homegrown Napa cabbage even without a traditional garden. Happy gardening!

Conclusion
So, there you have it! Growing Napa cabbage without a garden isn’t just possible; it’s surprisingly rewarding. This DIY trick opens up a world of fresh, crisp Napa cabbage right on your balcony, patio, or even a sunny windowsill. Forget relying solely on grocery store produce, often shipped from afar and lacking that just-picked vibrancy. With a little effort and this simple method, you can enjoy the unique flavor and texture of homegrown Napa cabbage in your favorite dishes.
Why is this a must-try? Because it empowers you to take control of your food source, even in the absence of a traditional garden. It’s a sustainable, space-saving solution that brings the joy of gardening to urban dwellers and anyone with limited outdoor space. Plus, the taste difference between store-bought and homegrown Napa cabbage is undeniable. The fresh, slightly sweet, and subtly peppery flavor is amplified when you harvest it yourself.
But don’t stop there! Experiment with different container sizes to see what works best for your space and the variety of Napa cabbage you choose. Try adding companion plants like marigolds or nasturtiums to deter pests naturally. Consider using different types of potting mix to find the perfect balance of drainage and nutrient retention. You can even explore growing other Asian greens alongside your Napa cabbage, creating a mini-Asian vegetable garden on your patio.
Ready to embark on your Napa cabbage growing adventure? We encourage you to give this DIY trick a try. It’s easier than you think, and the results are well worth the effort. Once you’ve harvested your first head of homegrown Napa cabbage, we’d love to hear about your experience! Share your photos, tips, and variations in the comments below. Let’s build a community of urban gardeners who are passionate about growing their own food, one delicious Napa cabbage at a time. This method of growing Napa cabbage is a game changer for small spaces.
Frequently Asked Questions (FAQs)
Q: What is the best time of year to start growing Napa cabbage in containers?
A: Napa cabbage is a cool-season crop, so the best time to start growing it is in the spring or fall. For a spring harvest, start seeds indoors 6-8 weeks before the last expected frost. For a fall harvest, start seeds outdoors or indoors in late summer, about 8-10 weeks before the first expected frost. Avoid planting during the hottest months of summer, as high temperatures can cause the cabbage to bolt (go to seed prematurely).
Q: What size container do I need for growing Napa cabbage?
A: Choose a container that is at least 12 inches in diameter and 12 inches deep. Napa cabbage needs plenty of room for its roots to develop. A larger container (15-20 inches) is even better, especially if you plan to grow multiple plants in the same container. Make sure the container has drainage holes to prevent waterlogging.
Q: What type of potting mix should I use?
A: Use a high-quality potting mix that is well-draining and rich in organic matter. Avoid using garden soil, as it can be too heavy and compact for container gardening. A mix of peat moss, perlite, and vermiculite is a good option. You can also add compost or aged manure to the potting mix to provide extra nutrients.
Q: How often should I water my Napa cabbage plants?
A: Water your Napa cabbage plants regularly, especially during hot, dry weather. The soil should be consistently moist but not waterlogged. Check the soil moisture by sticking your finger about an inch deep into the soil. If it feels dry, it’s time to water. Water deeply, allowing the water to drain out of the drainage holes. Avoid overhead watering, as this can promote fungal diseases.
Q: How much sunlight do Napa cabbage plants need?
A: Napa cabbage plants need at least 6 hours of sunlight per day. Choose a sunny location for your container garden. If you don’t have a spot that gets full sun, try to provide at least 4-5 hours of direct sunlight. You can also supplement with grow lights if needed.
Q: How do I fertilize my Napa cabbage plants?
A: Napa cabbage plants are heavy feeders, so they need regular fertilization. Start fertilizing about 2-3 weeks after transplanting the seedlings into the container. Use a balanced fertilizer (e.g., 10-10-10) or a fertilizer specifically formulated for vegetables. Follow the instructions on the fertilizer label. You can also use organic fertilizers like compost tea or fish emulsion. Fertilize every 2-3 weeks throughout the growing season.
Q: What are some common pests and diseases that affect Napa cabbage?
A: Common pests that affect Napa cabbage include aphids, cabbage worms, flea beetles, and slugs. To control pests, you can use insecticidal soap, neem oil, or handpick them off the plants. Row covers can also help to prevent pests from reaching the plants. Common diseases that affect Napa cabbage include clubroot, black rot, and downy mildew. To prevent diseases, choose disease-resistant varieties, practice crop rotation, and avoid overhead watering. Ensure good air circulation around the plants.
Q: How do I know when my Napa cabbage is ready to harvest?
A: Napa cabbage is ready to harvest when the head is firm and compact. The size of the head will vary depending on the variety, but most varieties are ready to harvest when they are about 6-8 inches in diameter. To harvest, cut the head off at the base with a sharp knife.
Q: Can I grow Napa cabbage indoors year-round?
A: While it’s possible to grow Napa cabbage indoors, it can be challenging to provide the ideal growing conditions. Napa cabbage needs plenty of sunlight and cool temperatures. If you have a sunny windowsill or can provide supplemental lighting, you may be able to grow Napa cabbage indoors. However, the heads may not be as large as those grown outdoors.
Q: What are some good companion plants for Napa cabbage?
A: Good companion plants for Napa cabbage include marigolds, nasturtiums, dill, rosemary, and thyme. These plants can help to deter pests and attract beneficial insects. Avoid planting Napa cabbage near other members of the brassica family, such as broccoli, cauliflower, and kale, as they can attract the same pests and diseases.
Q: Can I save seeds from my Napa cabbage plants?
A: Saving seeds from Napa cabbage can be tricky because it is a biennial plant, meaning it takes two years to produce seeds. If you want to save seeds, you will need to overwinter the plants and allow them to flower and produce seeds in the second year. However, Napa cabbage is often cross-pollinated, so the seeds may not produce true-to-type plants.
Q: What are some creative ways to use my homegrown Napa cabbage?
A: The possibilities are endless! Napa cabbage is incredibly versatile. Use it in slaws, salads, stir-fries, soups, and kimchi. It’s also delicious steamed or braised. Try adding it to your favorite noodle dishes or using it as a wrap for fillings. The fresh, crisp flavor of homegrown Napa cabbage will elevate any dish.

Leave a Comment