

Growing Peas at Home can seem daunting, but trust me, it’s one of the most rewarding experiences a home gardener can have! Imagine plucking sweet, plump peas straight from the vine, the taste far surpassing anything you’d find in a grocery store. For centuries, peas have been a staple crop, enjoyed by everyone from ancient Romans to medieval peasants. They’re a symbol of spring and new beginnings, and bringing that symbolism into your own backyard is easier than you think.
But why bother with the effort? Well, store-bought peas often lack that fresh, vibrant flavor. Plus, growing peas at home allows you to control exactly what goes into your food, avoiding harmful pesticides and ensuring a truly organic harvest. This DIY guide is packed with simple tricks and hacks to help you cultivate a thriving pea patch, even if you’re a complete beginner. I’ll share my secrets for choosing the right varieties, preparing your soil, providing proper support, and protecting your precious peas from pests and diseases. Get ready to enjoy a bountiful harvest of delicious, homegrown peas – it’s time to get your hands dirty!

Growing Peas at Home: A Beginner’s Guide to Sweet Success
Hey there, fellow garden enthusiasts! I’m so excited to share my experience with growing peas at home. There’s nothing quite like the taste of fresh, homegrown peas straight from the vine. They’re so much sweeter and more flavorful than anything you can buy in the store. Plus, growing them yourself is incredibly rewarding and surprisingly easy! This guide will walk you through every step, from choosing the right variety to harvesting your delicious bounty.
Choosing the Right Pea Variety
Before you even think about planting, you need to decide what kind of peas you want to grow. There are three main types:
* Shelling Peas (English Peas): These are the classic peas where you remove the pods and eat the peas inside. They’re known for their sweetness and are perfect for eating fresh, freezing, or using in recipes.
* Snap Peas: With snap peas, you eat the entire pod! They’re crisp, juicy, and have a satisfying “snap” when you bite into them. They’re great for snacking, stir-fries, or adding to salads.
* Snow Peas: Similar to snap peas, snow peas have flat pods with small peas inside. They’re tender and slightly sweet, and they’re often used in Asian cuisine.
Consider your preferences and how you plan to use your peas when making your choice. I personally love growing a mix of shelling and snap peas for variety.
Preparing Your Garden Bed
Peas thrive in well-drained soil with plenty of sunlight. Here’s how to get your garden bed ready:
* Sunlight: Peas need at least 6 hours of sunlight per day. Choose a location in your garden that gets plenty of sun.
* Soil: Peas prefer slightly acidic to neutral soil (pH 6.0-7.0). Amend your soil with compost or well-rotted manure to improve drainage and fertility.
* Support: Most pea varieties need support to climb. You can use a trellis, netting, or even branches. I’ve found that a simple trellis made from bamboo stakes and twine works perfectly.
Planting Your Pea Seeds
The best time to plant peas is in early spring, as soon as the soil can be worked. Peas are cool-season crops and prefer cooler temperatures.
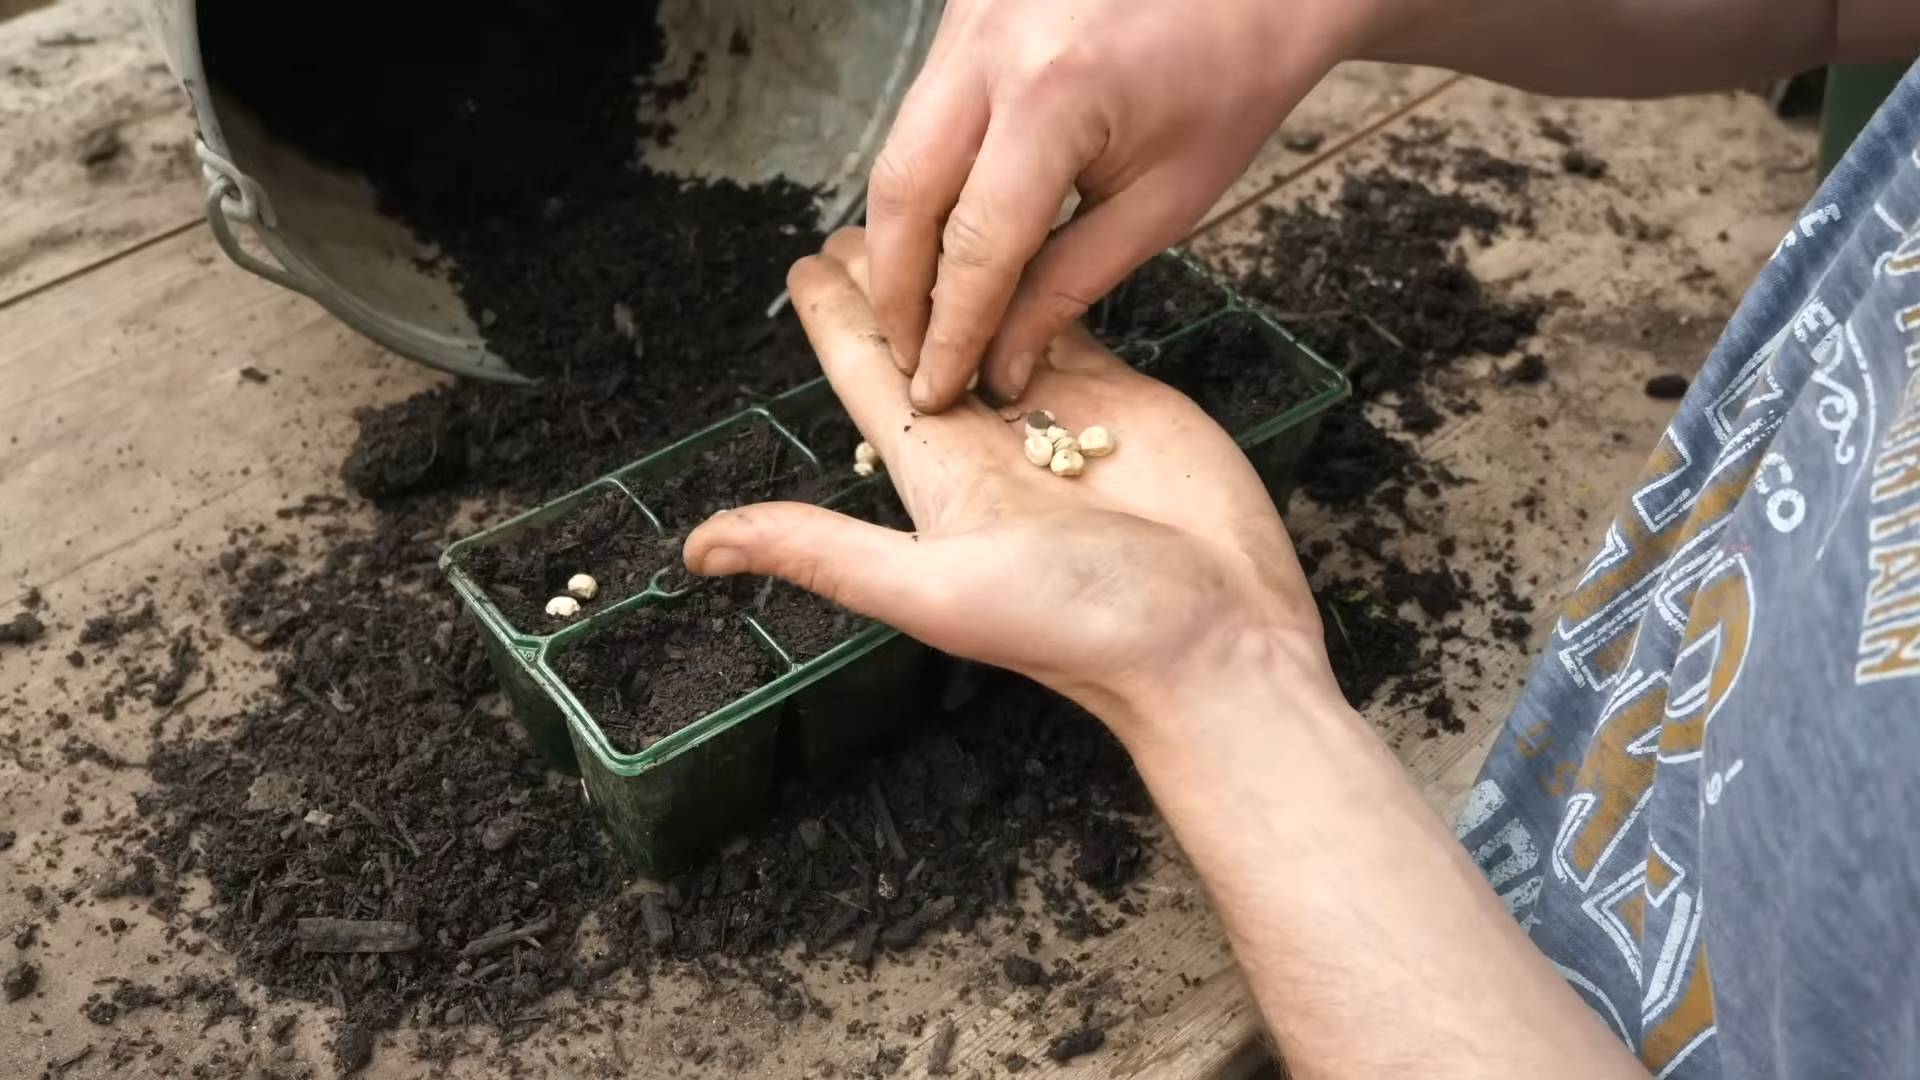
1. Soaking the Seeds: Before planting, soak your pea seeds in water for 12-24 hours. This will help them germinate faster. I usually put them in a small bowl with water and leave them overnight.
2. Planting Depth: Plant your pea seeds about 1 inch deep and 2 inches apart. If you’re planting in rows, space the rows about 18 inches apart.
3. Watering: After planting, water the soil gently but thoroughly. Keep the soil consistently moist until the seeds germinate.
4. Providing Support: Once your pea seedlings start to emerge, provide them with support to climb. Gently guide the tendrils towards the trellis or netting. I like to check on them every few days and help them find their way.
Caring for Your Pea Plants
Peas are relatively low-maintenance plants, but there are a few things you can do to ensure a successful harvest:
* Watering: Water your pea plants regularly, especially during dry periods. Avoid overwatering, as this can lead to root rot. I usually water them deeply once or twice a week, depending on the weather.
* Fertilizing: Peas don’t need a lot of fertilizer, but you can give them a boost with a balanced fertilizer a few weeks after they emerge. Follow the instructions on the fertilizer package.
* Weeding: Keep your garden bed free of weeds, as they can compete with your pea plants for nutrients and water. I like to hand-weed regularly to keep things tidy.
* Pest Control: Peas can be susceptible to pests like aphids and pea weevils. Inspect your plants regularly and take action if you see any signs of infestation. You can use insecticidal soap or neem oil to control pests. I’ve found that a strong blast of water from the hose can also help dislodge aphids.
Harvesting Your Peas
The moment you’ve been waiting for! Harvesting your peas is the most rewarding part of the process.
1. Shelling Peas: Harvest shelling peas when the pods are plump and full. The peas inside should be well-developed but not too hard. Simply snap the pods off the vine and shell the peas.
2. Snap Peas: Harvest snap peas when the pods are plump and crisp. The pods should be bright green and snap easily when bent.
3. Snow Peas: Harvest snow peas when the pods are flat and tender. The peas inside should be small and barely visible.
Harvest your peas regularly to encourage continued production. The more you pick, the more they’ll grow! I usually harvest my peas every few days during peak season.
Troubleshooting Common Pea Problems
Even with the best care, you might encounter some problems when growing peas. Here are a few common issues and how to address them:
* Poor Germination: If your pea seeds aren’t germinating, it could be due to cold soil, poor drainage, or old seeds. Make sure the soil is warm enough and well-drained, and use fresh seeds.
* Yellowing Leaves: Yellowing leaves can be a sign of nutrient deficiency or disease. Check the soil pH and amend with compost or fertilizer if necessary.
* Powdery Mildew: Powdery mildew is a fungal disease that can affect peas in humid conditions. Improve air circulation by spacing your plants properly and water at the base of the plants. You can also use a fungicide if necessary.
* Pests: As mentioned earlier, aphids and pea weevils can be a problem. Inspect your plants regularly and take action if you see any signs of infestation.
Enjoying Your Homegrown Peas
Now that you’ve harvested your delicious peas, it’s time to enjoy them! Here are a few of my favorite ways to use homegrown peas:
* Eating Fresh: There’s nothing quite like eating fresh peas straight from the vine. They’re so sweet and flavorful!
* Freezing: Peas freeze well, so you can enjoy them all year round. Simply blanch the peas for a few minutes, then freeze them in freezer bags.
* Cooking: Peas can be used in a variety of dishes, such as soups, stews, salads, and stir-fries. They’re a versatile and nutritious ingredient.
Building a Simple Pea Trellis
As I mentioned earlier, peas need support to climb. Here’s how I build a simple and effective pea trellis:
Materials You’ll Need:
* Bamboo stakes (4-6, depending on the length of your row)
* Twine or garden string
* Scissors
Instructions:
1. Insert the Stakes: Push the bamboo stakes into the ground along your row of peas, spacing them about 2-3 feet apart. Make sure the stakes are firmly planted.
2. Tie the Twine: Starting at the bottom of the stakes, tie a length of twine to one stake. Then, weave the twine back and forth between the stakes, creating a horizontal support for the peas to climb.
3. Add More Layers: Continue adding layers of twine every 6-8 inches, until you reach the top of the stakes.
4. Secure the Ends: Tie off the ends of the twine securely to the stakes.
That’s it! Your simple pea trellis is ready to go. As your pea plants grow, gently guide their tendrils towards the twine.
Extending Your Pea Season
Want to enjoy fresh peas for longer? Here are a few tips for extending your pea season:
* Succession Planting: Plant new pea seeds every 2-3 weeks to ensure a continuous harvest.
* Choose Early and Late Varieties: Select pea varieties that mature at different times. This will help you spread out your harvest.
* Provide Shade: In warmer climates, provide some shade for your pea plants during the hottest part of the day. This will help them stay cool and productive.
Saving Pea Seeds for Next Year
If you want to save seeds from your pea plants for next year, here’s how:
1. Choose Healthy Plants: Select healthy, vigorous pea plants to save seeds from.
2. Allow Pods to Dry: Allow the pea pods to dry completely on the vine. They should turn brown and brittle.
3. Harvest the Seeds: Once the pods are dry, harvest them and shell the peas.
4. Dry the Seeds: Spread the pea seeds out on a tray and allow them to dry completely for a few weeks.
5. Store the Seeds: Store the dried pea seeds in an airtight container in a cool, dark, and dry place.
With these tips, you can enjoy fresh, homegrown peas year after year!
Growing peas
Conclusion
So, there you have it! Growing peas at home, especially with this simple DIY trick, is not just a gardening endeavor; it’s an investment in fresh, flavorful produce and a rewarding connection with nature. Forget those bland, store-bought peas that lack the vibrant sweetness of freshly picked ones. With minimal effort and a touch of creativity, you can transform your garden, balcony, or even a sunny windowsill into a thriving pea patch.
This DIY method, focusing on [mention the specific DIY trick from the main article – assuming it’s about using recycled materials for trellises], offers a sustainable and cost-effective way to support your pea plants as they climb towards the sun. It’s a fantastic way to repurpose materials, reduce waste, and add a unique, personal touch to your garden. Plus, the satisfaction of harvesting your own homegrown peas, knowing you nurtured them from seed to pod, is simply unparalleled.
But don’t stop there! Feel free to experiment with different pea varieties. Consider trying snow peas for their edible pods, snap peas for their plump, juicy sweetness, or classic shelling peas for a burst of flavor in your favorite dishes. You can also adjust the DIY trellis design to suit your space and aesthetic preferences. Perhaps you’ll use bamboo stakes instead of recycled plastic, or maybe you’ll create a vertical garden system using repurposed pallets. The possibilities are endless!
Growing peas at home is more than just a recipe for success; it’s a journey of discovery and a celebration of fresh, seasonal eating. We wholeheartedly encourage you to give this DIY trick a try. It’s easier than you think, and the rewards are well worth the effort.
Once you’ve harvested your first batch of homegrown peas, we’d love to hear about your experience! Share your photos, tips, and variations in the comments below. Let’s create a community of pea-growing enthusiasts and inspire others to embrace the joy of homegrown goodness. Happy gardening!
Frequently Asked Questions (FAQs)
What are the best pea varieties to grow at home?
The best pea varieties for home growing depend on your preferences and climate. For edible pods, snow peas like ‘Oregon Giant’ or ‘Dwarf Grey Sugar’ are excellent choices. Snap peas, such as ‘Sugar Snap’ or ‘Super Sugar Snap,’ offer a plump, juicy sweetness. For shelling peas, consider ‘Little Marvel’ for early harvests or ‘Wando’ for heat tolerance. Research varieties that are well-suited to your local climate and growing season for optimal results. Consider disease resistance as well.
How much sunlight do peas need?
Peas thrive in full sun, requiring at least 6-8 hours of direct sunlight per day. Insufficient sunlight can lead to leggy growth, reduced flowering, and lower yields. If you’re growing peas indoors or in a partially shaded area, consider supplementing with grow lights to ensure they receive adequate light.
When is the best time to plant peas?
Peas are a cool-season crop, meaning they prefer cooler temperatures. The best time to plant peas is in early spring, as soon as the soil can be worked. In warmer climates, you can also plant peas in the fall for a winter harvest. Avoid planting peas during the hottest months of summer, as high temperatures can inhibit germination and growth. Check your local planting calendar for specific dates based on your region’s climate.
How often should I water my pea plants?
Peas need consistent moisture to thrive. Water your pea plants regularly, especially during dry periods. Aim to keep the soil consistently moist but not waterlogged. Overwatering can lead to root rot, while underwatering can stress the plants and reduce yields. A good rule of thumb is to water deeply when the top inch of soil feels dry to the touch. Mulching around the plants can help retain moisture and suppress weeds.
What kind of soil is best for growing peas?
Peas prefer well-drained soil that is rich in organic matter. Amend your soil with compost or other organic materials before planting to improve drainage and fertility. Peas also prefer a slightly acidic to neutral soil pH (around 6.0-7.0). Conduct a soil test to determine your soil’s pH and nutrient levels, and amend accordingly. Avoid planting peas in heavy clay soil, as it can become waterlogged and inhibit root growth.
How do I support my pea plants with the DIY trellis?
The DIY trellis [assuming it’s about using recycled materials for trellises] provides essential support for climbing pea varieties. As the pea plants grow, gently guide their tendrils towards the trellis. The tendrils will naturally grasp onto the trellis, allowing the plants to climb vertically. Ensure the trellis is sturdy enough to support the weight of the mature pea plants. You may need to tie the plants to the trellis in some areas if they are struggling to reach it on their own.
How do I harvest peas?
Harvest peas when the pods are plump and filled with peas. For shelling peas, the pods should be firm and rounded. For snow peas and snap peas, harvest when the pods are still flat and tender. Gently snap the pods off the vine, being careful not to damage the plant. Harvest regularly to encourage continued production. Overripe peas can become tough and starchy.
What are some common pests and diseases that affect peas?
Common pests that affect peas include aphids, pea weevils, and slugs. Diseases include powdery mildew, root rot, and fusarium wilt. Monitor your plants regularly for signs of pests or diseases. Use organic pest control methods, such as insecticidal soap or neem oil, to control pests. Ensure good air circulation to prevent fungal diseases. Choose disease-resistant varieties whenever possible.
Can I grow peas in containers?
Yes, you can grow peas in containers, but you’ll need to choose a large enough container (at least 12 inches in diameter) to accommodate the root system. Use a well-draining potting mix and provide adequate support for the plants to climb. Container-grown peas may require more frequent watering and fertilization than those grown in the ground.
How can I improve my pea harvest?
To improve your pea harvest, ensure your plants receive adequate sunlight, water, and nutrients. Amend your soil with compost or other organic materials before planting. Provide a sturdy trellis for the plants to climb. Harvest regularly to encourage continued production. Protect your plants from pests and diseases. Consider using a nitrogen-fixing inoculant when planting to improve nitrogen uptake.


Leave a Comment