

Growing Potatoes: Beginner’s Guide – Ever dreamt of harvesting your own homegrown potatoes, bursting with flavor and freshness? Imagine the satisfaction of digging into the earth and unearthing a treasure trove of these versatile vegetables, ready to be transformed into crispy fries, creamy mashed potatoes, or hearty stews. This isn’t just a dream; it’s an achievable reality, even if you’re a complete beginner!
Potatoes have a rich history, dating back thousands of years to the Andes Mountains in South America, where they were a staple food for the Inca civilization. From their humble beginnings, potatoes have journeyed across the globe, becoming a cornerstone of cuisines worldwide. Today, they’re not only a vital food source but also a symbol of resourcefulness and the simple pleasures of home gardening.
But why should you bother with growing potatoes yourself? In today’s world, where convenience often trumps quality, homegrown potatoes offer a unique opportunity to reconnect with nature and enjoy the unparalleled taste of freshly harvested produce. Plus, you have complete control over the growing process, ensuring that your potatoes are free from harmful chemicals and pesticides. This beginner’s guide will equip you with all the essential knowledge and practical tips you need to embark on your potato-growing adventure. I’m excited to share these simple steps with you, so let’s get started and turn your garden into a potato paradise!
Growing Potatoes: A Beginner’s Guide to Bountiful Harvests!
Hey there, fellow gardening enthusiasts! I’m so excited to share my potato-growing journey with you. Growing your own potatoes is surprisingly easy and incredibly rewarding. There’s nothing quite like digging up your own fresh, homegrown potatoes – the taste is simply unbeatable! This guide will walk you through everything you need to know, from choosing the right potatoes to harvesting your delicious crop. Let’s get started!
Choosing Your Seed Potatoes
First things first, you can’t just plant any old potato from the grocery store. You need seed potatoes, which are specially grown potatoes certified to be disease-free. You can find these at your local garden center or online.
* Certified Seed Potatoes: Always opt for certified seed potatoes to ensure a healthy start and avoid introducing diseases to your garden.
* Variety Selection: Consider what kind of potatoes you enjoy eating. There are different varieties for different uses:
* Early Season (New Potatoes): These mature quickly (around 70-90 days) and are great for boiling or steaming. Examples include ‘Yukon Gold’ and ‘Irish Cobbler’.
* Mid-Season: These take a bit longer (90-110 days) and are good for general use. ‘Kennebec’ is a popular choice.
* Late Season (Storage Potatoes): These take the longest (110-135 days) and are ideal for storing over the winter. ‘Russet Burbank’ and ‘Red Pontiac’ are excellent options.
* Size Matters: Choose seed potatoes that are about the size of a chicken egg. If they’re larger, you can cut them into pieces, ensuring each piece has at least one or two “eyes” (those little buds that will sprout).
Sprouting Your Seed Potatoes (Chitting)
Chitting, or sprouting, your seed potatoes before planting gives them a head start and can result in an earlier harvest. It’s not strictly necessary, but I highly recommend it!
* Timing: Start chitting about 4-6 weeks before your last expected frost.
* The Process:
* Place your seed potatoes in a cool, bright location (but not in direct sunlight). An egg carton or a shallow tray works well.
* The “eyes” will start to sprout, forming short, green shoots.
* Turn the potatoes occasionally to ensure even sprouting.
* Aim for sprouts that are about 1/2 to 1 inch long before planting.
Preparing Your Potato Patch
Potatoes need well-drained, slightly acidic soil. They also need plenty of sunlight – at least 6-8 hours a day.
* Soil Preparation:
* Choose a sunny spot in your garden.
* Loosen the soil to a depth of at least 12 inches.
* Amend the soil with compost or well-rotted manure to improve drainage and fertility. Potatoes are heavy feeders!
* Remove any rocks or debris that could hinder root growth.
* Soil pH: Potatoes prefer a soil pH between 5.5 and 6.5. You can test your soil pH with a soil testing kit and amend it accordingly.
* Hilling Rows: Create rows or mounds of soil about 8-12 inches high and 2-3 feet apart. This is where you’ll plant your seed potatoes. Hilling is crucial for potato production, as it encourages more potatoes to form along the buried stem.
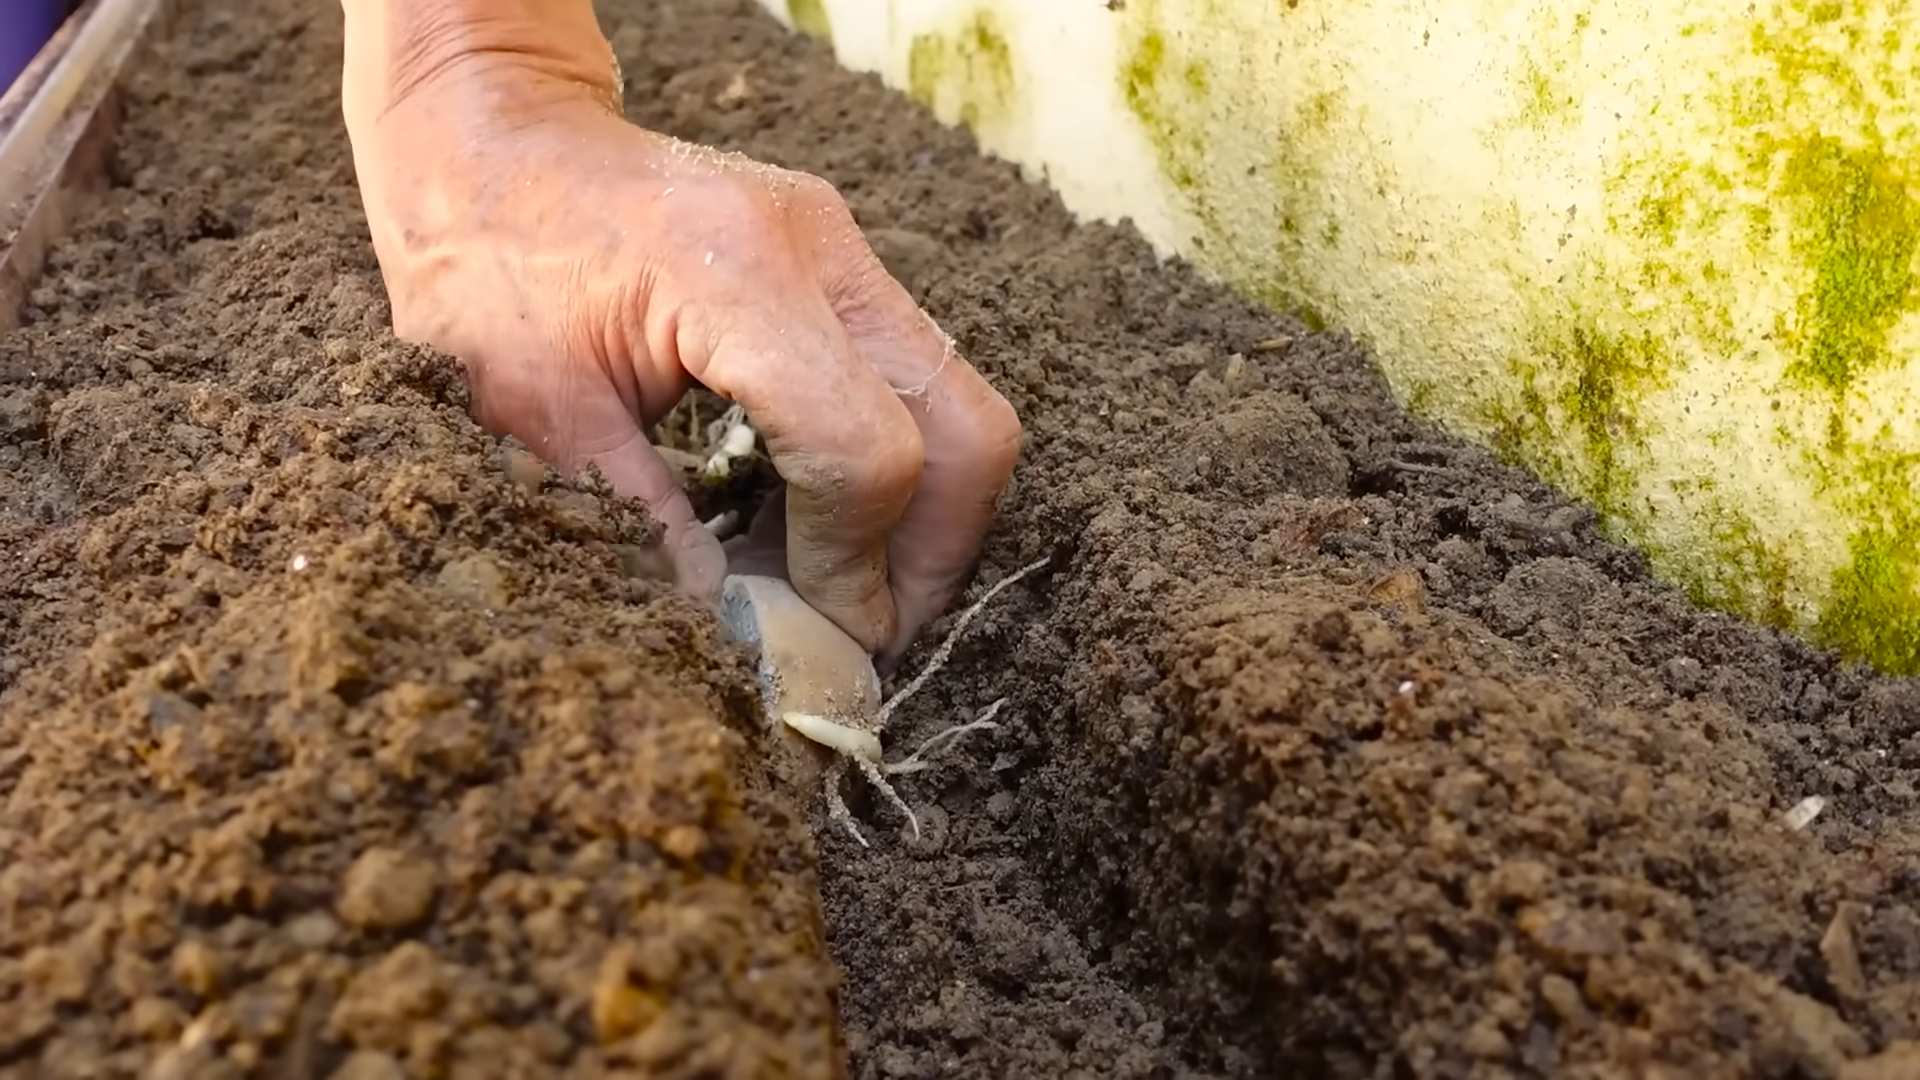
Planting Your Seed Potatoes
Now for the fun part – planting!
1. Dig Trenches: Dig trenches along the top of your prepared rows, about 4-6 inches deep.
2. Space Potatoes: Place your seed potatoes (or cut pieces) in the trenches, sprout-side up, spacing them about 12 inches apart.
3. Cover with Soil: Gently cover the seed potatoes with soil, filling in the trenches.
4. Water Well: Water the newly planted potatoes thoroughly.
Caring for Your Potato Plants
Potatoes need consistent moisture and regular hilling to thrive.
* Watering: Keep the soil consistently moist, especially during dry periods. Water deeply, but avoid overwatering, which can lead to rot.
* Hilling (Earthing Up): As the potato plants grow, gradually hill up the soil around the stems. This encourages more potato formation along the buried stem.
* When the plants are about 6 inches tall, use a hoe or shovel to pull soil from the sides of the rows up around the stems, burying the lower part of the plant.
* Repeat this process every few weeks as the plants grow, until the rows are about 12-18 inches high.
* Fertilizing: Potatoes benefit from regular fertilization. Use a balanced fertilizer (e.g., 10-10-10) or a fertilizer specifically formulated for potatoes. Follow the instructions on the fertilizer package. I like to side-dress my potatoes with compost tea every few weeks.
* Weed Control: Keep the potato patch free of weeds, which can compete with the plants for nutrients and water. Hand-pull weeds or use a hoe to cultivate the soil. Mulching can also help suppress weed growth.
* Pest and Disease Control: Keep an eye out for common potato pests and diseases, such as potato beetles, aphids, and blight.
* Potato Beetles: Hand-pick potato beetles and their larvae off the plants. You can also use insecticidal soap or neem oil.
* Aphids: Spray aphids with insecticidal soap or a strong stream of water.
* Blight: Blight is a fungal disease that can quickly destroy potato plants. To prevent blight, choose disease-resistant varieties, ensure good air circulation, and avoid overhead watering. If blight appears, remove and destroy affected foliage immediately. Copper-based fungicides can also help control blight.
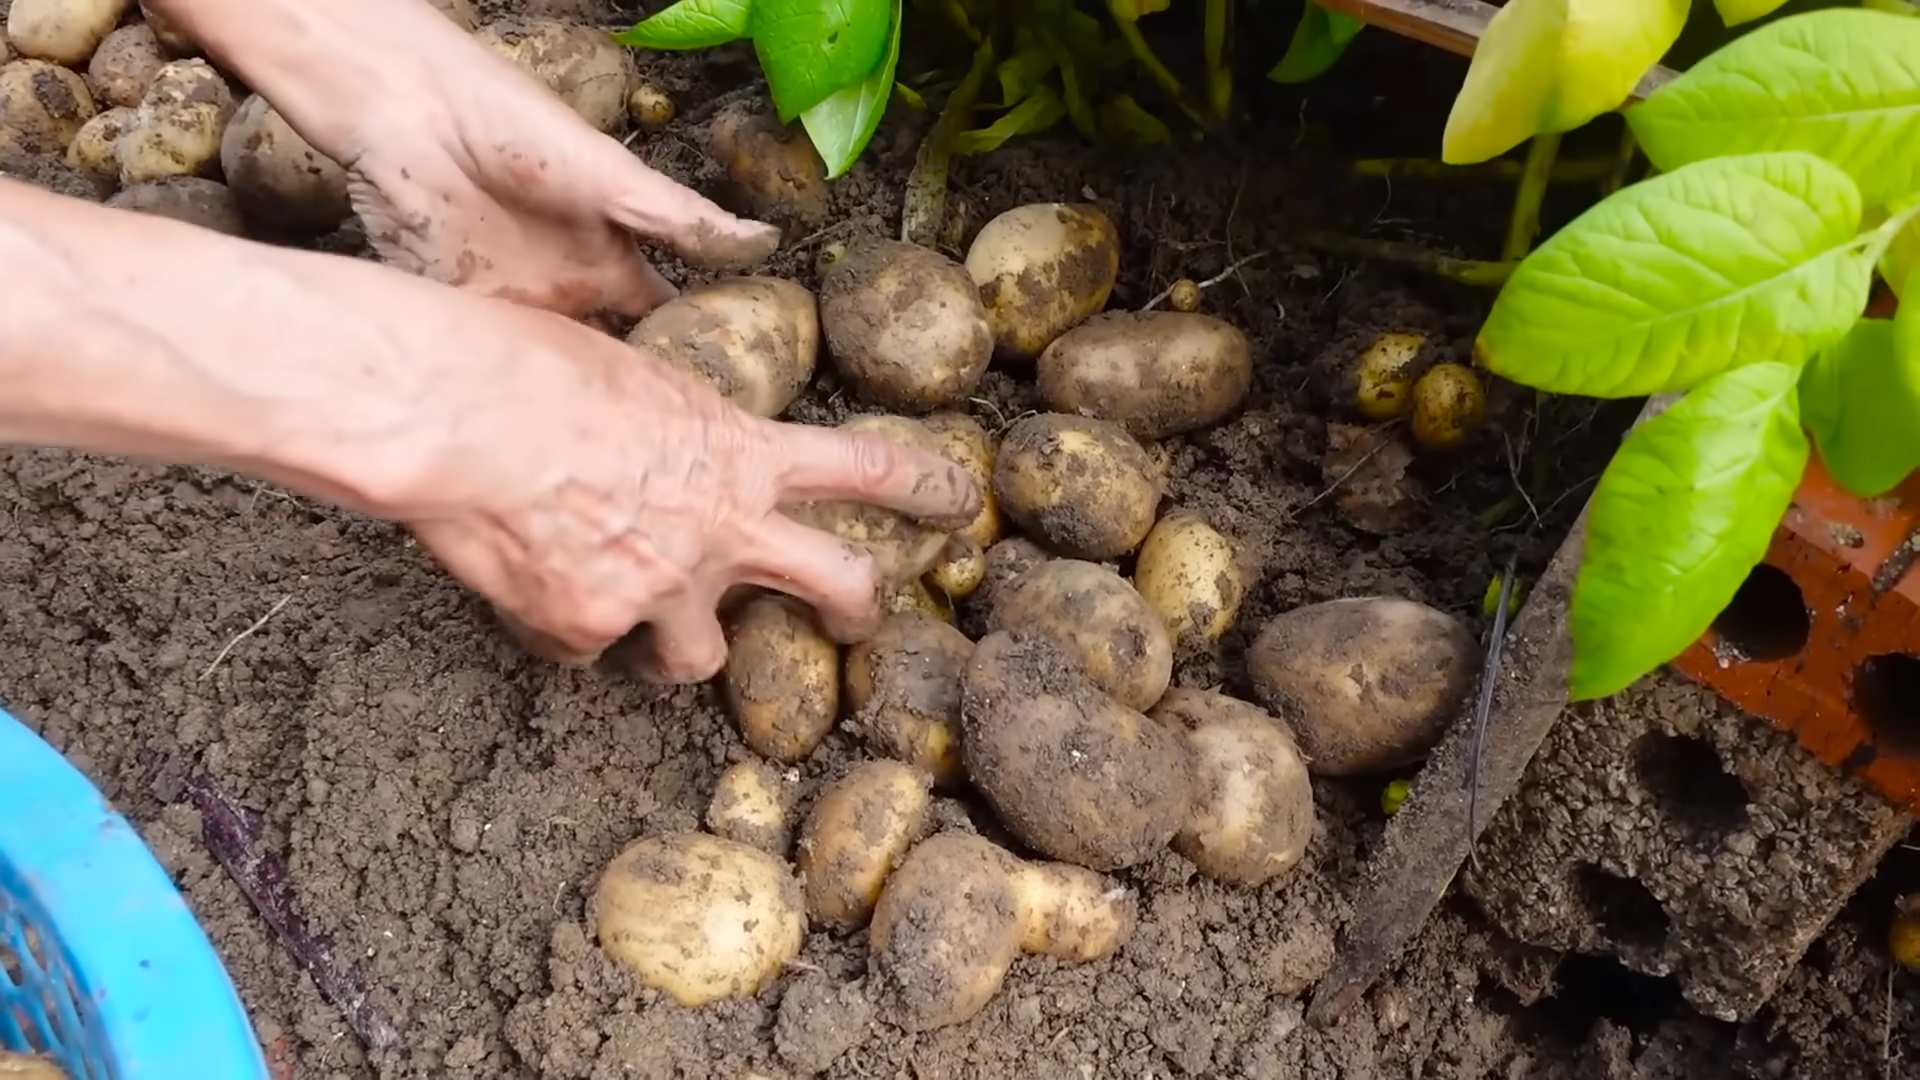
Harvesting Your Potatoes
The moment you’ve been waiting for! Knowing when to harvest your potatoes depends on the variety and your desired use.
* New Potatoes: Harvest new potatoes when the plants are flowering or shortly after. The potatoes will be small and tender. Gently dig around the base of the plant to harvest the potatoes, being careful not to damage them.
* Mature Potatoes: Harvest mature potatoes when the plants have died back and the foliage has turned yellow or brown. This usually occurs about 2-3 weeks after flowering.
1. Prepare to Dig: Use a garden fork or shovel to carefully dig up the potatoes. Start a few inches away from the plant stem to avoid damaging the potatoes.
2. Dig Carefully: Gently lift the soil, being careful not to puncture the potatoes.
3. Collect Your Harvest: Collect the potatoes and brush off any excess soil.
4. Curing (for Storage Potatoes): If you plan to store your potatoes, cure them for a week or two in a cool, dark, and well-ventilated place. This helps to toughen the skins and prevent rot.
Storing Your Potatoes
Proper storage is essential for keeping your potatoes fresh and delicious throughout the winter.
* Ideal Conditions: Store potatoes in a cool, dark, and well-ventilated place, such as a root cellar or a cool basement. The ideal temperature is between 40-50°F (4-10°C).
* Avoid Light: Exposure to light can cause potatoes to turn green and produce solanine, a toxic compound.
* Proper Ventilation: Good ventilation helps prevent moisture buildup, which can lead to rot.
* Storage Containers: Store potatoes in burlap sacks, wooden crates, or cardboard boxes.
* Check Regularly: Check your stored potatoes regularly for signs of rot or spoilage. Remove any damaged potatoes to prevent the spread of disease.
Troubleshooting Common Potato Problems
Even with the best care, you might encounter some challenges along the way. Here are a few common problems and how to address them:
* Green Potatoes: As mentioned earlier, green potatoes contain solanine and should not be eaten. This is caused by exposure to light. To prevent greening, hill up the soil around the plants regularly and store potatoes in a dark place.
* Potato Scab: Potato scab is a common soilborne disease that causes rough, corky lesions on the surface of potatoes. To prevent scab, maintain a slightly acidic soil pH (below 6.0) and avoid overwatering.
* Hollow Heart: Hollow heart is a physiological disorder that causes a hollow cavity in the center of the potato. This is often caused by inconsistent watering or rapid growth. To prevent hollow heart, provide consistent moisture and avoid over-fertilizing.
* Pest Infestations: As mentioned earlier, potato beetles and aphids are common potato pests. Monitor your plants regularly and take action promptly to control infestations.
Enjoying Your Homegrown Potatoes
Congratulations
Conclusion
So, there you have it! Growing your own potatoes, even if you’re a complete beginner, is not only achievable but also incredibly rewarding. Forget the bland, store-bought spuds – imagine the satisfaction of harvesting your own crop of flavorful, homegrown potatoes, bursting with freshness and nutrients. This simple DIY trick, starting with seed potatoes and a little patience, unlocks a world of culinary possibilities and connects you directly to the source of your food.
Why is this a must-try? Because it’s more than just growing vegetables; it’s about experiencing the magic of nature firsthand. It’s about understanding where your food comes from and appreciating the effort that goes into producing it. It’s about reducing your carbon footprint by cutting down on transportation and packaging. And, let’s be honest, it’s about bragging rights when you serve up a dish made with potatoes you grew yourself!
But the best part? The versatility! Once you’ve mastered the basics, the possibilities are endless. Experiment with different varieties of seed potatoes – from the classic Russet to the vibrant Yukon Gold or the finger-licking goodness of fingerling potatoes. Try different growing methods – container gardening for small spaces, raised beds for improved drainage, or even the innovative potato tower for maximizing yield.
Consider adding companion plants like marigolds to deter pests or basil to enhance flavor. You can also adjust your fertilization schedule based on your soil type and the specific needs of your potato variety. Don’t be afraid to get creative and tailor the process to your own unique environment and preferences.
And remember, growing potatoes is a journey, not a destination. There will be challenges along the way – pests, diseases, weather fluctuations – but these are all opportunities to learn and grow (pun intended!). Embrace the process, celebrate your successes, and don’t be discouraged by setbacks.
We wholeheartedly encourage you to give this DIY potato growing trick a try. It’s easier than you think, and the rewards are immeasurable. Imagine the taste of freshly dug new potatoes, steamed and drizzled with butter, or the satisfaction of making homemade potato chips from your own harvest. The possibilities are truly endless.
So, grab some seed potatoes, prepare your soil, and get ready to embark on a rewarding gardening adventure. And most importantly, don’t forget to share your experiences with us! We’d love to hear about your successes, your challenges, and your favorite ways to enjoy your homegrown potatoes. Share your photos, tips, and recipes in the comments below – let’s build a community of potato-growing enthusiasts! Let’s all discover the joy of growing potatoes.
Frequently Asked Questions (FAQ)
What exactly are seed potatoes, and are they different from regular potatoes?
Seed potatoes are specifically grown to be planted and produce new potato plants. They are essentially potato tubers that have several “eyes” or buds, which will sprout and develop into stems and roots. While you *can* technically plant a regular potato from the grocery store, seed potatoes are certified to be disease-free and are more likely to produce a healthy and abundant crop. Grocery store potatoes may have been treated to prevent sprouting, which can hinder their ability to grow. It’s always best to invest in certified seed potatoes from a reputable source for the best results.
How much space do I need to grow potatoes?
The amount of space required depends on the variety of potato and the growing method you choose. Generally, you’ll need about 12-18 inches between plants in a row and 30-36 inches between rows. If you’re growing in containers, a 5-gallon bucket or larger is recommended for each plant. For potato towers, the footprint is relatively small, but you’ll need to ensure the structure is stable and can support the weight of the growing potatoes and soil. Consider the mature size of the potato variety you’re planting when determining spacing. Smaller varieties like fingerling potatoes can be planted closer together than larger varieties like Russets.
What kind of soil is best for growing potatoes?
Potatoes prefer well-drained, loose soil that is rich in organic matter. A slightly acidic soil pH of 6.0 to 6.5 is ideal. Amend your soil with compost or well-rotted manure before planting to improve drainage and fertility. Avoid heavy clay soils, as they can become waterlogged and hinder potato development. If you have clay soil, consider growing potatoes in raised beds or containers with a well-draining potting mix. Good drainage is crucial to prevent diseases like potato rot.
How often should I water my potato plants?
Water your potato plants regularly, especially during dry periods. Aim to keep the soil consistently moist but not waterlogged. Water deeply and less frequently, rather than shallowly and more often. The frequency of watering will depend on your climate, soil type, and the stage of growth. Young plants need less water than mature plants that are actively producing tubers. Check the soil moisture regularly by sticking your finger into the soil a few inches deep. If it feels dry, it’s time to water.
What are common potato pests and diseases, and how can I prevent them?
Common potato pests include potato beetles, aphids, and flea beetles. Diseases include early blight, late blight, and potato scab. To prevent pests and diseases, practice good garden hygiene, such as removing weeds and debris that can harbor pests and diseases. Rotate your crops each year to prevent soilborne diseases from building up. Use certified disease-free seed potatoes. Consider using organic pest control methods, such as insecticidal soap or neem oil, to control pests. For diseases, ensure good air circulation around your plants and avoid overhead watering, which can promote fungal growth. If you notice signs of disease, remove affected leaves or plants immediately to prevent the spread.
When is the best time to harvest my potatoes?
The timing of harvest depends on the variety of potato and whether you want “new potatoes” or mature potatoes. New potatoes can be harvested a few weeks after flowering, when the tubers are small and tender. Mature potatoes are typically harvested in the fall, after the foliage has died back. To check if your potatoes are ready for harvest, dig up a test plant and examine the tubers. If the skins are thick and firm, they are ready to be harvested. Store mature potatoes in a cool, dark, and dry place to prevent sprouting.
Can I grow potatoes in containers?
Yes, growing potatoes in containers is a great option for those with limited space. Choose a large container, at least 5 gallons in size, with drainage holes. Use a well-draining potting mix and plant your seed potatoes about 4 inches deep. As the plants grow, add more soil to the container, burying the stems to encourage more tuber production. Water regularly and fertilize as needed. Container-grown potatoes may require more frequent watering and fertilization than those grown in the ground.
What are some good companion plants for potatoes?
Companion planting can help deter pests, attract beneficial insects, and improve the overall health of your potato plants. Some good companion plants for potatoes include:
* Marigolds: Deter nematodes and other soil pests.
* Basil: Repels potato beetles and other insects.
* Beans: Fix nitrogen in the soil, which can benefit potato growth.
* Garlic: Repels aphids and other pests.
* Horseradish: Is said to deter potato blight.
Avoid planting potatoes near tomatoes, cucumbers, raspberries, sunflowers, and members of the cabbage family, as they can compete for nutrients or attract similar pests and diseases.
Leave a Comment