

Potatoes: no garden, no money? No problem! Ever dreamt of harvesting your own creamy, earthy potatoes, but thought you needed acres of land and a hefty investment? Think again! This DIY guide is your ticket to spud-tastic success, even if you’re short on space and cash.
For centuries, potatoes have been a staple food around the globe, nourishing communities and fueling civilizations. From the Andean highlands where they originated, to the humble gardens of today, potatoes represent resilience and resourcefulness. But you don’t need to be a seasoned farmer to enjoy the fruits (or rather, tubers!) of your labor.
In today’s world, many of us are looking for ways to connect with nature, grow our own food, and save a few bucks along the way. That’s where this article comes in. I’m going to show you simple, ingenious methods for growing potatoes, even if you live in an apartment, have a tiny balcony, or are on a tight budget. Forget expensive gardening equipment and sprawling plots – we’re talking about creative solutions using everyday materials.
Why spend money on store-bought potatoes when you can cultivate your own delicious crop with minimal effort and maximum satisfaction? Get ready to unleash your inner gardener and discover the joy of growing potatoes, no matter your circumstances. Let’s get started!
Growing Potatoes in a Bucket: A Beginner’s Guide
Hey there, fellow gardening enthusiasts! So, you’re itching to grow your own potatoes but lack a garden and are on a tight budget? No problem! I’m here to show you how to cultivate a bountiful potato harvest right in a bucket. It’s easier than you think, and incredibly rewarding. Let’s get our hands dirty (figuratively, for now!).
What You’ll Need
Before we dive in, let’s gather our supplies. The beauty of this method is that it’s super adaptable, so don’t stress if you can’t find *exactly* what I list.
* A Large Bucket: Aim for a 5-gallon bucket or larger. The bigger, the better, as it gives the potatoes more room to grow. You can often find these for free or very cheap at local restaurants, bakeries, or even construction sites (just ask!). Make sure it’s clean!
* Potato “Seed”: These aren’t actual seeds, but rather small potatoes or pieces of potato with “eyes” (those little buds that sprout). You can buy certified seed potatoes from a garden center, or you can use organic potatoes from the grocery store that have started to sprout. Avoid using potatoes that have been treated with sprout inhibitors.
* Potting Mix: A good quality potting mix is essential. It needs to be well-draining to prevent the potatoes from rotting. Don’t use garden soil directly, as it can become compacted in a bucket.
* Water: Obvious, but crucial!
* Fertilizer (Optional): A balanced, slow-release fertilizer can give your potatoes a boost, but it’s not strictly necessary. I’ve had success both with and without it.
* Drill (Optional): If your bucket doesn’t have drainage holes, you’ll need a drill to create some.
* Mulch (Optional): Straw or wood chips can help retain moisture and suppress weeds.
Preparing Your Seed Potatoes
This step is crucial for getting a good start.
* Chitting (Sprouting): If your seed potatoes haven’t already sprouted, you’ll want to encourage them to do so. This process is called “chitting.” Place the potatoes in a cool, bright location (but not direct sunlight) for a week or two. You’ll see small, green sprouts (eyes) emerge.
* Cutting (If Necessary): If you’re using larger potatoes, you can cut them into pieces, ensuring that each piece has at least two or three eyes. Let the cut pieces dry for a day or two to callous over. This helps prevent rotting. I usually aim for pieces about the size of a golf ball.
Planting Your Potatoes
Now for the fun part!
1. Drill Drainage Holes: If your bucket doesn’t have them, drill several drainage holes in the bottom. This is vital to prevent waterlogging, which can kill your potato plants.
2. Add Potting Mix: Fill the bottom of the bucket with about 4-6 inches of potting mix.
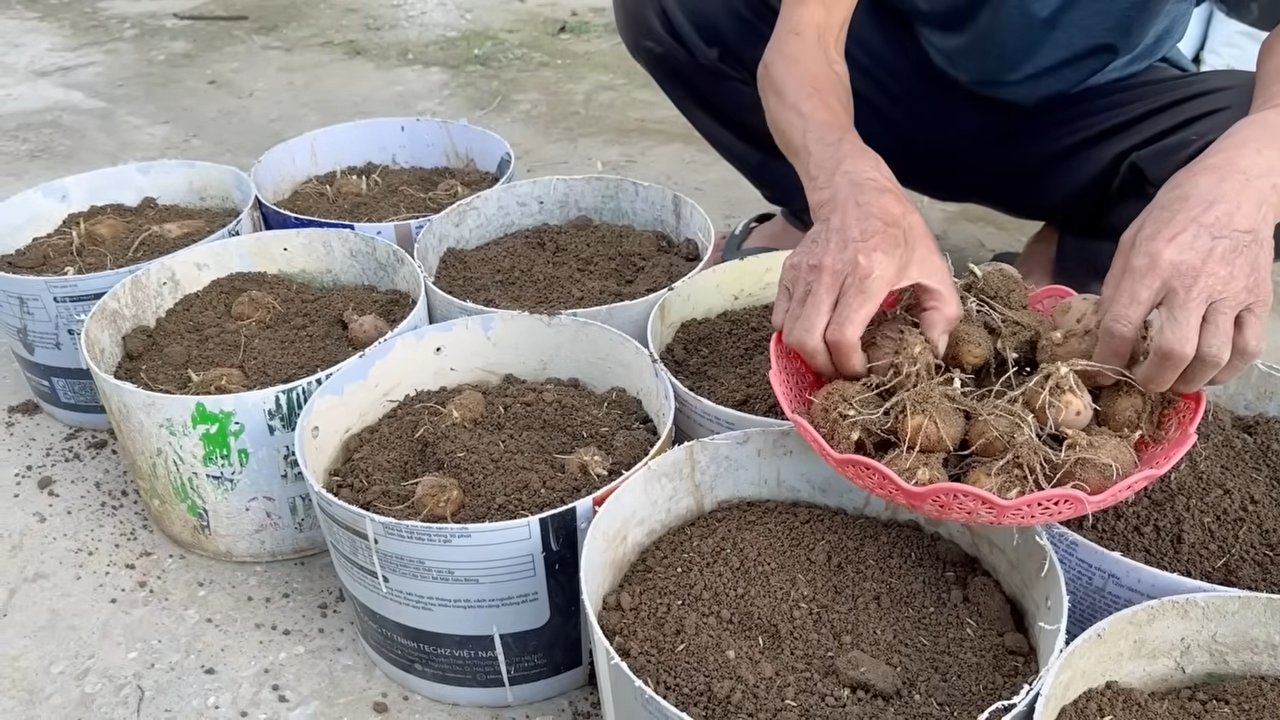
3. Plant the Seed Potatoes: Place the seed potato pieces (or small whole potatoes) on top of the potting mix, with the eyes facing upwards. Space them evenly if you’re planting multiple pieces in one bucket. I usually plant 2-3 pieces in a 5-gallon bucket.
4. Cover with More Potting Mix: Cover the seed potatoes with another 4-6 inches of potting mix.
5. Water Thoroughly: Water the soil until it’s moist but not soggy.
“Hilling” Your Potatoes
This is the secret to maximizing your potato yield! As the potato plants grow, you’ll need to add more soil to encourage more potatoes to form along the stem. This is called “hilling.”
1. Wait for Growth: Once the potato plants have grown about 6-8 inches tall, it’s time to hill.
2. Add More Potting Mix: Add enough potting mix to cover the stems, leaving only the top few leaves exposed.
3. Repeat: Continue this process every few weeks as the plants grow, until the bucket is almost full. The more you hill, the more potatoes you’ll get!
4. Water Regularly: Keep the soil consistently moist, but not waterlogged. Check the soil moisture by sticking your finger a couple of inches into the soil. If it feels dry, it’s time to water.
Caring for Your Potato Plants
A little TLC goes a long way.
* Sunlight: Potatoes need at least 6 hours of sunlight per day. Place your bucket in a sunny location.
* Watering: As mentioned earlier, water regularly, especially during hot weather.
* Fertilizing (Optional): If you’re using fertilizer, follow the instructions on the package. I usually fertilize every few weeks with a balanced liquid fertilizer.
* Pest Control: Keep an eye out for pests like aphids or potato beetles. If you spot any, you can try hand-picking them off or using an organic insecticide.
* Disease Prevention: Good air circulation can help prevent fungal diseases. Avoid overcrowding the plants and ensure the bucket is in a well-ventilated area.
Harvesting Your Potatoes
The moment we’ve all been waiting for!
1. Signs of Maturity: The potato plants will start to flower, and the foliage will eventually turn yellow and die back. This is a sign that the potatoes are ready to harvest.
2. Stop Watering: A week or two before harvesting, stop watering the plants. This will help the potato skins to harden.
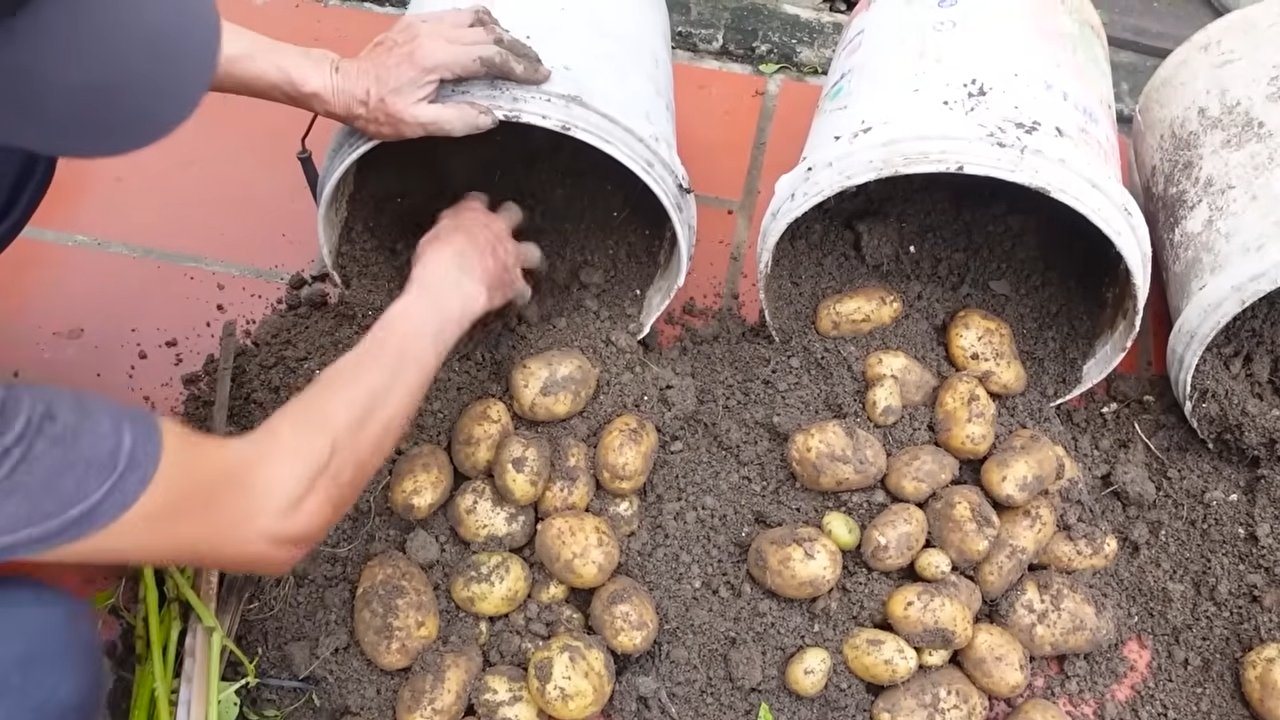
3. Harvesting: The easiest way to harvest is to simply dump the bucket onto a tarp or large sheet. Then, carefully sift through the soil and collect your potatoes! You can also reach into the bucket and carefully dig around the edges to harvest potatoes without disturbing the entire plant. This allows you to harvest some “new potatoes” (small, tender potatoes) while leaving the rest to continue growing.
4. Curing (Optional): If you plan to store your potatoes for a longer period, you can cure them. Spread the potatoes out in a cool, dark, and well-ventilated place for a week or two. This will help the skins to toughen up and prevent rotting.
Troubleshooting
Even with the best intentions, things can sometimes go wrong. Here are a few common issues and how to address them:
* Yellowing Leaves: This can be caused by overwatering, underwatering, nutrient deficiencies, or pests. Check the soil moisture and adjust your watering accordingly. If you suspect a nutrient deficiency, try fertilizing with a balanced fertilizer. Inspect the plants for pests and take appropriate action.
* Rotting Potatoes: This is usually caused by overwatering or poor drainage. Make sure your bucket has adequate drainage holes and avoid overwatering.
* Small Potatoes: This can be caused by insufficient sunlight, poor soil, or not enough hilling. Ensure the plants are getting at least 6 hours of sunlight per day. Use a good quality potting mix and hill the plants regularly.
* No Potatoes: This can be caused by using potatoes that have been treated with sprout inhibitors, planting too late in the season, or not providing enough sunlight or water. Use organic potatoes that have sprouted, plant at the appropriate time of year for your region, and ensure the plants are getting enough sunlight and water.
Tips for Success
Here are a few extra tips to help you grow a bumper crop of potatoes in a bucket:
* Choose the Right Potato Variety: Some potato varieties are better suited for container growing than others. Look for varieties that are compact and early-maturing.
* Rotate Your Crops: Avoid planting potatoes in the same bucket year after year. This can help prevent soilborne diseases.
* Use a Soil Thermometer: Potatoes prefer soil temperatures between 60 and 70 degrees Fahrenheit. A soil thermometer can help you monitor the soil temperature and ensure it’s optimal for growth.
* Don’t Be Afraid to Experiment: Gardening is all about experimentation. Try different potato varieties, fertilizers, and watering techniques to see what works best for you.
Growing potatoes in a bucket is a fun and rewarding experience. With a little bit of effort, you can enjoy fresh, homegrown potatoes even without a garden. So, grab a bucket, some seed potatoes, and get growing! Happy gardening!
Conclusion
So, there you have it! Growing your own potatoes without a garden and on a budget is not only possible, it’s incredibly rewarding. This DIY potato growing trick transforms the seemingly impossible into a tangible, delicious reality. Forget the sprawling garden plots and the hefty price tags associated with traditional gardening; all you need is a container, some soil, seed potatoes (or even sprouted potatoes from your pantry!), and a little bit of patience.
Why is this a must-try? Because it democratizes gardening. It empowers anyone, regardless of their living situation or financial constraints, to experience the joy of nurturing life and harvesting their own food. Imagine the satisfaction of digging into a container and unearthing a bounty of fresh, homegrown potatoes, knowing you cultivated them yourself with minimal resources. It’s a connection to nature, a lesson in sustainability, and a delicious way to supplement your meals.
But the beauty of this method lies in its adaptability. Feel free to experiment with different container sizes. Larger containers will generally yield more potatoes, but even a smaller bucket can produce a surprising harvest. Consider using different types of soil mixes. While a basic potting mix works well, you can enrich it with compost or other organic matter to boost nutrient content. And don’t be afraid to get creative with your potato varieties! From classic Russets to colorful fingerlings, each type offers a unique flavor and texture. You can even try growing sweet potatoes using a similar container method.
This DIY potato growing trick is more than just a gardening hack; it’s a gateway to a more sustainable and fulfilling lifestyle. It’s a chance to reconnect with the earth, to learn about the natural world, and to enjoy the fruits (or rather, the tubers!) of your labor.
We wholeheartedly encourage you to give this a try. It’s a simple, affordable, and incredibly satisfying project that can bring a touch of nature into your home, no matter where you live. And once you’ve harvested your first batch of homegrown potatoes, we’d love to hear about your experience! Share your photos, tips, and stories in the comments below. Let’s build a community of urban potato growers and inspire others to embrace the joy of DIY gardening. What are you waiting for? Get planting!
Frequently Asked Questions (FAQ)
What kind of potatoes can I grow using this method?
You can grow almost any type of potato in a container! However, some varieties are better suited for container growing than others. Determinate varieties, which produce potatoes in a single layer, are generally easier to manage in containers. Popular choices include Yukon Gold, Red Pontiac, and Irish Cobbler. Indeterminate varieties, which produce potatoes along the stem as it grows, can also be grown in containers, but they require more hilling (adding soil to the stem as it grows) and may need larger containers. Fingerling potatoes are also a great option for container gardening. Experiment and see what works best for you!
How do I prepare my seed potatoes?
Seed potatoes are potatoes specifically grown for planting. You can purchase them from garden centers or online retailers. If you’re using potatoes from your pantry, look for ones that have developed “eyes” or sprouts. To encourage sprouting, place the potatoes in a cool, bright location for a week or two. Once the sprouts are about an inch long, you can cut the potatoes into pieces, ensuring that each piece has at least one or two eyes. Let the cut pieces dry for a day or two to prevent rotting. This process is called “chitting” and helps to give your potatoes a head start.
What kind of soil should I use?
A well-draining potting mix is essential for growing potatoes in containers. Avoid using garden soil, as it can be too heavy and compact, leading to drainage problems. A good potting mix will retain moisture while allowing excess water to drain away. You can also amend your potting mix with compost or other organic matter to improve its fertility and drainage. A mix of equal parts potting soil, compost, and perlite or vermiculite is a good starting point.
How much sunlight do potatoes need?
Potatoes need at least six hours of sunlight per day to thrive. Choose a location that receives plenty of direct sunlight. If you’re growing your potatoes indoors, you may need to supplement with grow lights. Rotate the container regularly to ensure that all sides of the plant receive adequate sunlight.
How often should I water my potatoes?
Water your potatoes regularly, especially during hot, dry weather. The soil should be consistently moist but not waterlogged. Check the soil moisture by sticking your finger into the soil. If the top inch or two feels dry, it’s time to water. Avoid overwatering, as this can lead to root rot.
How do I “hill” my potatoes?
Hilling is the process of adding soil to the stem of the potato plant as it grows. This encourages the plant to produce more potatoes along the stem. When the potato plant is about 6 inches tall, add a few inches of soil to the container, covering the lower part of the stem. Repeat this process every few weeks as the plant grows, until the container is almost full.
When are my potatoes ready to harvest?
The time it takes for potatoes to mature depends on the variety and growing conditions. Generally, potatoes are ready to harvest about 70-90 days after planting. You can harvest “new potatoes” (small, immature potatoes) earlier, about 60 days after planting. To harvest, simply dig into the container and carefully remove the potatoes.
What if I don’t have seed potatoes?
No problem! You can use potatoes from your pantry that have started to sprout. Just make sure they are organic to avoid any sprout inhibitors. Follow the same steps for preparing seed potatoes, cutting them into pieces with at least one or two eyes each and letting them dry before planting.
Can I grow potatoes in a bag?
Yes, growing potatoes in a bag is a popular and effective method. Use a large, sturdy bag made of burlap or a similar material. Follow the same steps for planting and hilling as you would for a container. Bags are often more portable than containers, making it easier to move your potatoes to a sunny location.
What are some common problems when growing potatoes in containers?
Some common problems include pests, diseases, and nutrient deficiencies. Keep an eye out for pests like aphids, potato beetles, and flea beetles. You can control these pests with organic insecticides or by handpicking them off the plants. Diseases like early blight and late blight can also affect potatoes. Prevent these diseases by providing good air circulation and avoiding overwatering. If you notice yellowing leaves or stunted growth, your potatoes may be lacking nutrients. Fertilize with a balanced fertilizer or compost tea.
How do I store my harvested potatoes?
Store your harvested potatoes in a cool, dark, and dry place. A root cellar is ideal, but a basement or garage can also work. Avoid storing potatoes in the refrigerator, as this can cause them to develop a sweet taste. Properly stored potatoes can last for several months.
Can I reuse the soil from my potato container?
It’s generally not recommended to reuse soil from a potato container for growing potatoes again in the same container the following year. Potatoes can deplete the soil of nutrients and may leave behind pathogens that can affect future crops. However, you can reuse the soil for other plants that are not susceptible to the same diseases. You can also amend the soil with compost and other organic matter to replenish its nutrients.

Leave a Comment