

Quick Cleaning Hacks: Time Saving – that’s what we all crave, isn’t it? Imagine reclaiming hours each week, simply by tweaking your cleaning routine. No more spending your precious weekends scrubbing away grime! We’ve all been there, staring at a mountain of mess, feeling overwhelmed and defeated. But what if I told you that cleaning doesn’t have to be a dreaded chore?
For generations, clever homemakers have passed down their secret cleaning shortcuts, often born out of necessity and a desire to maximize their time. Think about it – before the age of fancy cleaning products, resourcefulness was key. These time-tested methods, often using simple household ingredients, are just as effective today.
In today’s fast-paced world, time is our most valuable commodity. That’s why mastering these quick cleaning hacks: time saving strategies is so crucial. You’ll not only free up your schedule for the things you truly enjoy, but you’ll also reduce stress and create a more peaceful and inviting home environment. Ready to ditch the endless scrubbing and embrace a smarter, more efficient way to clean? Let’s dive into some game-changing DIY cleaning tricks that will revolutionize your routine!
Quick Cleaning Hacks: Save Time and Shine!
Hey everyone! Let’s face it, cleaning isn’t exactly anyone’s favorite pastime. But a clean home is a happy home, right? So, I’ve compiled some of my absolute favorite quick cleaning hacks that will save you time and effort, leaving you with a sparkling space and more free time to enjoy it!
Hack 1: Microwave Magic – Steam Cleaning Power!
This is a game-changer for tackling stubborn microwave messes. Forget scrubbing for ages!
- The Problem: Baked-on food splatters that seem impossible to remove.
- The Solution: Harness the power of steam!
- Time Saved: At least 15 minutes of scrubbing!
Step-by-Step Instructions:
- Prepare Your Cleaning Solution: In a microwave-safe bowl, combine 1 cup of water with 2 tablespoons of white vinegar or lemon juice. I personally love lemon juice for the fresh scent!
- Microwave It: Place the bowl in the microwave and heat on high for 5-7 minutes. You want the water to boil and create a good amount of steam.
- Let It Sit: Leave the microwave door closed for another 3-5 minutes. This allows the steam to loosen all the grime. Don’t peek!
- Wipe Away the Mess: Carefully remove the bowl (it will be hot!). Use a clean cloth or sponge to easily wipe away the loosened food particles. You’ll be amazed at how easily everything comes off!
- Final Touches: For any stubborn spots, you can use the same cloth dipped in the remaining water/vinegar or lemon juice mixture.
Hack 2: Shower Head Sparkle – Vinegar Soak!
Hard water deposits can really clog up your shower head and reduce water pressure. This hack is super simple and effective.
- The Problem: Clogged shower head with mineral buildup.
- The Solution: A vinegar soak to dissolve the deposits.
- Time Saved: Avoid buying a new shower head or spending hours scrubbing.
Step-by-Step Instructions:
- Gather Your Supplies: You’ll need a plastic bag (a Ziploc bag works great), white vinegar, and a rubber band or twist tie.
- Fill the Bag: Pour enough white vinegar into the plastic bag to completely submerge the shower head.
- Secure the Bag: Carefully attach the bag to the shower head, ensuring the shower head is fully immersed in the vinegar. Use the rubber band or twist tie to secure the bag tightly.
- Soak Overnight: Let the shower head soak in the vinegar overnight (or for at least a few hours). This gives the vinegar ample time to dissolve the mineral deposits.
- Remove and Rinse: Remove the bag and discard the vinegar. Turn on the shower and let the water run for a few minutes to flush out any remaining vinegar and loosened debris.
- Check and Repeat (If Necessary): If you still notice some buildup, you can repeat the process. For particularly stubborn deposits, you can use an old toothbrush to gently scrub the shower head after soaking.
Hack 3: Blinds Be Gone – Sock It To ‘Em!
Cleaning blinds can be a real pain. This hack makes it much faster and easier.
- The Problem: Dusty and hard-to-reach blinds.
- The Solution: Use an old sock as a duster!
- Time Saved: Significantly reduces the time spent dusting each individual slat.
Step-by-Step Instructions:
- Gather Your Supplies: You’ll need an old sock (preferably cotton or microfiber), a spray bottle with water or a cleaning solution (optional), and a bowl of water (optional).
- Prepare the Sock: Dampen the sock slightly with water or your preferred cleaning solution. You can either spray the sock directly or dip it in a bowl of water and wring out the excess. A slightly damp sock will attract dust more effectively.
- Dust the Blinds: Slip the sock onto your hand like a glove. Use your fingers to pinch each slat of the blind and wipe from one end to the other. The sock will trap the dust and dirt.
- Rinse and Repeat: As the sock gets dirty, rinse it in the bowl of water (if using) or replace it with a clean sock. Continue dusting each slat until all the blinds are clean.
- Dry (Optional): If you used a lot of water, you can use a dry sock to wipe down the blinds and remove any excess moisture.
Hack 4: Garbage Disposal Refresh – Citrus Power!
A smelly garbage disposal can stink up your whole kitchen. This hack uses natural ingredients to freshen it up.
- The Problem: A smelly garbage disposal.
- The Solution: Use citrus peels and ice to clean and deodorize.
- Time Saved: Avoid using harsh chemicals and expensive disposal cleaners.
Step-by-Step Instructions:
- Gather Your Citrus Peels: Save the peels from lemons, limes, oranges, or grapefruits. Citrus peels contain natural oils that help to break down grease and deodorize.
- Add Ice Cubes: Fill the garbage disposal with ice cubes. The ice helps to scrub the sides of the disposal and dislodge any stuck-on food particles.
- Add Citrus Peels: Toss the citrus peels into the disposal along with the ice.
- Run the Disposal: Turn on the cold water and run the garbage disposal for about 30 seconds to a minute. The ice and citrus peels will grind together, cleaning and freshening the disposal.
- Repeat (If Necessary): If the disposal is still smelly, you can repeat the process. You can also add a small amount of baking soda to the disposal before running it for extra deodorizing power.
Hack 5: Stainless Steel Shine – Olive Oil Magic!
This hack will leave your stainless steel appliances looking brand new.
- The Problem: Streaky and smudged stainless steel appliances.
- The Solution: Use olive oil to polish and protect.
- Time Saved: Avoid using expensive stainless steel cleaners.
Step-by-Step Instructions:
- Clean the Surface: First, wipe down your stainless steel appliances with a damp cloth to remove any loose dirt or debris.
- Apply Olive Oil: Pour a small amount of olive oil onto a clean, soft cloth (microfiber works best). You only need a very small amount – a little goes a long way!
- Polish the Surface: Gently rub the olive oil onto the stainless steel surface, following the grain of the metal. Use circular motions to buff the surface and remove any streaks or smudges.
- Buff with a Clean Cloth: Use a clean, dry cloth to buff the surface and remove any excess olive oil. This will leave your stainless steel appliances with a beautiful, streak-free shine.
Hack 6: Bathtub Bliss – Grapefruit and Salt Scrub!
This is a natural and effective way to clean your bathtub without harsh chemicals.
- The Problem: Soap scum and grime buildup in the bathtub.
- The Solution: Use a grapefruit and salt scrub to naturally clean and deodorize.
- Time Saved: Avoid using harsh chemical cleaners and scrubbing for hours.
Step-by-Step Instructions:
- Prepare the Grapefruit: Cut a grapefruit in half.
- Sprinkle Salt: Sprinkle a generous amount of coarse salt (sea salt or kosher salt works well) onto the cut side of the grapefruit.
- Scrub the Tub: Use the grapefruit half to scrub the bathtub, focusing on areas with soap scum and grime. The salt acts as an abrasive, while the grapefruit juice helps to break down the buildup.
- Rinse Thoroughly: Rinse the bathtub thoroughly with water to remove any remaining salt and grapefruit residue.
- Enjoy Your Sparkling Tub: Your bathtub will be clean, fresh-smelling, and ready for a relaxing soak!
Hack 7: Grout Whitening Wonder – Baking Soda Paste!
Dirty grout can make your whole bathroom look dingy. This hack uses baking soda to brighten it up.
- The Problem: Dirty and discolored grout lines.
- The Solution: Use a baking soda paste to whiten and brighten.
-
Conclusion
So, there you have it! These quick cleaning hacks are more than just time-savers; they’re game-changers for anyone juggling a busy life. We’ve explored simple yet effective methods to reclaim your weekends and enjoy a sparkling clean home without sacrificing precious hours. From the magic of vinegar and baking soda to the surprisingly versatile power of lemon, these DIY solutions are not only budget-friendly but also environmentally conscious, reducing your reliance on harsh chemicals.
Why is this a must-try? Because it’s about more than just cleanliness; it’s about reclaiming your time and reducing stress. Imagine spending your Saturday relaxing with loved ones instead of scrubbing floors. These hacks make that a reality. They are designed to fit seamlessly into your existing routine, requiring minimal effort for maximum impact.
But don’t stop there! Feel free to experiment and adapt these hacks to suit your specific needs and preferences. For instance, if you’re not a fan of the vinegar smell, add a few drops of your favorite essential oil to the cleaning solution. Lavender, lemon, or eucalyptus can provide a refreshing and natural fragrance. You can also try using different types of cloths for dusting – microfiber cloths are excellent for trapping dust and preventing it from spreading. For stubborn stains, consider creating a paste of baking soda and water and letting it sit on the stain for a few minutes before scrubbing.
Another variation to consider is using these hacks for specific areas of your home. For example, the lemon hack works wonders on shower doors, removing soap scum and leaving them sparkling clean. The baking soda and vinegar combination is perfect for unclogging drains and eliminating odors. And the microfiber cloth trick is ideal for dusting delicate surfaces like electronics and furniture.
We truly believe that incorporating these quick cleaning hacks into your routine will transform your cleaning experience. It’s about working smarter, not harder, and achieving a clean and comfortable home without feeling overwhelmed.
Now, it’s your turn! We encourage you to try these DIY tricks and see the difference they can make in your own home. Don’t be afraid to experiment and find what works best for you. And most importantly, share your experience with us! We’d love to hear your feedback, tips, and variations. Let us know which hacks you found most effective, any challenges you encountered, and any creative solutions you came up with. Your insights can help others discover the joy of quick and easy cleaning.
Remember, a clean home is a happy home, and with these quick cleaning hacks, you can achieve that happiness without spending hours scrubbing and cleaning. So, go ahead, give them a try, and let us know what you think! We’re confident that you’ll be amazed at the results. Embrace the power of DIY cleaning and enjoy a cleaner, more relaxed, and more fulfilling life.
Frequently Asked Questions (FAQs)
Q: Are these quick cleaning hacks safe for all surfaces?
A: While most of these hacks are generally safe for a wide range of surfaces, it’s always a good idea to test them on a small, inconspicuous area first, especially when dealing with delicate materials like wood, marble, or painted surfaces. Vinegar, for example, is a powerful cleaning agent but can be too acidic for certain types of stone. Baking soda is mildly abrasive and should be used with caution on easily scratched surfaces. When in doubt, consult the manufacturer’s instructions for your specific surfaces.
Q: How often should I use these quick cleaning hacks?
A: The frequency of using these hacks depends on your individual needs and lifestyle. For high-traffic areas like kitchens and bathrooms, you may want to incorporate these hacks into your weekly cleaning routine. For less frequently used areas, such as guest rooms or storage spaces, you can use them as needed. The key is to be consistent and proactive, addressing messes and stains as soon as they occur to prevent them from becoming more difficult to remove later.
Q: Can I use these quick cleaning hacks if I have allergies or sensitivities?
A: If you have allergies or sensitivities, it’s important to be mindful of the ingredients used in these hacks. Vinegar, baking soda, and lemon are generally considered safe and non-toxic, but some individuals may be sensitive to them. If you experience any irritation or allergic reaction, discontinue use immediately and consult with a healthcare professional. You can also try using alternative cleaning agents that are specifically designed for sensitive skin or allergies. Wearing gloves and a mask while cleaning can also help minimize exposure to potential allergens.
Q: What are some other natural cleaning agents I can use?
A: In addition to vinegar, baking soda, and lemon, there are several other natural cleaning agents that you can use to keep your home clean and fresh. Borax is a natural mineral that can be used as a laundry booster, stain remover, and disinfectant. Hydrogen peroxide is a mild antiseptic that can be used to clean and disinfect surfaces. Essential oils, such as tea tree oil, lavender oil, and eucalyptus oil, have antibacterial and antifungal properties and can be added to cleaning solutions for a natural fragrance and added cleaning power.
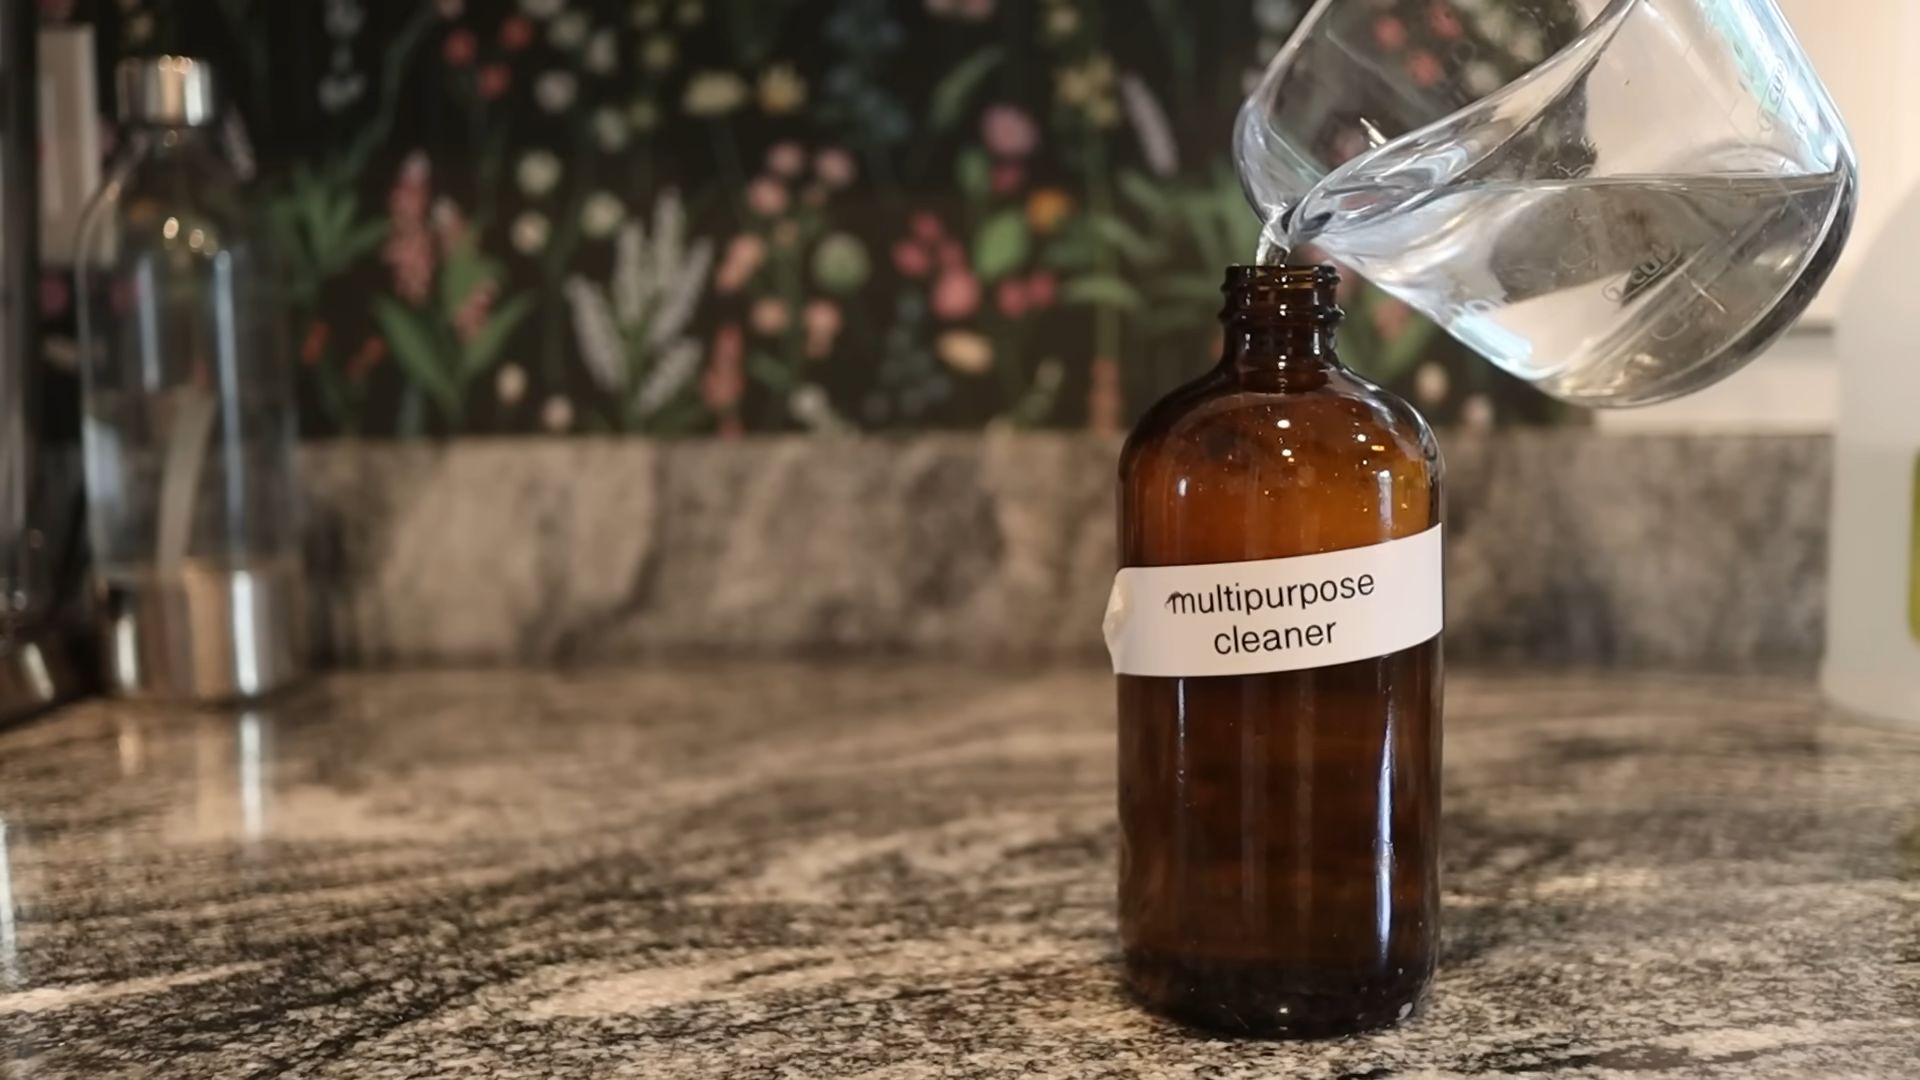
Q: How can I make my own all-purpose cleaner using these quick cleaning hacks?
A: Making your own all-purpose cleaner is easy and cost-effective. Simply combine equal parts of white vinegar and water in a spray bottle. You can add a few drops of your favorite essential oil for fragrance. For a stronger cleaning solution, you can add a tablespoon of baking soda. Shake well before each use and spray on surfaces, then wipe clean with a cloth. This all-purpose cleaner can be used on a variety of surfaces, including countertops, sinks, and floors.
Q: What’s the best way to store these DIY cleaning solutions?
A: It’s important to store your DIY cleaning solutions properly to maintain their effectiveness and prevent spoilage. Store them in airtight containers in a cool, dark place. Label each container clearly with the contents and date of preparation. Avoid storing them in direct sunlight or near heat sources, as this can cause them to degrade. For solutions containing essential oils, use dark-colored glass bottles to protect the oils from light.
Q: Can these quick cleaning hacks help me save money?
A: Absolutely! These quick cleaning hacks can save you a significant amount of money compared to buying commercial cleaning products. Vinegar, baking soda, and lemon are all inexpensive and readily available ingredients. By making your own cleaning solutions, you can avoid the high cost of brand-name products and reduce your reliance on harsh chemicals. Plus, you’ll be reducing your environmental impact by using natural and biodegradable ingredients.
Q: How can I get my kids involved in cleaning using these quick cleaning hacks?
A: Getting kids involved in cleaning can be a fun and educational experience. Start by assigning them age-appropriate tasks, such as dusting, wiping surfaces, or sorting laundry. Make it a game by setting a timer and seeing who can complete their task the fastest. Use natural cleaning agents that are safe for kids to handle. And most importantly, praise their efforts and make it a positive experience. By involving your kids in cleaning, you’ll be teaching them valuable life skills and fostering a sense of responsibility.

Leave a Comment