

Soda Can Crafts Cups: Who knew your empty soda cans could have a fabulous second life? I’m always looking for ways to be more sustainable and creative around the house, and that’s how I stumbled upon the amazing world of upcycling soda cans into adorable and functional cups!
Upcycling, the art of transforming waste materials into something new and useful, has been around for centuries, deeply rooted in cultures that valued resourcefulness. Think about it – our grandparents and great-grandparents were masters of making do, turning scraps into treasures. Now, we’re bringing that spirit back with a modern twist!
Why should you learn these soda can crafts cups tricks? Well, for starters, it’s a fantastic way to reduce waste and contribute to a greener planet. Plus, it’s incredibly satisfying to create something beautiful and practical from something you’d normally toss in the recycling bin. Imagine sipping your morning coffee from a unique, handmade cup that you crafted yourself! It’s a conversation starter, a testament to your creativity, and a budget-friendly way to add a personal touch to your home. In this article, I’ll guide you through easy-to-follow steps to transform those aluminum cans into charming cups that are perfect for everything from picnics to everyday use. Let’s get crafting!
Turning Soda Cans into Stylish and Sustainable Cups: A DIY Guide
Hey there, fellow crafters! Ever looked at a pile of empty soda cans and thought, “There has to be something more I can do with these?” Well, you’re in luck! Today, I’m going to walk you through a super fun and surprisingly easy DIY project: turning those discarded soda cans into cool, reusable cups. Not only is this a great way to reduce waste, but you’ll also end up with some unique and eye-catching drinkware. Let’s get started!
What You’ll Need
Before we dive in, let’s gather all the necessary supplies. Trust me, having everything ready beforehand will make the process much smoother.
* **Empty Soda Cans:** Obviously! Make sure they’re thoroughly rinsed and dried. The more cans you have, the more cups you can make! I usually aim for at least 6-8 cans for a good crafting session.
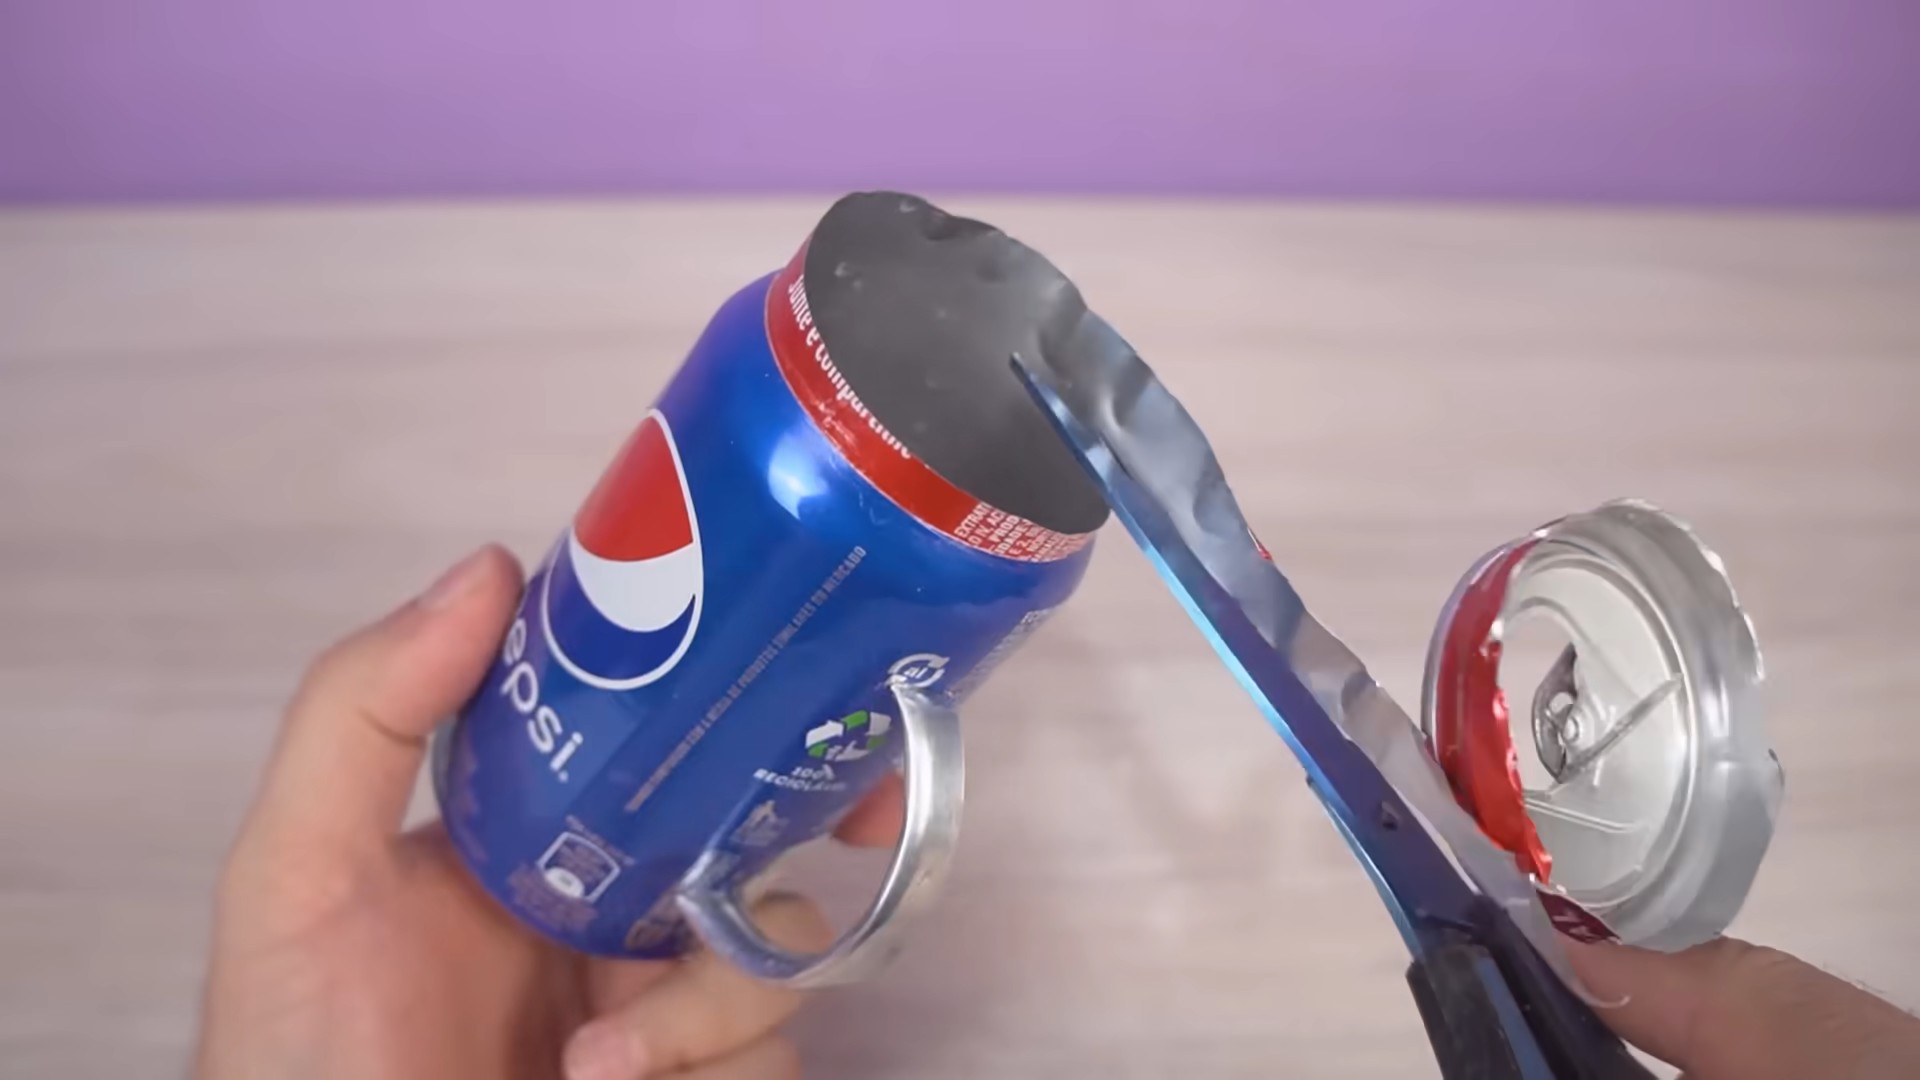
* **Can Opener (Side-Cutting):** This is crucial! A regular can opener will leave a sharp, dangerous edge. A side-cutting can opener, also known as a smooth edge can opener, cuts the lid off from the side, leaving a smooth, safe rim.
* **Scissors:** For trimming any stray edges or making small adjustments.
* **Sandpaper (Fine-Grit):** We’ll use this to smooth out any minor imperfections and ensure a perfectly safe drinking edge. I recommend 220-grit or higher.
* **Pliers (Optional):** These can be helpful for gripping and bending any stubborn edges.
* **Dish Soap and Water:** For a final cleaning after sanding.
* **Towel:** For drying the cups.
* **Optional Decorations:** This is where you can get creative! Consider using:
* **Acrylic Paint:** To personalize your cups with colors and designs.
* **Permanent Markers:** For drawing intricate patterns or adding text.
* **Washi Tape:** For a quick and easy decorative touch.
* **Clear Coat Sealer (Food-Safe):** If you’re using paint or markers, a food-safe sealer will protect your design and ensure it’s safe to drink from.
Preparing the Soda Cans
This is the most important part, as it involves handling sharp edges. Take your time and be extra careful!
1. **Rinse and Dry:** Make sure your soda cans are completely empty and thoroughly rinsed with soap and water. Dry them completely inside and out. Any leftover soda residue can attract bacteria and make the sanding process more difficult.
2. **Remove the Top:** This is where the side-cutting can opener comes in. Position the can opener on the top of the can, ensuring the cutting wheel is aligned with the side seam. Slowly and carefully rotate the can opener around the top, cutting the lid off from the side. The goal is to create a smooth, burr-free edge.
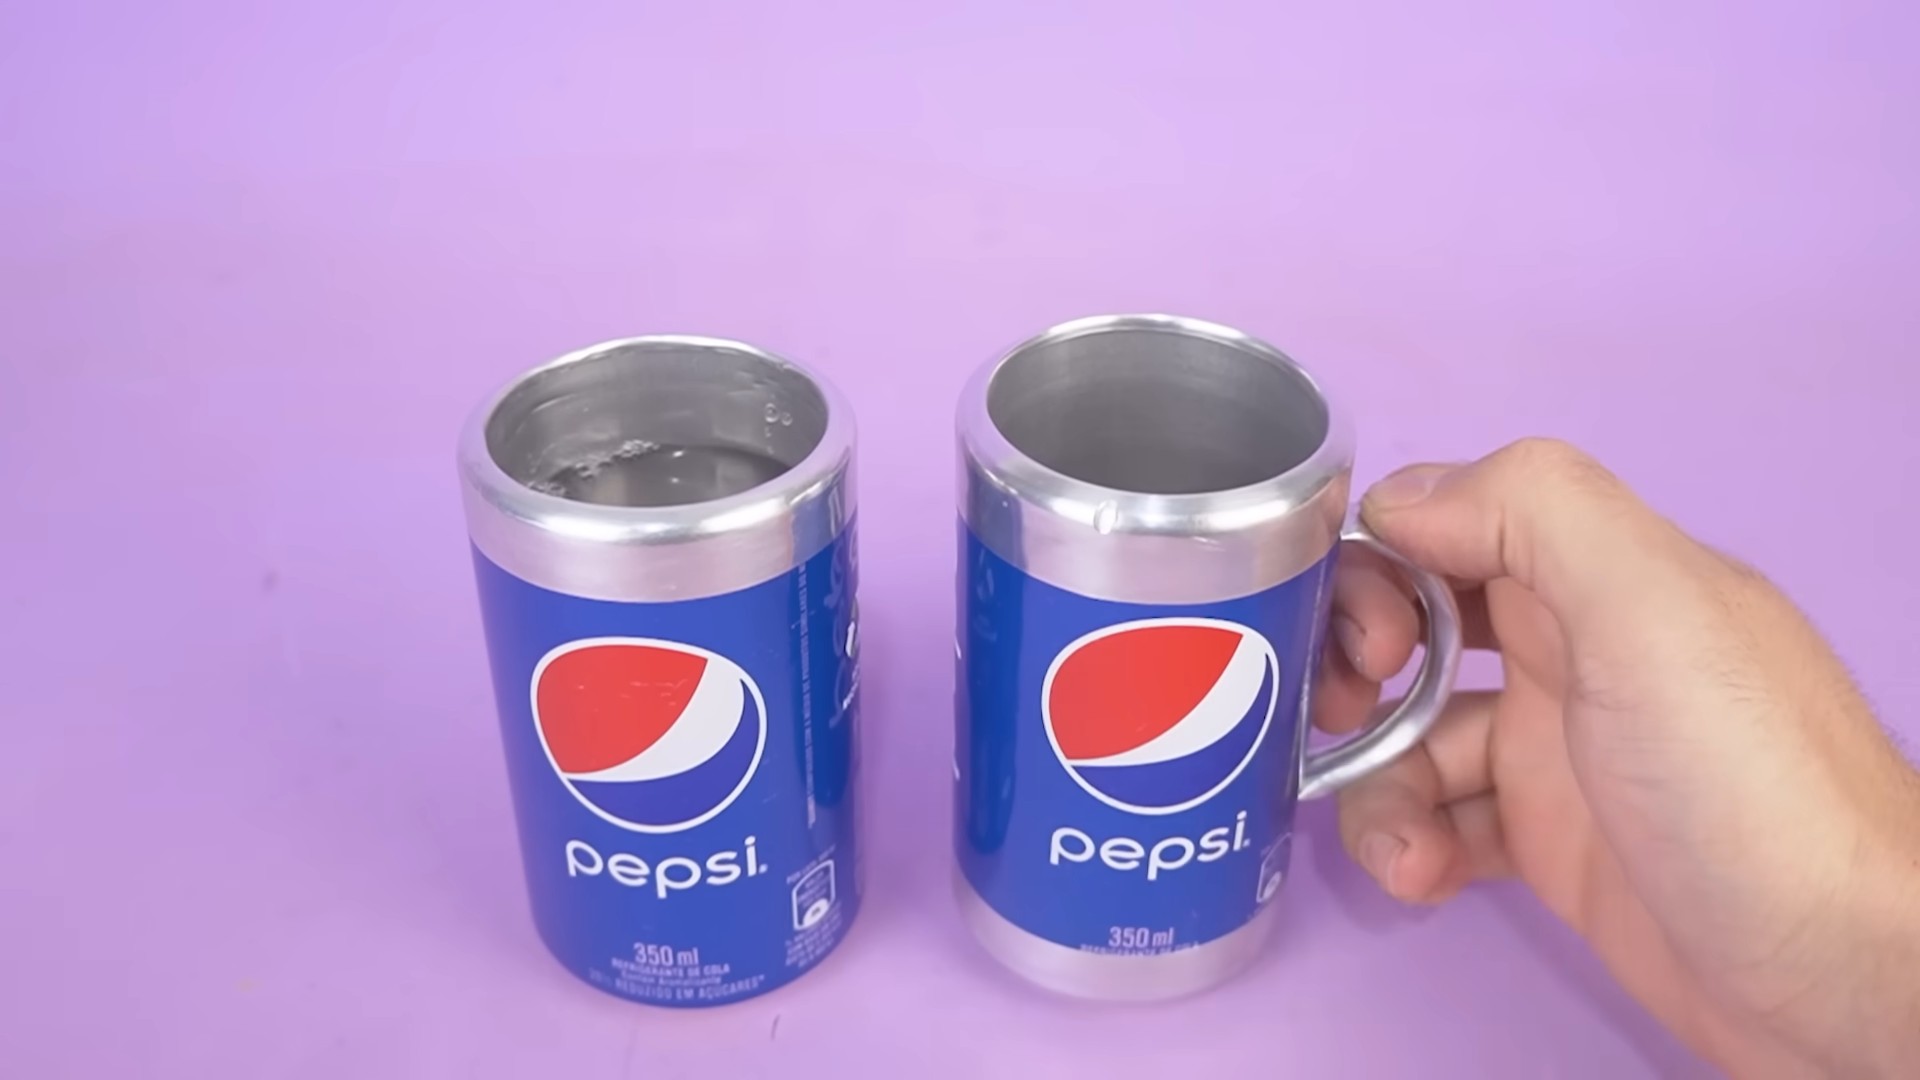
3. **Remove the Bottom (Optional):** Some people prefer to leave the bottom of the can intact for extra stability. However, removing the bottom allows you to create a taller cup or use the can as a sleeve for a glass. If you choose to remove the bottom, repeat step 2 on the bottom of the can.
4. **Inspect the Edges:** Carefully examine the cut edges of the can. Look for any sharp points, burrs, or unevenness. These need to be addressed before moving on to the next step.
Smoothing the Edges: Sanding for Safety
This is where we transform those potentially dangerous edges into smooth, safe rims.
1. **Prepare Your Sanding Area:** Find a well-lit and ventilated area to work in. A workbench or table covered with newspaper is ideal.
2. **Start Sanding:** Take your fine-grit sandpaper and begin sanding the cut edge of the can. Use a gentle, circular motion, applying even pressure. Focus on removing any sharp points or burrs.
3. **Check Your Progress:** Periodically run your finger along the sanded edge to check for smoothness. If you feel any rough spots, continue sanding until they are gone.
4. **Sand the Inside Edge:** Don’t forget to sand the inside edge of the can as well! This is just as important for preventing cuts.
5. **Repeat for All Cans:** Repeat steps 2-4 for all the cans you are turning into cups.
6. **Final Inspection:** Once you’ve sanded all the edges, give each can a final inspection. Run your finger along the entire rim to ensure it’s completely smooth and safe. If you find any remaining rough spots, give them a little extra sanding.
Cleaning and Polishing
Now that the edges are smooth, it’s time to give our cups a good cleaning.
1. **Wash with Soap and Water:** Wash each cup thoroughly with dish soap and warm water. This will remove any metal shavings or residue from the sanding process.
2. **Rinse Thoroughly:** Rinse the cups thoroughly to remove all traces of soap.
3. **Dry Completely:** Use a clean towel to dry the cups completely, both inside and out.
Decorating Your Cups (Optional)
This is where you can let your creativity shine! There are endless possibilities for decorating your soda can cups.
1. **Painting:** If you’re using acrylic paint, apply thin, even coats to the outside of the cup. Let each coat dry completely before applying the next. You can use stencils, freehand designs, or even create abstract patterns.
2. **Markers:** Permanent markers are great for adding intricate details or writing personalized messages on your cups.
3. **Washi Tape:** Washi tape is a quick and easy way to add color and patterns to your cups. Simply wrap the tape around the cup in various designs.
4. **Sealing (Important for Painted/Marked Cups):** If you’ve used paint or markers, it’s essential to seal your design with a food-safe clear coat sealer. This will protect your artwork and ensure it’s safe to drink from. Follow the manufacturer’s instructions for applying the sealer. Usually, this involves spraying a thin, even coat over the entire decorated surface and allowing it to dry completely. You might need to apply multiple coats for optimal protection.
Tips and Tricks for Success
* Choosing the Right Can Opener: Seriously, invest in a good side-cutting can opener. It makes all the difference in the world. A regular can opener will leave a jagged edge that’s difficult and dangerous to smooth out.
* Sanding is Key: Don’t skimp on the sanding! This is the most important step for ensuring the safety of your cups. Take your time and be thorough.
* Start Simple: If you’re new to crafting, start with a simple design. You can always add more details later.
* Protect Your Work Surface: Cover your work surface with newspaper or a drop cloth to protect it from paint and scratches.
* Ventilation is Important: When sanding or using spray paint, work in a well-ventilated area to avoid inhaling harmful fumes.
* Food-Safe Sealant is a Must: If you plan on drinking from your decorated cups, always use a food-safe sealant to protect your design and ensure it’s safe.
* Consider the Size: Soda cans come in different sizes. Choose the size that best suits your needs.
* Experiment with Different Techniques: Don’t be afraid to experiment with different decorating techniques. Try using different colors, patterns, and materials to create unique and personalized cups.
* Let it Dry Completely: Always allow your paint, markers, or sealant to dry completely before using your cups. This will prevent smudging and ensure a long-lasting finish.
* Hand Wash Only: To prolong the life of your decorated cups, hand wash them with mild soap and water. Avoid using abrasive cleaners or putting them in the dishwasher.
* Get Creative with Uses: These cups aren’t just for drinks! You can also use them as pen holders, small planters, or even decorative accents.
Safety First!
Safety is paramount when working with metal. Always wear gloves to protect your hands from sharp edges. Be extra careful when using the can opener and sandpaper. If you’re working with children, supervise them closely and ensure they understand the importance of safety.
And there you have it! You’ve successfully transformed ordinary soda cans into stylish and sustainable cups. Now you can enjoy your favorite beverages in your own unique creations. Happy crafting!
Conclusion
So, there you have it! Transforming humble soda cans into surprisingly stylish and functional cups is not just a fun afternoon project; it’s a testament to the power of resourcefulness and creativity. We’ve walked you through the steps, highlighting the safety precautions and offering tips to ensure a successful and enjoyable crafting experience. But why should you actually try this?
Firstly, it’s incredibly satisfying. There’s a unique sense of accomplishment that comes from taking something destined for the recycling bin and giving it a new, useful life. In a world increasingly focused on sustainability, this simple act contributes, however modestly, to reducing waste and promoting a more circular economy. Plus, it’s a fantastic way to teach children about recycling and the value of repurposing materials.
Secondly, these DIY soda can cups are surprisingly durable and versatile. Perfect for picnics, camping trips, or even just everyday use around the house, they’re lightweight, easy to clean, and resistant to breakage. Imagine serving refreshing lemonade in cups you crafted yourself – a guaranteed conversation starter!
Thirdly, the possibilities for customization are endless. While we’ve focused on a basic design, feel free to experiment with different can sizes and shapes. Consider adding decorative elements like paint, stickers, or even decoupage to personalize your creations. You could even try creating a set of themed cups for different occasions, such as holiday gatherings or birthday parties. For a more sophisticated look, explore techniques for smoothing the edges further, perhaps using a specialized tool or even a food-safe epoxy coating.
Don’t be afraid to get creative with the finishing touches. A simple sanding and polishing can yield a surprisingly sleek and professional result. You can also explore different handle options, perhaps using wire or even repurposed leather scraps to create a more ergonomic grip. Remember to always prioritize safety and use appropriate tools and materials for each step.
This project isn’t just about making a cup; it’s about embracing a mindset of resourcefulness and creativity. It’s about finding beauty and utility in the unexpected and challenging yourself to see the potential in everyday objects. It’s about making something unique and personal that reflects your own style and values.
We strongly encourage you to give this DIY soda can cups project a try. Gather your materials, follow the instructions carefully, and most importantly, have fun! And once you’ve created your own masterpiece, we’d love to see it. Share your photos and experiences with us on social media using [Your Hashtag Here]. Let’s inspire each other to create a more sustainable and beautiful world, one soda can cup at a time. We are confident that you will find this project rewarding and that your new cups will become a cherished addition to your home.
Frequently Asked Questions (FAQ)
Is it safe to drink from a soda can cup?
This is the most important question, and the answer is nuanced. While the aluminum itself is generally considered safe, the primary concern is the potential for sharp edges and the leaching of aluminum into your drink, especially if the beverage is acidic. To mitigate these risks, meticulous sanding and smoothing of all edges are crucial. Consider using a fine-grit sandpaper and then polishing the edges for a smooth, rounded finish. Furthermore, avoid using these cups for hot beverages or highly acidic drinks like lemon juice or vinegar. If you are still concerned, you can line the inside of the cup with a food-grade epoxy resin, ensuring it is fully cured before use. Always prioritize safety and err on the side of caution.
What tools do I really need for this project?
At a minimum, you’ll need a can opener (preferably one that leaves a smooth edge), scissors or a craft knife, sandpaper (various grits), and a file. Safety glasses are also highly recommended to protect your eyes from metal shavings. For more advanced techniques, you might consider a metal polishing compound and a buffing wheel. A deburring tool can also be helpful for removing sharp edges quickly and efficiently. Remember to always use tools safely and follow the manufacturer’s instructions.
How do I prevent the edges from being sharp?
Preventing sharp edges is paramount for safety. Start by using a can opener that creates a smooth, rolled edge. Then, use a file to remove any remaining burrs or sharp points. Sandpaper is your best friend here. Begin with a coarse grit to remove larger imperfections and gradually move to finer grits for a smooth finish. Pay particular attention to the rim of the cup, as this is where most contact will occur. You can also use a specialized edge-rounding tool for a more professional finish.
Can I paint or decorate my soda can cup?
Absolutely! Painting and decorating your soda can cup is a great way to personalize it. However, it’s important to use paints and adhesives that are safe for contact with food and beverages. Look for non-toxic, water-based acrylic paints or epoxy resins specifically designed for food contact. Before painting, thoroughly clean and degrease the can surface to ensure proper adhesion. You can also apply a primer to create a smoother surface for painting. After painting, seal the surface with a food-safe sealant to protect the paint and prevent it from chipping or peeling.
How do I clean my soda can cup?
Hand washing is the best way to clean your soda can cup. Avoid using abrasive cleaners or scouring pads, as these can scratch the surface and damage any decorative finishes. Use warm, soapy water and a soft sponge or cloth. Rinse thoroughly and dry completely. Do not put your soda can cup in the dishwasher, as the high heat and harsh detergents can damage the metal and any applied coatings.
What other variations can I try?
The possibilities are endless! You can experiment with different can sizes and shapes to create cups of varying capacities. Try using cans from different beverages to create a colorful and eclectic set. You can also add handles using wire, leather, or even repurposed plastic. Consider creating a base for the cup using wood or other materials to provide added stability. For a more decorative touch, try adding beads, sequins, or other embellishments. You can also explore techniques like decoupage or etching to create unique designs.
How durable are these cups? Will they bend easily?
While soda cans are relatively thin, the finished cups can be surprisingly durable. The rolled edges and cylindrical shape provide structural integrity. However, they are not indestructible. Avoid applying excessive pressure or dropping them from a height. With proper care, they should last for a reasonable amount of time. You can also reinforce the cups by adding a layer of epoxy resin or by creating a thicker base.
Can I use these cups for hot drinks?
It is generally not recommended to use these cups for hot drinks. The aluminum can conduct heat quickly, making the cup uncomfortable to hold. Additionally, the heat can potentially cause the leaching of aluminum into the beverage. If you must use them for hot drinks, consider using a sleeve or coaster to protect your hands. However, it is always best to use cups specifically designed for hot beverages.
What if I don’t have sandpaper? Are there any alternatives?
While sandpaper is the ideal tool for smoothing the edges, you can use alternatives in a pinch. A nail file or emery board can be used to remove sharp edges and smooth the surface. You can also try using a pumice stone or even a piece of brick or concrete to gently rub away any imperfections. However, these alternatives may not provide as smooth a finish as sandpaper.
Where can I find inspiration for decorating my soda can cups?
The internet is a treasure trove of inspiration! Search for “DIY soda can crafts” or “recycled can art” on platforms like Pinterest, Instagram, and YouTube. You’ll find countless examples of creative and unique designs. You can also draw inspiration from nature, art, and your own personal style. Don’t be afraid to experiment and try new things. The most important thing is to have fun and create something that you love.


Leave a Comment