

Teachers Day Card DIY: Show your appreciation with a heartfelt, handmade card! Let’s be honest, store-bought cards can feel a little impersonal, right? This year, ditch the generic and create a truly special Teachers Day card that your favorite educator will cherish. I’m going to guide you through some fun and easy DIY techniques that will transform simple paper into a personalized masterpiece.
The tradition of giving cards to teachers dates back centuries, evolving from simple tokens of gratitude to elaborate expressions of thanks. In many cultures, teachers are revered figures, and a handmade card is a beautiful way to acknowledge their dedication and impact. It’s a tangible reminder of the student-teacher bond, a connection built on learning, growth, and mutual respect.
Why a DIY card? Because it’s personal! In a world of mass-produced everything, a handmade gift speaks volumes. It shows you took the time and effort to create something unique, reflecting your appreciation in a way a store-bought card simply can’t. Plus, it’s a fantastic way to unleash your creativity and have some fun! With these Teachers Day Card DIY ideas, you’ll not only create a memorable gift but also discover a new hobby. Let’s get crafting!
DIY Teacher’s Day Pop-Up Card: A Heartfelt Handmade Gift
Okay, let’s get crafty! I’m going to walk you through creating a super special pop-up card for Teacher’s Day. This isn’t just any card; it’s a personalized, heartfelt gift that your teacher will truly cherish. We’re going to make a pop-up element inside that adds a wow factor. Trust me, it’s easier than it looks!
Materials You’ll Need
Before we dive in, let’s gather our supplies. Having everything ready will make the process smooth and enjoyable.
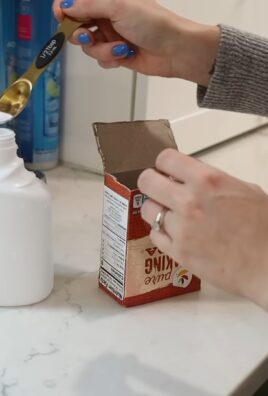
* Cardstock: You’ll need at least two sheets of cardstock. One for the base of the card and another for the pop-up element and decorations. Choose colors that you think your teacher will like! I usually go for something bright and cheerful.
* Scissors: A good pair of scissors is essential for clean cuts.
* Craft Knife (Optional): A craft knife and cutting mat can be helpful for more intricate cuts, but it’s not absolutely necessary.
* Ruler: For measuring and creating straight lines.
* Pencil: For sketching and marking measurements.
* Glue Stick or Double-Sided Tape: To adhere the different parts of the card together. I prefer a glue stick for less mess, but double-sided tape works great too.
* Markers, Colored Pencils, or Crayons: For decorating and adding personal touches.
* Decorative Paper (Optional): Scrapbook paper, patterned paper, or even wrapping paper can add extra flair.
* Embellishments (Optional): Stickers, glitter, buttons, ribbon – anything you want to use to make the card extra special!
* Cutting Mat (Optional): If you are using a craft knife, a cutting mat is essential to protect your work surface.
Designing the Pop-Up Element
This is where the magic happens! We’re going to create a simple but effective pop-up mechanism. I’ll show you a couple of options, and you can choose the one you feel most comfortable with.
Option 1: The Basic Pop-Up Box
This is a classic and easy-to-execute pop-up.
1. Cut the Pop-Up Pieces: On your second sheet of cardstock, cut two rectangles. The size will depend on how big you want your pop-up element to be. I usually go for something around 2 inches wide and 1 inch tall.
2. Score the Rectangles: Score each rectangle in the middle, creating a fold line.
3. Attach to the Card Base: Open your card base (the first sheet of cardstock folded in half). Position the folded rectangles inside the card, one on each side of the fold. Glue or tape one side of each rectangle to the card base, making sure the fold of the rectangle aligns with the fold of the card.
4. Test the Pop-Up: Close the card. The rectangles should fold flat. When you open the card, they should pop up, creating a platform.
Option 2: The Simple Pop-Up Shape
This option is great for showcasing a specific shape or message.
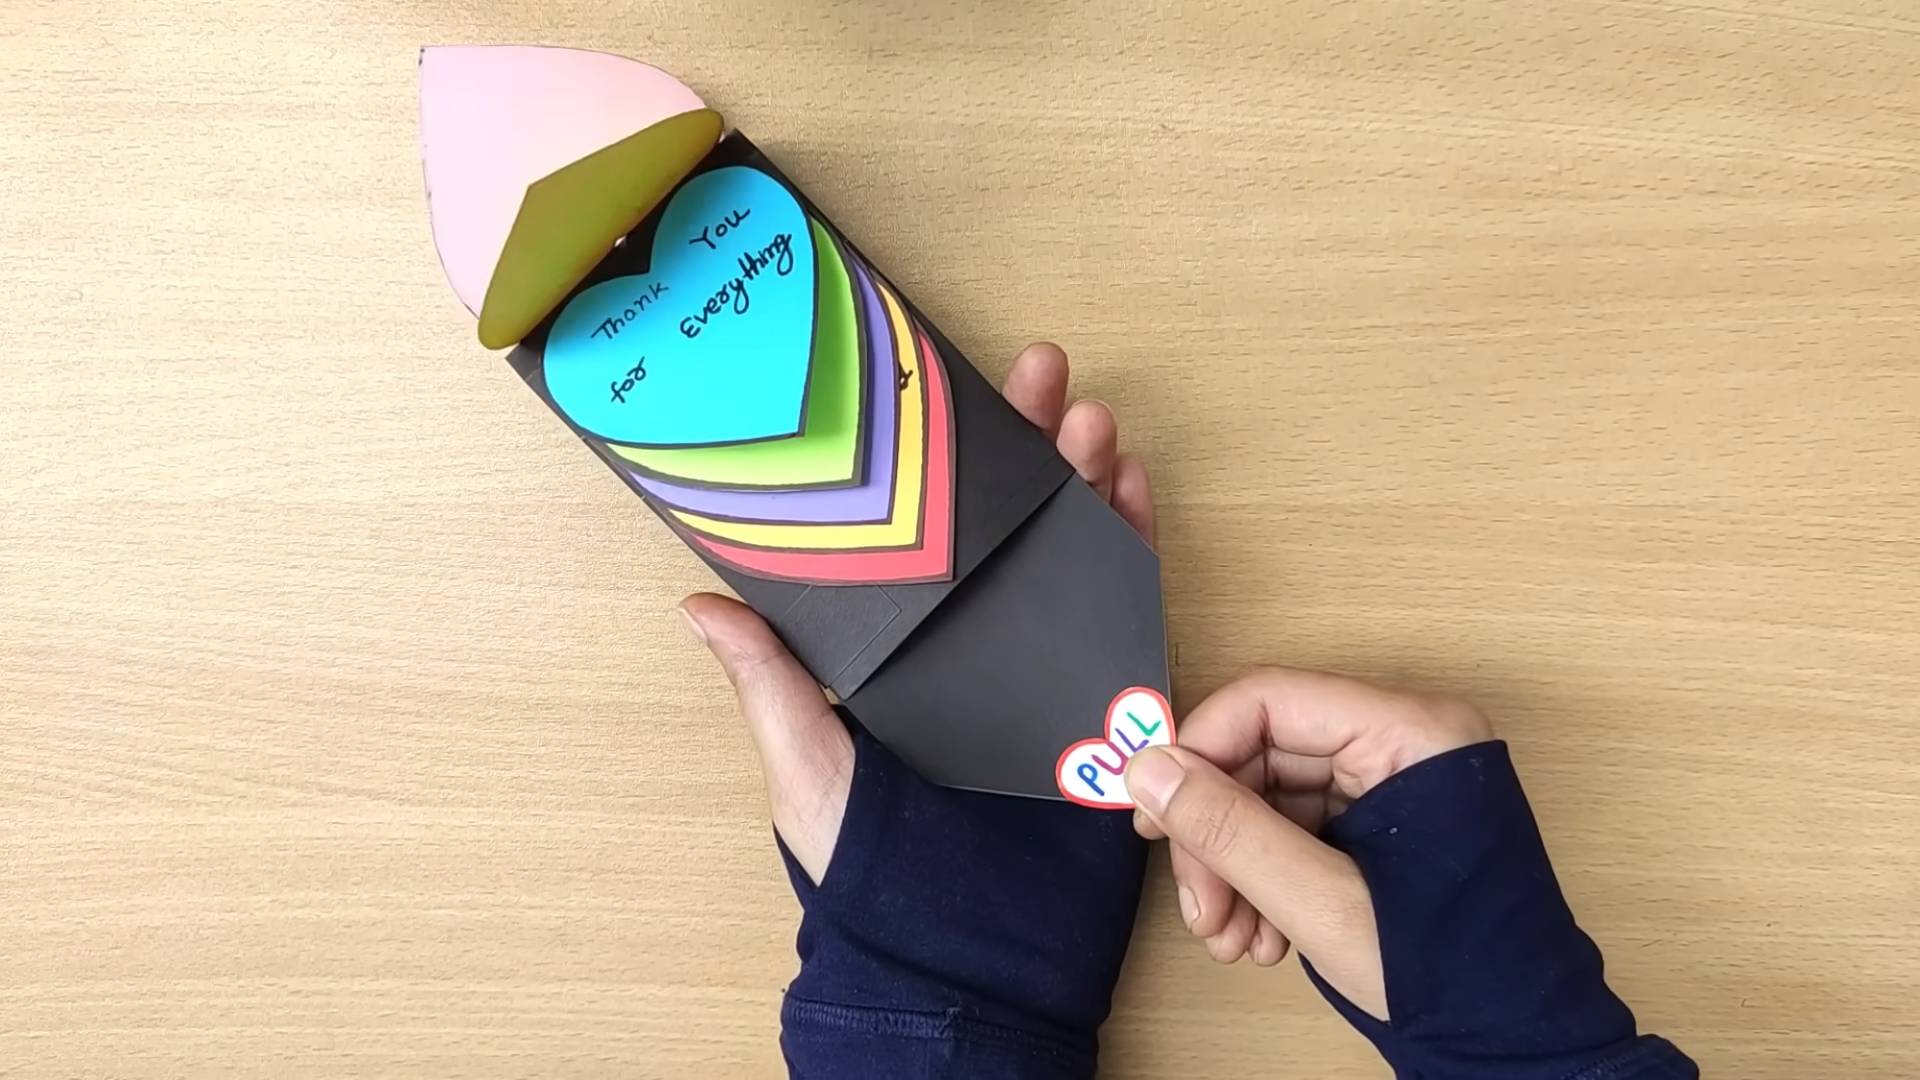
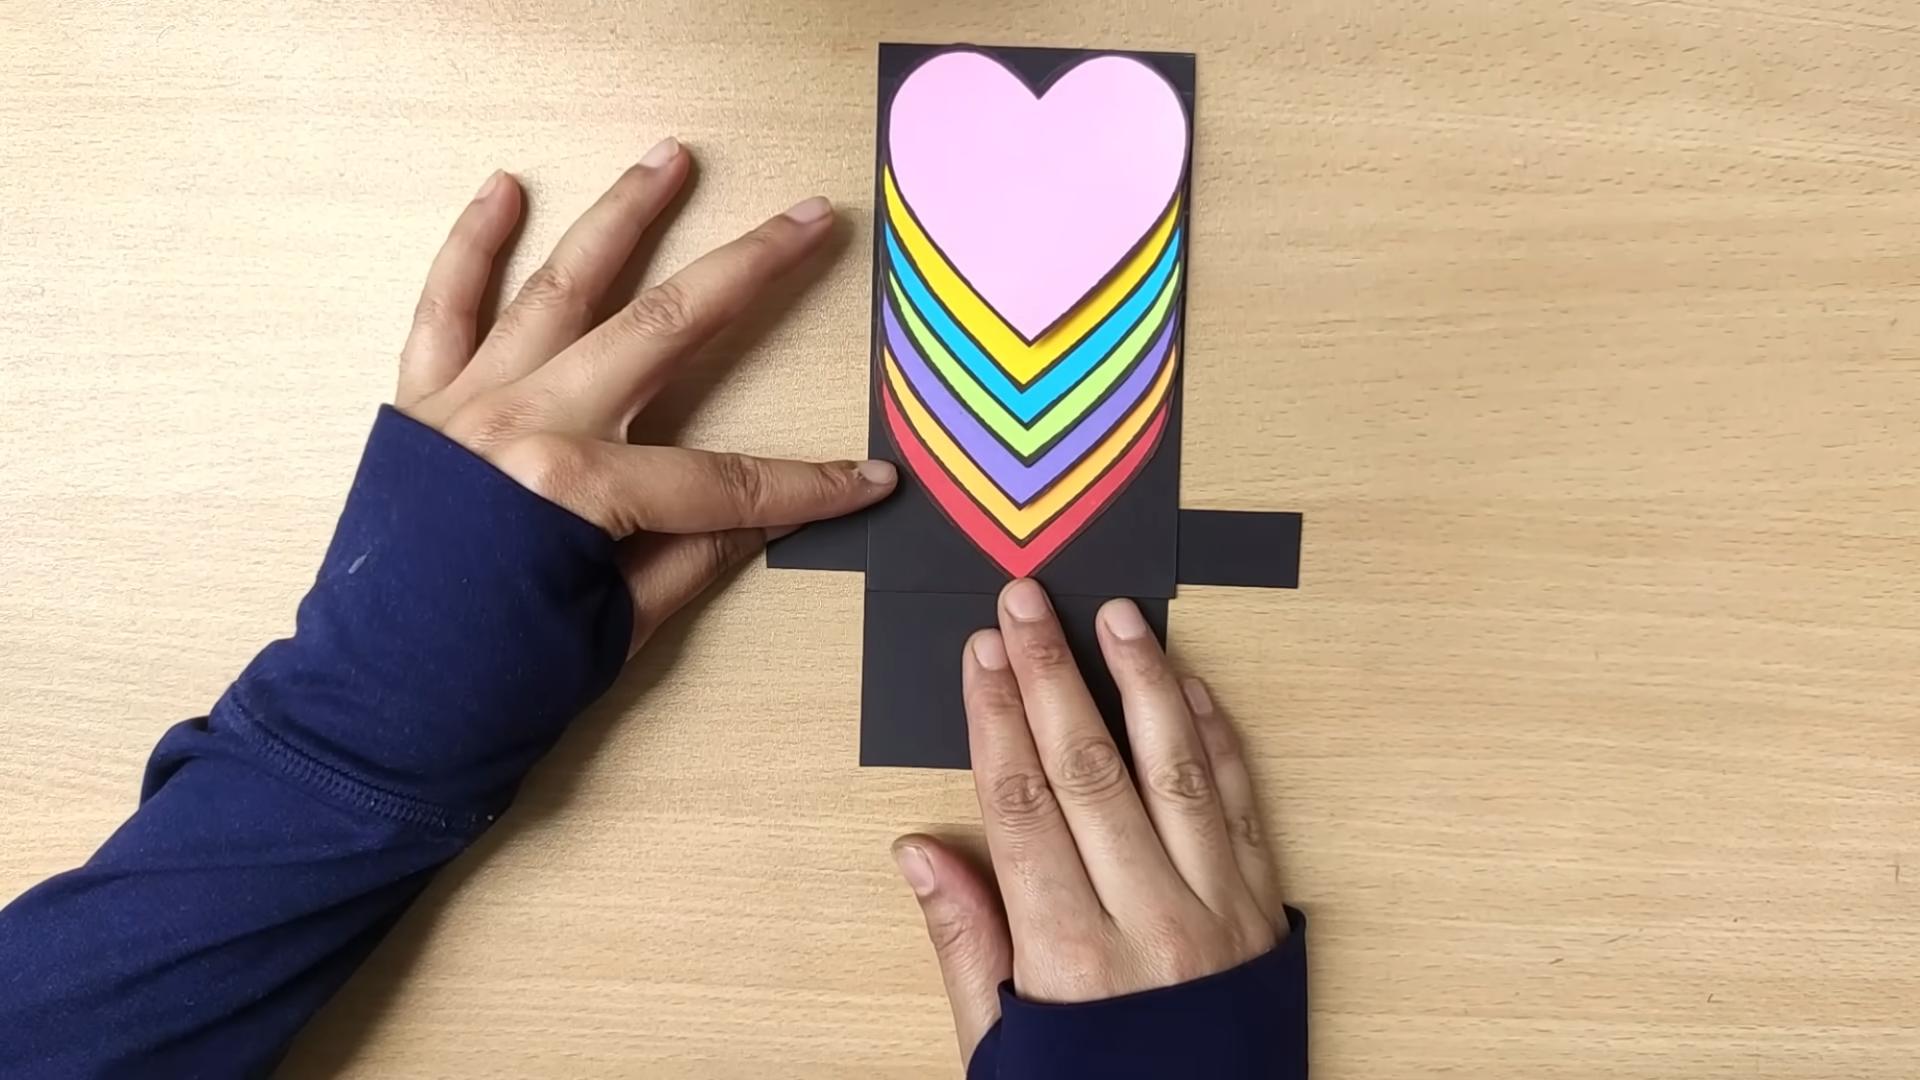
1. Cut the Pop-Up Shape: Cut out the shape you want to pop up from your second sheet of cardstock. This could be a heart, a star, a book, or even a simple “Thank You” message.
2. Create the Support Tabs: Cut two small rectangles from the same cardstock. These will be the support tabs that hold the shape upright.
3. Fold the Support Tabs: Fold each rectangle in half.
4. Attach the Shape to the Tabs: Glue or tape one side of each folded tab to the back of your pop-up shape, near the bottom.
5. Attach the Tabs to the Card Base: Open your card base. Position the pop-up shape inside the card. Glue or tape the other side of each folded tab to the card base, one on each side of the fold.
6. Test the Pop-Up: Close the card. The shape should fold flat. When you open the card, it should pop up.
Assembling the Card
Now that we have our pop-up element ready, let’s put everything together!
1. Prepare the Card Base: Fold your first sheet of cardstock in half to create the card base. Make sure the fold is crisp and clean.
2. Attach the Pop-Up Element: If you haven’t already, attach your chosen pop-up element to the inside of the card base, following the instructions from the previous section. Double-check that it pops up correctly when you open the card and folds flat when you close it.
3. Decorate the Pop-Up Element: Now it’s time to add some personality to the pop-up element! You can draw on it, add stickers, or even glue on small embellishments. Think about what your teacher likes and try to incorporate those elements into the design. For example, if your teacher loves books, you could cut out a small book shape and glue it onto the pop-up platform.
4. Decorate the Inside of the Card: Add a heartfelt message to the inside of the card. You can write a thank you note, share a favorite memory from class, or simply express your appreciation for your teacher’s hard work. Don’t be afraid to get creative with your writing! You can use different fonts, colors, and even add small drawings to make the message more visually appealing.
5. Decorate the Outside of the Card: The outside of the card is just as important as the inside! You can use markers, colored pencils, crayons, or decorative paper to create a beautiful design. Consider adding your teacher’s name, a picture related to their subject, or a simple “Happy Teacher’s Day” message. I like to use a combination of different techniques to create a layered and interesting design. For example, I might use decorative paper as a background and then add hand-drawn elements on top.
6. Add Embellishments (Optional): If you want to add even more flair to your card, consider using embellishments like stickers, glitter, buttons, or ribbon. These can add texture and dimension to the design. Just be careful not to overdo it – sometimes less is more!
7. Let the Glue Dry: Before you give the card to your teacher, make sure all the glue is completely dry. This will prevent any of the embellishments from falling off or the card from sticking together.
Tips and Tricks for a Perfect Pop-Up Card
Here are a few extra tips to help you create a truly amazing Teacher’s Day card:
* Plan Your Design: Before you start cutting and gluing, take some time to plan out your design. Sketch out your ideas on a piece of paper to get a better sense of how everything will look.
* Use High-Quality Materials: Using high-quality cardstock and glue will make a big difference in the overall look and durability of your card.
* Take Your Time: Don’t rush the process! Take your time and pay attention to detail. The more effort you put into the card, the more special it will be.
* Personalize It: The most important thing is to personalize the card to your teacher. Think about their interests, their teaching style, and your relationship with them. The more personal the card is, the more meaningful it will be.
* Practice Makes Perfect: If you’re new to making pop-up cards, don’t be afraid to practice on a scrap piece of paper first. This will help you get a feel for the techniques and avoid making mistakes on your final card.
* Don’t Be Afraid to Experiment: There are no rules when it comes to crafting! Don’t be afraid to experiment with different materials, techniques, and designs. The most important thing is to have fun and create something that you’re proud of.
* Consider the Teacher’s Subject: If your teacher teaches a specific subject, try to incorporate elements related to that subject into the card. For example, if your teacher teaches math, you could use geometric shapes or mathematical symbols in the design. If your teacher teaches English, you could use quotes from famous authors or images of books.
* Add a Photo: If you have a photo of you and your teacher, you could add it to the card. This will make the card even more personal and memorable.
* Write a Sincere Message: The message you write inside the card is just as important as the design. Take some time to write a sincere and heartfelt message expressing your appreciation for your teacher.
* Presentation Matters: Once you’ve finished making the card, take some time to present it nicely. You can wrap it in tissue paper, tie it with a ribbon, or even put it in a small gift bag.
I hope this guide has inspired you to create a beautiful and heartfelt Teacher’s Day pop-up
Conclusion
So, there you have it! Crafting a personalized Teachers Day card DIY is more than just a fun activity; it’s a heartfelt expression of gratitude that your teachers will cherish for years to come. In a world saturated with generic gifts, a handmade card stands out, radiating sincerity and demonstrating the time and effort you invested in showing your appreciation.
This DIY project isn’t just about following instructions; it’s about unleashing your creativity and adding a personal touch that reflects your unique relationship with your teacher. Think about incorporating elements that resonate with their personality or teaching style. Do they have a favorite color? Use it prominently in your design. Are they passionate about a particular subject? Include a relevant image or quote. Did they tell a joke that everyone loved? Maybe you can incorporate that into the card.
The beauty of this Teachers Day card DIY lies in its adaptability. Feel free to experiment with different materials. Instead of cardstock, try using recycled paper for an eco-friendly touch. Incorporate pressed flowers, fabric scraps, or even small trinkets that hold special meaning. Consider adding embellishments like glitter, ribbons, or buttons to enhance the visual appeal.
For a truly unique card, explore different techniques. Try paper quilling to create intricate designs, or experiment with watercolor paints for a vibrant and artistic effect. If you’re feeling adventurous, consider creating a pop-up card that reveals a hidden message or image when opened.
Remember, the most important aspect of this DIY project is the thought and effort you put into it. Your teacher will appreciate the time you took to create something special just for them. Don’t be afraid to get creative, have fun, and let your personality shine through.
We wholeheartedly encourage you to try this Teachers Day card DIY. It’s a simple yet meaningful way to express your gratitude and make your teacher feel truly appreciated. Once you’ve created your masterpiece, we’d love to see it! Share your creations with us on social media using [Your Social Media Hashtag] and inspire others to spread the love this Teachers Day. We can’t wait to see the amazing cards you come up with! Let’s make this Teachers Day unforgettable with heartfelt, handmade expressions of appreciation.
Frequently Asked Questions (FAQ)
What kind of paper is best for making a Teachers Day card?
The best type of paper for your Teachers Day card DIY depends on the look you’re going for and the materials you plan to use. Cardstock is a popular choice because it’s sturdy and provides a good base for various embellishments. It comes in a wide range of colors and finishes, allowing you to customize your card to your teacher’s preferences. If you’re planning on using watercolors or other wet media, watercolor paper is a good option as it’s designed to absorb moisture without buckling. For a more rustic or eco-friendly look, consider using recycled paper or kraft paper. Ultimately, the best paper is the one that you enjoy working with and that complements your overall design.
I’m not very artistic. Can I still make a nice card?
Absolutely! You don’t need to be a professional artist to create a beautiful and heartfelt Teachers Day card DIY. The key is to focus on simplicity and sincerity. Even a simple card with a handwritten message can be incredibly meaningful. Consider using stencils or pre-made templates to create basic shapes and designs. You can also incorporate decorative elements like stickers, ribbons, or washi tape to add visual interest without requiring advanced artistic skills. Remember, the most important thing is the message you convey. A heartfelt thank you note, expressing your appreciation for your teacher’s hard work and dedication, will always be cherished, regardless of your artistic abilities.
What kind of message should I write inside the card?
The message you write inside your Teachers Day card should be personal and sincere. Start by thanking your teacher for their hard work and dedication. Be specific about what you appreciate most about their teaching style or the impact they’ve had on your learning. Share a specific memory or anecdote that highlights their positive influence. You can also express your gratitude for their patience, encouragement, and support. Avoid generic phrases and try to write from the heart. A simple “Thank you for being an amazing teacher” can go a long way, especially when followed by specific examples of their positive impact.
Can I involve my kids in making the card?
Yes, absolutely! Involving your kids in making a Teachers Day card DIY is a wonderful way to teach them about gratitude and appreciation. Even young children can participate by coloring, drawing, or adding stickers to the card. Older children can help with more complex tasks like cutting, gluing, or writing the message. Make it a family activity and let everyone contribute their unique talents and ideas. It’s a great opportunity to bond with your kids while creating a meaningful gift for their teacher. Just be sure to supervise younger children closely when using scissors or glue.
What if I don’t have all the materials listed?
Don’t worry if you don’t have all the materials listed in the instructions. The beauty of a Teachers Day card DIY is that it can be adapted to whatever materials you have on hand. Get creative and use what you have available. Instead of cardstock, use construction paper or even a piece of cardboard. Instead of glitter, use colored pencils or markers. The most important thing is to use your imagination and make the card your own. You can also substitute materials based on the desired effect. For example, if you don’t have ribbon, you can use yarn or string.
How can I make the card more personalized?
There are many ways to personalize your Teachers Day card DIY. Consider incorporating elements that reflect your teacher’s personality or interests. If they have a favorite color, use it prominently in your design. If they’re passionate about a particular subject, include a relevant image or quote. You can also add a personal touch by including a photo of you and your teacher, or by writing a handwritten poem or song. Another idea is to create a card that reflects a specific memory or inside joke that you share with your teacher. The more personal you make the card, the more meaningful it will be to your teacher.
How early should I start making the card?
It’s always a good idea to start making your Teachers Day card DIY a few days in advance to avoid feeling rushed. This will give you ample time to gather your materials, plan your design, and complete the project without feeling stressed. Starting early also allows you to make any necessary adjustments or corrections. If you’re involving your kids in the project, starting early will give them more time to participate and enjoy the process. Aim to have the card completed at least a day or two before Teachers Day so you can ensure it’s ready to be presented.
Where can I find inspiration for my card design?
There are many places to find inspiration for your Teachers Day card DIY design. Browse online platforms like Pinterest, Instagram, and Etsy for ideas and examples of handmade cards. Look through craft magazines or books for inspiration. You can also visit your local craft store and browse their selection of card-making supplies for ideas. Don’t be afraid to experiment and try different techniques. The most important thing is to find a design that you like and that reflects your personal style. Remember, the best inspiration often comes from your own creativity and imagination.
Leave a Comment