

Tire pumpkin planter DIY projects are a fantastic way to add a touch of rustic charm and sustainable flair to your garden! Have you ever looked at an old tire and thought, “There has to be a better use for this than just sitting in a landfill?” Well, you’re in luck! We’re diving headfirst into a creative and eco-friendly project that transforms discarded tires into adorable pumpkin planters.
The concept of repurposing materials for gardening has deep roots, echoing the resourcefulness of generations past who utilized every available item. Think about it – turning something destined for waste into a vibrant home for your plants is not only practical but also a beautiful nod to a more sustainable lifestyle. Plus, there’s something incredibly satisfying about creating something unique with your own two hands.
Why do you need this tire pumpkin planter DIY in your life? Because it’s a fun, budget-friendly way to add personality to your outdoor space! It’s perfect for those with limited gardening space, as these planters can be placed on patios, balconies, or even small yards. More importantly, it’s a fantastic way to recycle and reduce waste. I’m excited to show you how to turn those old tires into charming pumpkin planters that will be the envy of all your neighbors. Let’s get started!
Turn Old Tires into Adorable Pumpkin Planters!
Hey there, fellow DIY enthusiasts! Are you looking for a fun, eco-friendly way to add some autumnal charm to your porch or garden? Well, look no further! I’m going to show you how to transform those old, discarded tires into the cutest pumpkin planters you’ve ever seen. This project is not only a great way to recycle, but it’s also surprisingly easy and budget-friendly. Get ready to roll up your sleeves and get creative!
What You’ll Need:
Before we dive in, let’s gather all the necessary materials. Trust me, having everything on hand will make the process much smoother.
* Old Tires (any size will work, but similar sizes look best if you’re making a set)
* Utility Knife or Jigsaw (for cutting the tire)
* Measuring Tape
* Marker or Chalk
* Gloves (to protect your hands)
* Safety Glasses (essential for cutting)
* Paint (exterior acrylic paint in orange, green, and black)
* Paintbrushes (various sizes)
* Potting Soil
* Plants (mums, pansies, ornamental grasses – anything that screams “fall!”)
* Optional: Primer (for better paint adhesion)
* Optional: Clear Coat Sealer (for added protection against the elements)
* Optional: Sandpaper (for smoothing rough edges)
* Optional: Drill with drill bit (for drainage holes)
Preparing the Tires: The Foundation for Your Pumpkin Patch
This is a crucial step, so let’s take our time and do it right. We want our pumpkin planters to be sturdy and safe.
1. Clean the Tires: First things first, give those tires a good scrub! Use soap and water to remove any dirt, grime, or debris. A clean surface will ensure that the paint adheres properly. Let them dry completely before moving on to the next step. I usually leave mine out in the sun for a few hours.
2. Mark the Cutting Line: Now, we need to decide how tall we want our pumpkin planters to be. Use your measuring tape and marker to draw a line around the tire. This line will be our cutting guide. I usually aim for a height of about 8-12 inches, but feel free to adjust it to your liking. Make sure the line is as even as possible all the way around.
3. Cut the Tire: This is where the utility knife or jigsaw comes in. If you’re using a utility knife, be extremely careful! It’s best to make several shallow cuts along the marked line rather than trying to cut all the way through in one go. If you’re using a jigsaw, make sure you have a blade that’s suitable for cutting rubber. Follow the marked line carefully, keeping the saw steady. Remember to wear your safety glasses! This step can get a little messy.
4. Smooth the Edges (Optional): Once you’ve cut the tire, you might notice some rough or jagged edges. Use sandpaper to smooth them out. This will not only make the planter look nicer but also prevent any accidental cuts or scrapes.
5. Drill Drainage Holes (Optional): If you live in an area with heavy rainfall, you might want to drill a few drainage holes in the bottom of the tire. This will prevent the soil from becoming waterlogged and keep your plants healthy. Use a drill bit that’s appropriate for rubber and drill several holes evenly spaced around the bottom of the tire.
Painting the Tires: Bringing Your Pumpkins to Life
This is where the fun really begins! Get ready to unleash your inner artist and transform those tires into vibrant pumpkins.
1. Apply Primer (Optional): If you want the paint to adhere really well and last longer, consider applying a coat of primer first. This will create a smooth, even surface for the paint to grip onto. Let the primer dry completely before moving on to the next step.
2. Paint the Tires Orange: Now, it’s time to paint the tires orange! Use exterior acrylic paint, which is designed to withstand the elements. Apply several coats of paint, allowing each coat to dry completely before applying the next. This will ensure that the color is rich and vibrant. I usually do at least two coats, sometimes even three, for maximum coverage.
3. Add Details: Once the orange paint is dry, it’s time to add some details to make your pumpkins look even more realistic. Use green paint to create a stem at the top of the tire. You can also add some black paint to create a face, if you like. Get creative and have fun with it! You can paint a classic jack-o’-lantern face, or you can create something completely unique. I’ve seen some people paint cute little smiles or even add googly eyes!
4. Apply Clear Coat Sealer (Optional): To protect your painted pumpkins from the elements and make them last longer, consider applying a coat of clear coat sealer. This will create a protective barrier that will help prevent the paint from fading or chipping. Let the sealer dry completely before moving on to the next step.
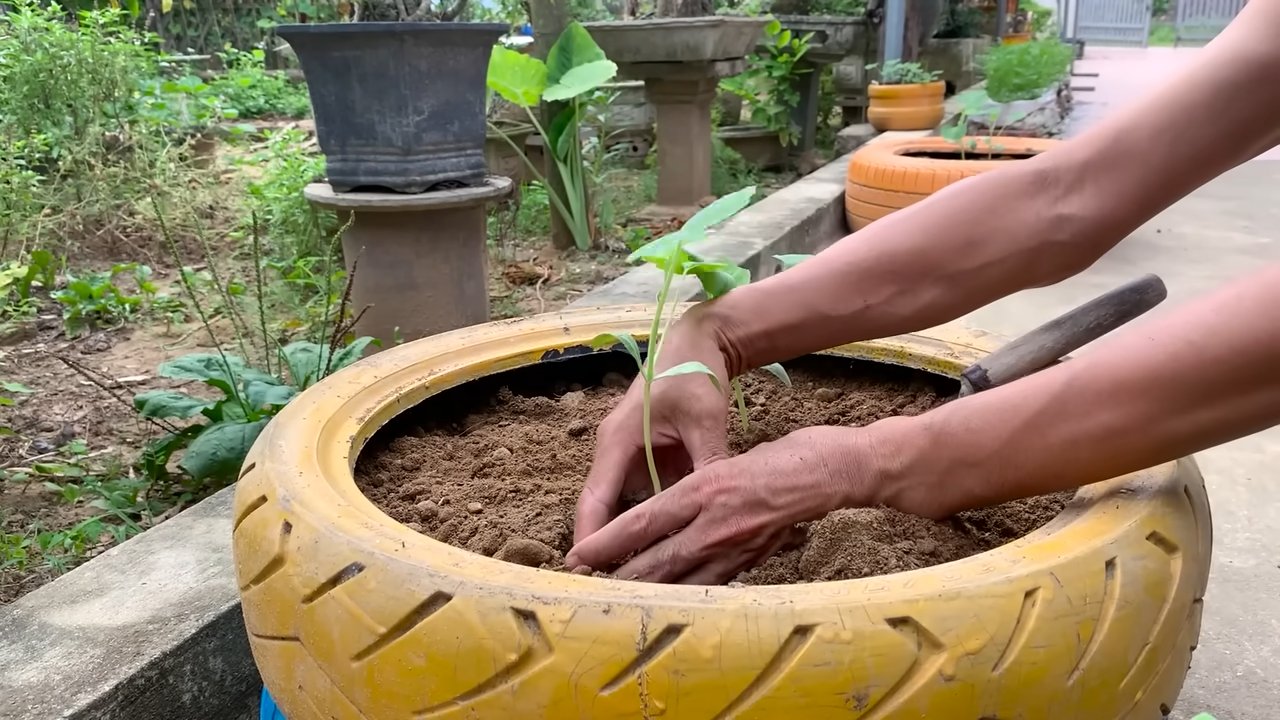
Planting Your Pumpkin Planters: The Grand Finale
Now that our tires are transformed into beautiful pumpkin planters, it’s time to fill them with soil and plants!
1. Fill with Potting Soil: Fill the tire with high-quality potting soil. Make sure the soil is loose and well-draining. Leave a few inches of space at the top of the tire.
2. Plant Your Flowers: Now, it’s time to plant your flowers! Choose plants that are appropriate for the season and your climate. Mums, pansies, and ornamental grasses are all great choices for fall. Arrange the plants in the soil, making sure they have enough space to grow.
3. Water Your Plants: Once you’ve planted your flowers, give them a good watering. This will help them settle into their new home.
4. Arrange Your Pumpkin Planters: Now, it’s time to arrange your pumpkin planters on your porch, patio, or in your garden. You can group them together to create a festive display, or you can scatter them around for a more subtle touch.
Tips and Tricks for Success:
* Safety First: Always wear gloves and safety glasses when cutting the tires.
* Choose the Right Paint: Use exterior acrylic paint for best results.
* Let the Paint Dry Completely: Allow each coat of paint to dry completely before applying the next.
* Get Creative with the Details: Don’t be afraid to experiment with different colors and designs.
* Choose the Right Plants: Select plants that are appropriate for the season and your climate.
* Consider the Size: Smaller tires are easier to handle and paint, especially if you’re doing this project with kids. Larger tires make a bigger statement!
* Secure the Tires (Optional): If you’re worried about the tires tipping over, especially in windy conditions, you can secure them to the ground with stakes or by placing heavy rocks inside.
* Add a Personal Touch: Consider adding other decorative elements to your pumpkin planters, such as ribbons, bows, or even small gourds.
* Recycle Responsibly: If you can’t find old tires to use, check with local tire shops or recycling centers. They may be able to provide you with some.
* Make it a Family Affair: This is a great project to do with kids! They’ll love helping you paint and plant the flowers.
Troubleshooting:
* Paint Not Adhering: If the paint isn’t adhering properly, make sure the tires are clean and dry. You may also need to apply a coat of primer.
* Tire Too Difficult to Cut: If you’re having trouble cutting the tire with a utility knife, try using a jigsaw instead.
* Plants Not Thriving: If your plants aren’t thriving, make sure they’re getting enough sunlight and water. You may also need to fertilize them.
* Tire Smells: New tires sometimes have a strong rubber smell. Letting them air out for a few days before painting can help.
And there you have it! You’ve successfully transformed old tires into adorable pumpkin planters. Now you can sit back, relax, and enjoy the fruits (or should I say, pumpkins?) of your labor. Happy crafting!
Conclusion
So, there you have it! Transforming old tires into charming pumpkin planters is not just a fun and budget-friendly project; it’s a statement. It’s a statement about creativity, sustainability, and adding a personal touch to your outdoor space. Forget those generic, store-bought planters that everyone else has. With this DIY tire pumpkin planter, you’re crafting a unique piece of art that reflects your personality and resourcefulness.
Why is this DIY trick a must-try? Because it’s incredibly versatile. You can customize the size, color, and design to perfectly match your existing garden decor. Imagine a whole family of pumpkin planters, each with its own distinct character, adorning your porch or patio. It’s also a fantastic way to upcycle something that would otherwise end up in a landfill, contributing to a more eco-conscious lifestyle. Plus, the satisfaction of creating something beautiful and functional with your own hands is simply unmatched.
But the possibilities don’t stop there. Consider these variations to truly make your tire pumpkin planter your own:
* Add drainage holes: Ensure proper drainage by drilling holes in the bottom of the tire before painting and planting. This will prevent waterlogging and keep your plants healthy.
* Experiment with paint techniques: Beyond basic orange, explore ombre effects, stencils, or even hand-painted designs. Think beyond the traditional pumpkin look! Maybe a spooky ghost face for Halloween or a festive floral pattern for spring.
* Incorporate embellishments: Glue on decorative elements like buttons, beads, or twine to add texture and visual interest. Consider using natural materials like dried leaves or small twigs for a rustic touch.
* Vary the plant selection: While pumpkins are the obvious choice, don’t limit yourself! Plant colorful mums, cascading petunias, or even herbs for a practical and beautiful display. Succulents also thrive in tire planters, offering a low-maintenance option.
* Create a tiered planter: Stack multiple tire pumpkins of different sizes to create a stunning tiered display. This adds height and dimension to your garden and allows you to showcase a wider variety of plants.
This DIY tire pumpkin planter project is more than just a craft; it’s an opportunity to express your creativity, contribute to a greener planet, and add a touch of whimsy to your outdoor space. We wholeheartedly encourage you to give it a try. It’s easier than you think, and the results are truly rewarding.
So, gather your supplies, unleash your inner artist, and get ready to transform those old tires into adorable pumpkin planters. And most importantly, don’t forget to share your creations with us! We’d love to see your unique designs and hear about your experience. Post photos of your finished tire pumpkin planters on social media using #TirePumpkinPlanterDIY and inspire others to join the fun. Let’s spread the joy of upcycling and creative gardening together! We are confident that you will love this **tire pumpkin planter DIY** project.
FAQ
What kind of tires can I use for this project?
Almost any size tire can be used, from car tires to larger truck tires. The size of the tire will determine the size of your finished pumpkin planter. Consider the space you have available and the type of plants you want to grow when choosing your tires. Smaller tires are great for individual plants, while larger tires can accommodate multiple plants or even a small pumpkin patch. Just make sure the tires are relatively clean before you start working with them.
What kind of paint should I use?
For outdoor projects like this, it’s best to use exterior-grade paint that is designed to withstand the elements. Acrylic latex paint is a good option because it’s durable, water-resistant, and comes in a wide range of colors. You can also use spray paint, which is quick and easy to apply. Be sure to use a primer first to help the paint adhere to the tire and prevent it from peeling or chipping. Consider using a sealant after painting to further protect your creation from the elements and extend its lifespan.
How do I prepare the tire before painting?
Before you start painting, it’s important to clean the tire thoroughly to remove any dirt, grime, or debris. Use soap and water to scrub the tire, and then rinse it well. Allow the tire to dry completely before applying primer and paint. You can also use a degreaser to remove any oily residue. If the tire has any rough spots or sharp edges, you can sand them down with sandpaper to create a smoother surface.
How do I ensure proper drainage for my plants?
Proper drainage is essential for healthy plant growth. Before you start planting, drill several drainage holes in the bottom of the tire. The number and size of the holes will depend on the size of the tire and the type of plants you’re growing. You can also add a layer of gravel or pebbles to the bottom of the tire to improve drainage. Avoid using tires that are completely sealed, as this can lead to waterlogging and root rot.
What kind of soil should I use?
Use a high-quality potting mix that is specifically formulated for container gardening. Avoid using garden soil, as it can be too heavy and compacted for container plants. A good potting mix will provide adequate drainage and aeration, which are essential for healthy root growth. You can also amend the potting mix with compost or other organic matter to improve its fertility.
What plants are best suited for tire pumpkin planters?
The best plants for tire pumpkin planters are those that thrive in containers and can tolerate full sun. Pumpkins, of course, are the obvious choice, but you can also grow other vegetables, herbs, and flowers. Some popular options include mums, petunias, marigolds, tomatoes, peppers, and basil. Consider the size of the tire and the mature size of the plants when making your selection.
How do I care for my tire pumpkin planter?
Water your plants regularly, especially during hot, dry weather. Fertilize them every few weeks with a balanced fertilizer. Remove any dead or dying leaves or flowers to encourage new growth. Protect your plants from pests and diseases by inspecting them regularly and taking appropriate action if necessary. During the winter months, you may need to protect your plants from frost or move them indoors.
Is this project safe for children?
While this project can be a fun activity for the whole family, it’s important to take certain safety precautions. Always supervise children when they are working with tools or paint. Wear gloves to protect your hands from paint and chemicals. Work in a well-ventilated area to avoid inhaling fumes. Dispose of paint and other materials properly. And be sure to clean up any spills or messes immediately.
Where can I find inspiration for my tire pumpkin planter design?
The internet is a great source of inspiration for tire pumpkin planter designs. Search for images on Pinterest, Instagram, or Google to find ideas for paint colors, embellishments, and plant selections. You can also visit local garden centers or nurseries to see how they display plants in containers. Don’t be afraid to get creative and experiment with different designs until you find something that you love.
How long will my tire pumpkin planter last?
With proper care and maintenance, your tire pumpkin planter can last for many years. The lifespan of the planter will depend on the quality of the materials you use, the climate you live in, and how well you protect it from the elements. To extend the lifespan of your planter, consider storing it indoors during the winter months or covering it with a tarp to protect it from rain and snow. You can also re-paint it every few years to keep it looking fresh and new.
Leave a Comment