

Yardlong Bean Growing Guide: Unlock the secrets to bountiful harvests right in your own backyard!
Have you ever dreamt of plucking incredibly long, delicious beans straight from your garden? Imagine the envy of your neighbors as you proudly display these culinary marvels! Well, dream no more! This DIY guide is your passport to successfully cultivating yardlong beans, also known as asparagus beans or Chinese long beans, and trust me, it’s easier than you think.
These fascinating legumes have a rich history, deeply rooted in Asian cuisine and culture. For centuries, they’ve been a staple ingredient, adding a unique flavor and texture to stir-fries, salads, and countless other dishes. But beyond their culinary appeal, yardlong beans are also incredibly nutritious, packed with vitamins and minerals that contribute to a healthy lifestyle.
Why should you embark on this yardlong bean growing adventure? Because fresh, homegrown produce simply tastes better! Plus, knowing exactly where your food comes from and how it’s grown provides peace of mind. With the rising cost of groceries and increasing concerns about food security, mastering the art of yardlong bean growing is a practical and rewarding skill. I’m here to guide you through every step, from selecting the right seeds to harvesting your impressive crop. Let’s get started and transform your garden into a yardlong bean paradise!
DIY Vertical Yardlong Bean Trellis: A Space-Saving Garden Marvel
Hey there, fellow gardening enthusiasts! Are you dreaming of bountiful harvests of yardlong beans but short on space? Well, I’ve got just the project for you: a DIY vertical yardlong bean trellis! This project is not only incredibly rewarding but also a fantastic way to maximize your garden’s potential. I’m going to walk you through every step, from gathering materials to harvesting your delicious beans. Let’s get started!
Why Vertical Gardening with Yardlong Beans?
Before we dive into the how-to, let’s talk about why vertical gardening is perfect for yardlong beans. These beans, as the name suggests, can grow incredibly long – sometimes over three feet! They need a strong support system to climb and thrive. A vertical trellis offers several advantages:
* Space Saving: It allows you to grow more beans in a smaller area.
* Improved Air Circulation: Reduces the risk of fungal diseases.
* Easier Harvesting: No more bending over to pick beans hidden on the ground.
* Aesthetic Appeal: Adds a beautiful vertical element to your garden.
Materials You’ll Need
Okay, let’s gather our supplies. Here’s what you’ll need to build your own yardlong bean trellis:
* Four Wooden Posts (4×4 inches): I recommend using pressure-treated lumber for durability, especially if you live in a damp climate. The length will depend on how tall you want your trellis, but 8 feet is a good starting point, giving you about 6 feet above ground.
* Chicken Wire or Garden Trellis Netting: Choose a mesh size that’s easy for the bean tendrils to grab onto. Chicken wire is sturdy and long-lasting, but garden netting is lighter and easier to work with. I personally prefer chicken wire for its robustness.
* Heavy-Duty Staples or U-Nails: For attaching the chicken wire or netting to the wooden posts.
* Measuring Tape: Essential for accurate measurements.
* Pencil or Marker: For marking cutting lines and post placement.
* Post Hole Digger or Shovel: To create holes for the wooden posts.
* Level: To ensure your trellis is straight and stable.
* Hammer or Staple Gun: For securing the chicken wire or netting.
* Gloves: To protect your hands.
* Safety Glasses: Always a good idea when working with tools.
* Concrete Mix (Optional): For extra stability, especially in windy areas.
* Yardlong Bean Seeds: Of course! Choose your favorite variety.
Building Your Yardlong Bean Trellis: Step-by-Step
Now for the fun part! Let’s build this trellis.
1. Planning and Measuring
Before you start digging, take some time to plan the layout of your trellis. Consider the amount of sunlight your garden receives and choose a location that gets at least 6-8 hours of direct sunlight per day.
* Measure the Area: Determine the dimensions of your trellis. I usually aim for a square or rectangular shape, about 4 feet wide and 8 feet long.
* Mark Post Locations: Use your measuring tape and pencil to mark the spots where you’ll dig the post holes. Ensure the posts are evenly spaced.
2. Digging the Post Holes
This is where you’ll get a little workout!
1. Dig the Holes: Use your post hole digger or shovel to dig holes for each of the four posts. The holes should be at least 2 feet deep to provide adequate support.
2. Check for Obstacles: Be mindful of underground utilities. If you’re unsure, contact your local utility company before digging.
3. Setting the Posts
Now, let’s get those posts in the ground.
1. Position the Posts: Place each post into its hole.
2. Level the Posts: Use your level to ensure each post is perfectly vertical. This is crucial for the stability of your trellis.
3. Add Concrete (Optional): If you want extra stability, mix concrete according to the package instructions and pour it into the holes around the posts. This will help anchor them firmly in place.
4. Backfill with Soil: If you’re not using concrete, backfill the holes with soil, tamping it down firmly around each post.
4. Attaching the Chicken Wire or Netting
This is where the trellis starts to take shape!
1. Measure and Cut: Measure the distance between the posts and cut the chicken wire or netting to the appropriate size. Leave a little extra to wrap around the posts.
2. Attach the Wire/Netting: Starting at one corner, attach the chicken wire or netting to the posts using heavy-duty staples or U-nails. Make sure the wire/netting is taut and secure. I like to use a staple gun for this, it makes the process much faster.
3. Work Your Way Around: Continue attaching the wire/netting to all four posts, ensuring it’s evenly distributed and securely fastened.
4. Trim Excess: Once the wire/netting is securely attached, trim any excess material.
5. Planting Your Yardlong Beans
Now for the most exciting part – planting your beans!
1. Prepare the Soil: Amend the soil around the base of the trellis with compost or other organic matter. Yardlong beans prefer well-drained, fertile soil.
2. Sow the Seeds: Plant the yardlong bean seeds according to the package instructions. I usually plant them about 1 inch deep and 4-6 inches apart.
3. Water Thoroughly: Water the newly planted seeds thoroughly.
4. Provide Initial Support: As the bean seedlings emerge, gently guide their tendrils towards the trellis. They’ll soon start climbing on their own.
Caring for Your Yardlong Beans
Once your beans are planted, here are a few tips to keep them happy and healthy:
* Watering: Water regularly, especially during dry periods. Yardlong beans need consistent moisture to thrive.
* Fertilizing: Fertilize every few weeks with a balanced fertilizer.
* Pest Control: Keep an eye out for pests like aphids and bean beetles. Treat them promptly with insecticidal soap or other appropriate methods.
* Weeding: Keep the area around the trellis free of weeds.
* Pruning: Prune any yellowing or damaged leaves to encourage healthy growth.
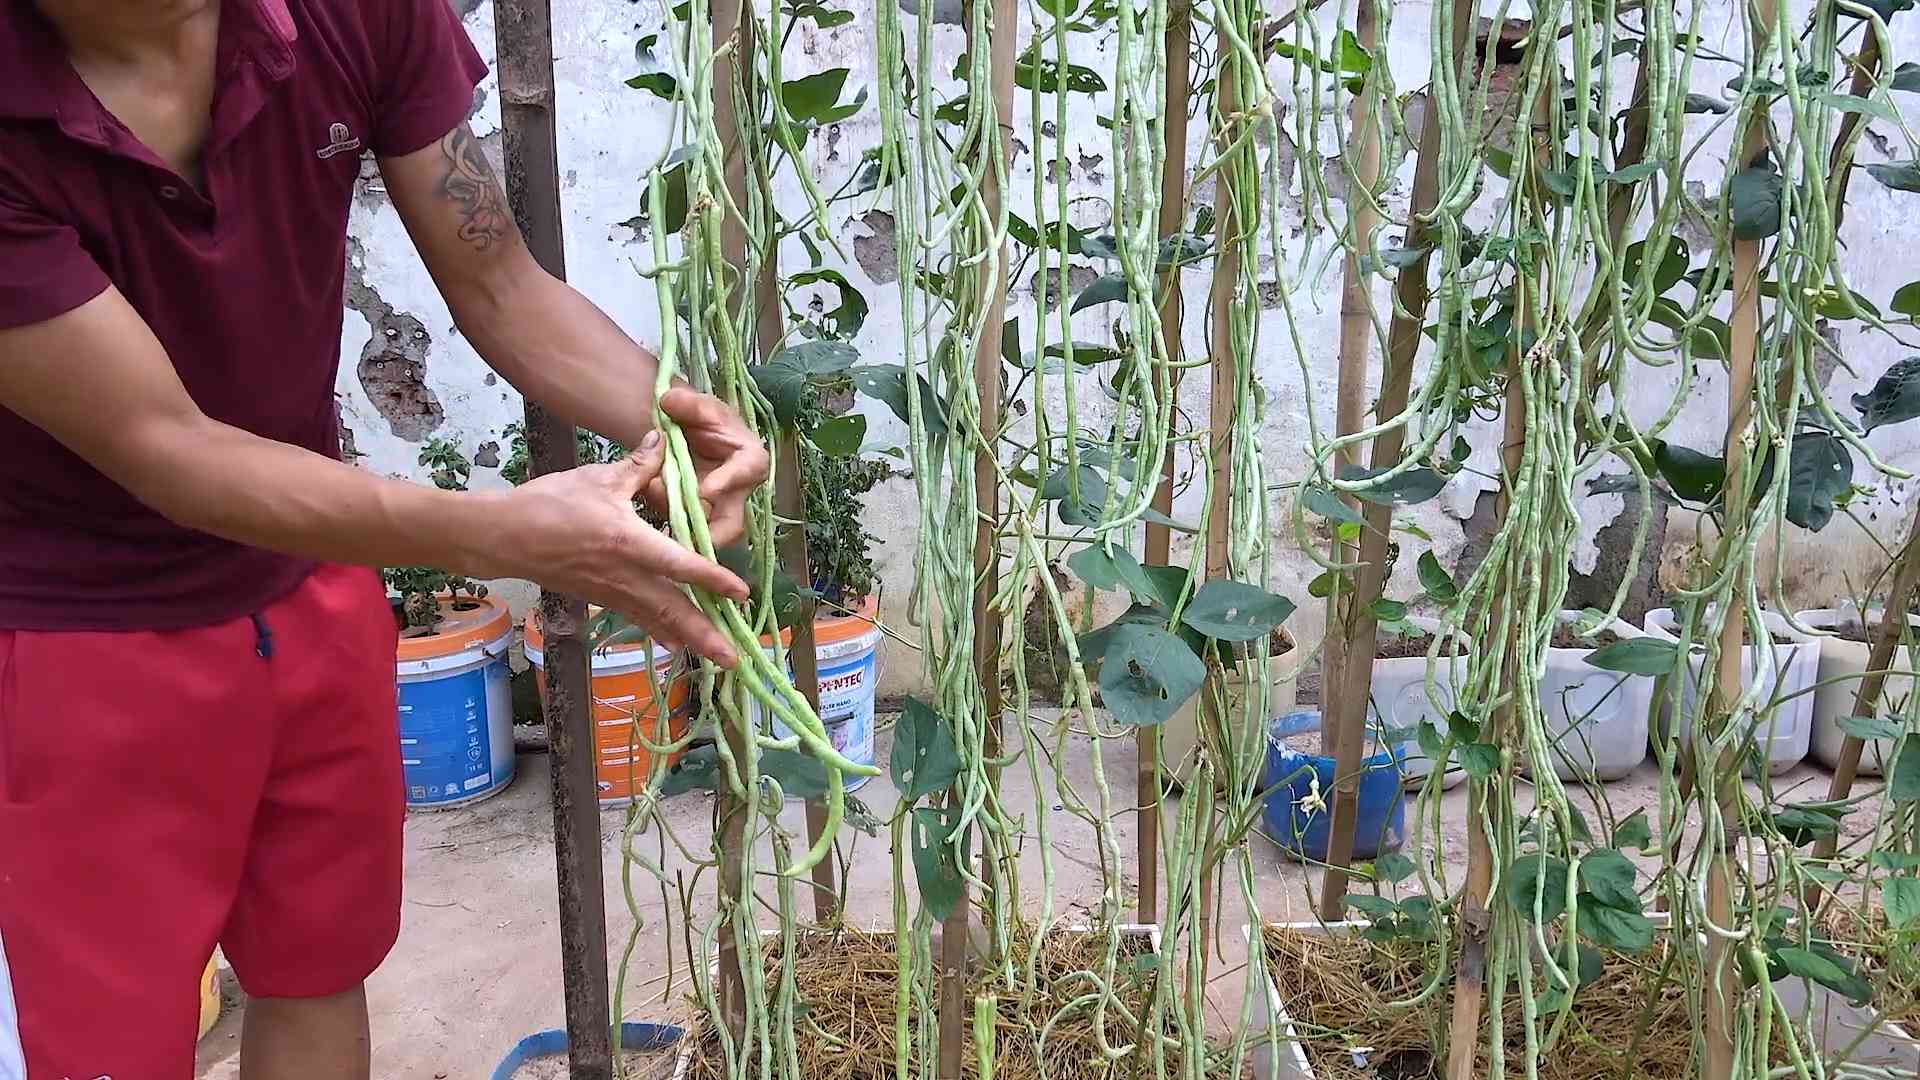
Harvesting Your Yardlong Beans
The moment you’ve been waiting for!
* Harvest Time: Yardlong beans are typically ready to harvest about 60-80 days after planting.
* Harvesting Technique: Harvest the beans when they are about 12-18 inches long and still tender. Use scissors or pruning shears to cut the beans from the vine.
* Regular Harvesting: Harvest regularly to encourage continued production. The more you pick, the more beans you’ll get!
Troubleshooting
Even with the best planning, sometimes things don’t go exactly as expected. Here are a few common issues and how to address them:
* Posts Not Stable: If your posts are wobbly, add more concrete or reinforce them with additional supports.
* Beans Not Climbing: Gently guide the bean tendrils towards the trellis. They may need a little encouragement at first.
* Pest Infestation: Treat pests promptly with appropriate methods.
* Yellowing Leaves: This could be a sign of overwatering, underwatering, or nutrient deficiency. Adjust your watering schedule and fertilize as needed.
Enjoy Your Harvest!
And there you have it! A beautiful and productive yardlong bean trellis that will provide you with a bountiful harvest for months to come. I hope you found this guide helpful. Happy gardening!

Conclusion
So, there you have it! Mastering the art of growing yardlong beans doesn’t require a green thumb blessed by the gardening gods. It’s about understanding their needs, providing the right support, and being patient. This comprehensive guide has armed you with the knowledge to cultivate your own thriving yardlong bean patch, bursting with these delicious and impressive legumes.
Why is this DIY approach a must-try? Because it puts you in control. You’re not relying on questionable store-bought produce, often shipped from afar and lacking the vibrant freshness that homegrown vegetables offer. You’re nurturing your own food source, connecting with nature, and experiencing the immense satisfaction of harvesting something you’ve grown from seed. Plus, the taste difference is undeniable. Freshly picked yardlong beans have a crispness and sweetness that simply can’t be replicated.
Beyond the basics, feel free to experiment! Try different varieties of yardlong beans – some are more heat-tolerant, others boast unique colors or flavors. Consider companion planting. Basil, marigolds, and nasturtiums are excellent choices for deterring pests and attracting beneficial insects to your yardlong bean plants. You can also explore different trellising methods. While a simple bamboo structure works wonders, you might want to get creative with repurposed materials or even design a decorative trellis that adds visual appeal to your garden.
Don’t be afraid to get your hands dirty and embrace the learning process. Gardening is a journey, not a destination. There will be challenges along the way, but the rewards – a bountiful harvest of delicious yardlong beans and the joy of connecting with nature – are well worth the effort.
We wholeheartedly encourage you to give this DIY yardlong bean growing guide a try. Start small, learn as you go, and most importantly, have fun! And once you’ve harvested your first crop, we’d love to hear about your experience. Share your tips, tricks, and triumphs in the comments below. Let’s build a community of yardlong bean enthusiasts and inspire others to embark on this rewarding gardening adventure. Your insights could be invaluable to fellow gardeners! Happy growing!
Frequently Asked Questions (FAQ)
What are the ideal growing conditions for yardlong beans?
Yardlong beans thrive in warm climates with plenty of sunshine. They need at least 6-8 hours of direct sunlight per day. The ideal soil temperature for germination is between 70°F and 85°F (21°C and 29°C). The soil should be well-draining and rich in organic matter. Amend heavy clay soils with compost or other organic materials to improve drainage. They are sensitive to frost, so plant them after the last frost date in your area.
How often should I water my yardlong bean plants?
Yardlong beans need consistent moisture, especially during hot weather. Water deeply and regularly, aiming to keep the soil consistently moist but not waterlogged. Check the soil moisture by sticking your finger about an inch deep into the soil. If it feels dry, it’s time to water. Avoid overhead watering, as this can promote fungal diseases. Drip irrigation or soaker hoses are excellent options for delivering water directly to the roots. During periods of heavy rain, you may need to reduce watering frequency.
What kind of fertilizer should I use for yardlong beans?
Yardlong beans are relatively light feeders, but they benefit from regular fertilization. A balanced fertilizer with an NPK ratio of 10-10-10 or 5-10-10 is a good choice. Apply fertilizer according to the package instructions, typically every 4-6 weeks during the growing season. You can also amend the soil with compost or other organic matter to provide a slow-release source of nutrients. Avoid over-fertilizing, as this can lead to excessive foliage growth at the expense of bean production.
How do I deal with pests and diseases affecting my yardlong beans?
Yardlong beans can be susceptible to various pests and diseases, including aphids, bean beetles, and fungal infections. Regularly inspect your plants for signs of infestation or disease. Handpick pests whenever possible. For more severe infestations, consider using insecticidal soap or neem oil. To prevent fungal diseases, ensure good air circulation around your plants and avoid overhead watering. Remove any infected leaves or plants promptly to prevent the spread of disease. Companion planting with basil, marigolds, or nasturtiums can also help deter pests.
When and how should I harvest my yardlong beans?
Yardlong beans are typically ready for harvest about 60-80 days after planting. Harvest them when they are young and tender, about 12-18 inches long. Use scissors or pruning shears to cut the beans from the vine, being careful not to damage the plant. Harvest regularly to encourage continued production. Overripe beans will become tough and stringy.
My yardlong bean plants are flowering, but not producing beans. What could be the problem?
There are several reasons why your yardlong bean plants might be flowering but not producing beans. One possibility is that the plants are not getting enough sunlight. Another is that the soil is lacking essential nutrients. Ensure that your plants are getting at least 6-8 hours of direct sunlight per day and fertilize them regularly with a balanced fertilizer. Poor pollination can also be a factor. Bees and other pollinators are essential for yardlong bean production. Attract pollinators to your garden by planting flowering herbs and vegetables. In some cases, high temperatures can also inhibit bean production.
Can I grow yardlong beans in containers?
Yes, you can grow yardlong beans in containers, but you’ll need to choose a large container, at least 12 inches in diameter and 12 inches deep. Use a well-draining potting mix and provide a sturdy trellis for the vines to climb. Container-grown yardlong beans may require more frequent watering and fertilization than those grown in the ground.
Are there different varieties of yardlong beans?
Yes, there are several varieties of yardlong beans available, each with its own unique characteristics. Some popular varieties include ‘Red Noodle,’ ‘Chinese Red Noodle,’ and ‘Orient Wonder.’ Experiment with different varieties to find the ones that grow best in your climate and that you enjoy the most.
How do I save seeds from my yardlong beans?
To save seeds from your yardlong beans, allow a few beans to mature fully on the vine. The pods will turn brown and dry. Once the pods are completely dry, harvest them and remove the seeds. Spread the seeds out on a tray to dry completely for a few days. Store the dried seeds in an airtight container in a cool, dark, and dry place.
What are some delicious ways to cook yardlong beans?
Yardlong beans are incredibly versatile and can be used in a variety of dishes. They can be stir-fried, steamed, grilled, or added to soups and stews. They pair well with Asian flavors like soy sauce, ginger, and garlic. They can also be used in salads or as a side dish. Experiment with different recipes and find your favorite ways to enjoy these delicious legumes.

Leave a Comment